
Script language for programmable displays


Author: Wolfgang Büscher, MKT Systemtechnik
Date : 2025-07-28 (ISO 8601)
Master file: <WoBu><ProgrammingTool>..help\scripting_01.htm
Online: www.mkt-sys.de/MKT-CD/upt/help/scripting_01.htm
( Note: In the printable version of this file, ?/Doku/art85122_UPT_Scripting_*.pdf, many external links don't work.)
Contents
-
Introduction
- Principle
- Unlockable Features (extended script functions)
-
Script Editor with Debugger
- Editor Toolbar
- Hotkeys and Context Menus of the Script Editor
- Debugging
- Breakpoints, Single-Step
- Disassembly
- Trace History
- Error messages / Error History
- Stack Display
- Symbol Table with variable display
- Watch List (shows values of a selection of variables)
- List of memory blocks dynamically allocated by the script
- Testing the application in the target's RAM (instead of FLASH)
- Interaction between script and display ("programmable display pages")
-
Language Reference
- Numbers
-
Strings
- Strings with different character encodings ("DOS", "ANSI", "Unicode")
- String usage and storage format
- String constants with special characters
- Strings with backslash sequences
-
String processing (functions) :
append chr ansi_chr unicode_chr CharAt char_encoding
atoi atof itoa ftoa hex HexString BinaryString
strlen strpos strpos2 stripos strrpos strripos substr
ParseInteger ParseFloat ParseHexString ParseBinaryString CAN.ParseString
- Constants
- Data Types (built-in and user-defined)
- Variables
- Arrays
- Operators
- User-defined functions and procedures
- Program flow control (loops and branches)
-
Other functions and commands
- Numeric functions, "Math", and digital signal processing
- Timers and 'Stopwatches'
- Displaying text on a multi-line text panel (cls, gotoxy, print & Co)
- Canvas functions (painting on a tCanvas)
- File I/O functions (file.create, file.open, file.write, file.read, file.close, directory.open, directory.read, ...)
- Transmission and reception of CAN messages (via script), CAN diagnostics
- Controlling the programmable display pages from the script / Controlling diagrams / display variables
- "System" functions (read the current timestamp,
keyboard, LEDs,
onboard I/O, supply voltage, temperature, frequency counter, etc.). - Date- and time conversions (modified Julian date, etc)
- Commands for the GPS receiver
- Functions to control the trace history
- Functions to control the virtual keyboard
- Interaction between Script and the Internet Protocol stack
Internet Application Interface ('socket'-like API) :
socket bind listen accept connect send recv close
Internet socket state diagram
JSON (Javascript Object Notation)
Internet / Ethernet-related troubleshooting
- Interaction between Script and the CANopen Protocol stack
- Extensions to the script language for SAE J1939
- Extensions to the script language for ISO 15765-2 (aka "ISO-TP")
- Preprocessor Directives
- Keyword List (with built-in commands, functions, data types, etc)
- Error messages
-
Event Handling in the script language
- Low-level system event handlers (OnKeyDown, etc)
- Events originating from UPT display elements ('Control Events')
- Timer Events
- CAN Receive Handlers
- Event handler for the virtual keyboard
-
Examples : CAN gateway, CAN 'ASCII' logger,
calculate PI, display control,
moving average, numeric integrator, thermometer (using NTCs),
timer events, control events,
file I/O, INI files,
Internet,Ethernet,TCP/IP,
text screen,
loops, arrays,
error frames, operator test, reaction test, Quad-Blocks, trace test, CANopen, J1939, ISO 15765-2, detect bus-sleep-mode,
VT100/VT52-Emulator, custom 'popup' menu,
Internationalisation (multi-language demo using a string lookup table for translation), 'App-Selector', Include files.
-
Bytecode (information for advanced users; not required
to use the script language)
- Compilation of the sourcecode into bytecode
- The Stack (for subroutines, intermediate results, function calls, arguments, and local variables)
- Bytecode specification, Mnemonics and Opcodes
- Latest Revisions
See also (links to external documents, only work in HTML but not in the "printable" (PDF) version of this document) :
- Manual for the programming tool
- main index (of the programming tool's help system)
- feature matrix (to check if scripting is supported for a particular device/firmware)
- display interpreter commands
- display interpreter functions .
Introduction
This document describes a scripting language, which has been implemented in some programmable display terminals by MKT Systemtechnik.
The script language can be used to ...
- Combine signals (i.e. generate "calculated" signals), or supervise signals received from CAN or other buses,
- implement protocols (also for CAN), which are not directly supported by the device-firmware, for example J1939, ISO 15765-2 ("ISO-TP");
- process events, which (due to their complexity) cannot be achieved in the display pages' 'Event'-definitions,
- programmatic file access, for example to implement custom specific event-logs, automatically generated error reports, etc;
- realize simple (SPS-like) flow controls, even though not for 'hard' real time (no guaranteed cycle time),
- implementation of algorithms which are too complex for the diplay's 'Event'-definition (which doesn't support loops, etc).
For most applications, you will not need the scripting language described in this chapter, because the functions for which the display terminals were originally intended can be realized without scripting. But in a few cases, the display's programmable 'Event' handlers ("page events" and "global events") will not be sufficient. This is where the scripting language can help.
The script language doesn't have anything to do with the
older display interpreter. This document describes the script
language, not the display interpreter (the latter was used to define
'global and local events' for the
display which were relevant for the display application). The script
language is compiled once (not interpreted while it runs),
using a proprietary bytecode which makes it much
faster than the display interpreter, but a bit less flexible.
Here is a simple but complete example (script sourcecode) which calculates
the display variable 'Power' by continuously multiplying variables 'Voltage' and 'Current':
   while(1)
     display.Power := display.Voltage * display.Current;
     wait_ms(50); // wait for 50 milliseconds, during this time the display is updated
   endwhile;
Throughout this document, sourcecode means the text which you typed into the script editor. The sourcecode will be compiled into bytecode. The bytecode is then executed on the target device, or in the programming tool's simulator.
Certain 'extended' script functions may have to be
unlocked (after been paid for).
Principle
From a user's point of view, the script is just a list of instructions and program flow control commands, entered with a simple text editor which is integrated in the programming tool. As a user, read the chapter about the script editor (integrated in the UPT programming tools), study a few examples (listed at the end of this document), and use the language reference to write your own scripts. If you are already familiar with programming languages and know what procedures, operators, arrays, strings, integer and floating point numbers are, you will only need to look at the keyword list occasionally. Otherwise, follow the hyperlinks in this document for more info ... and remember to use your browser's "back"-button to return to the point where you started reading.
After booting the programmable device, or starting the built-in simulator
in the programming tool, the script will start to run in the first line of
sourcecode. Typically, the first part of your script program will contain
a few initialisations, like setting script variables to their default values,
etc.
The end of the initialisation sequence should be marked in the script
by invoking init_done. This command enables event handlers,
and allows calling the script from programmable display pages as soon as the script
is 'open for business'.
After that, a typical script will just sit and 'wait' for something special
to happen, for example the reception of CAN messages, or if any of the
programmable display pages sets a signal for the script to "do something".
We'll get back to the aspects of signalling and event handling later.
Unlockable Features for the script language
Only the standard script functions which were originally developed during the author's spare time (for a his own 'hobby' purpose) are available without an extra fee. The extended functions, added to the script language for MKT Systemtechnik during the author's working hours at MKT Systemtechnik, must be unlocked (for a moderate fee, to cover MKT's development expenses) before they can be used. These extended script functions include, but are not limited to, the following "unlockable" features:
- Reception and transmission of CAN messages through the script language (CAN.xyz)
- File access functions for the script language (file.xyz), which includes the serial port(s) and other objects which can be accessed "like a file".
- Functions to communicate via TCP/IP or UDP
- Frequency- and event counters for the onboard digital inputs
- other hardware-dependent, specialized functions .... planned
As long as these functions are not unlocked, they will simply "not work". For example, if the script in the programmable terminal tries to send a CAN message, the message simply won't be sent. Trying to open a file, or a serial port, will return an invalid handle.
All the above features must be unlocked for the firmware, for each device on which you want to use these features. How to request an unlock-code from the manufacturer for a particular function, in a particular device, is described in this extra document.
We apologize in advance for any inconvience caused by the unlock procedure, but the company (MKT) cannot offer all these new features for free. On the other hand, customers who don't need these functions are not forced to pay for something which they will never need.
Script Editor and Debugger
The script editor is on the 'Script' tabsheet of the programming tool. If that tab is invisible, your hardware doesn't support scripts, or the programming tool is too old.
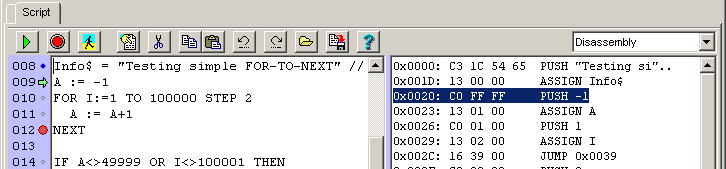
Script editor toolbar, sourcecode (left), and debugger panel (right)
By default, the editor uses syntax-highlighting. When enabled, the language's built-in keywords are shown in bold black characters, comments are blue, etc. Note that the syntax highlighting is not always updated while you type. In fact, the syntax highlighting function needs a valid symbol table (to identify the names of user defined procedures, variables, etc), which only exists after the program has been compiled. So after entering new sourcecode in the editor, you may have to click the 'STOP / RESET / RECOMPILE' button to update the syntax highlighting. If you find this feature too annoying, turn it off in the script editor menu (see next chapter). The editor will use plain 'black-on-white' characters then.
The size of the script
sourcecode may be limited to 32 or 64 kByte (in some cases 256
kByte), depending on the target system. The maximum size of the bytecode
(produced by the compiler) is 32 kByte on most targets. The script editor
isn't aware of such target-specific limitations, unless you inform
the programming tool about the capabilities of the target device (on the
'General Settings'
tab, "Max. size of script sourcecode in kByte").
You can see the amount of source- and bytecode memory occupied by the script
in the status line on the bottom of the 'Script' tab after compilation. For
example, after a successful compilation, the status line will show something
like:
| Compilation ok, 1234 of 65536 bytecode locations used, 6 kByte sourcecode. |
After compilation of the script (on the PC), it can be tested with the debugger.
The debugger supports breakpoints, single-step,
a disassember, the trace history,
and a display for the symbol table with variable values.
To simplify the development of scripts, the editor contains several tools explained in the following chapters.
These include, for example:
- the Toolbar (buttons above the sourcecode editor)
- the sourcecode editor's context menu (right-click into the sourcecode)
- the sidebar's context menu (right-click into the line numbers)
Details about the tools for the development of scripts follow in the next chapters.
The Script Editor Toolbar
The toolbar contains the usual editor functions like find, copy, paste, and cut (using the windows clipboard like any other text editor). In addition, there are these graphic buttons:
-
 RUN
RUN
-
Starts execution of the script, or continues execution at the last position.
If the script wasn't compiled after the text was modified in the editor,
it will be recompiled.
Execution may stop when the program hits a breakpoint, or an error occurrs.
-
 STOP / RESET / RECOMPILE
-
Stops execution (if running), or resets / recompiles the code (if already
stopped). Clicking this button with the PC's shift key held down sets the
execution pointer into the line of the cursor ("caret" in the editor text).
-
 SINGLE STEP (F7, aka 'Step In')
-
Executes the next command (which is marked with a green arrow on the left
side of the editor text). Especially useful after hitting a
breakpoint.
If the current line (marked by the green arrow) contains the call of a subroutine (procedure or function written in the script language), this command will step into the subroutine.
-
 STEP OVER (F8)
-
Also used to single-step through the script under debugger control.
In contast to the normal single step command (F7, aka 'Step In'), 'Step Over' executes
a complete subroutine (procedure or function
written in the script language), inclusive anything called 'from there'.
-
 STEP OUT
-
Executes the rest of the current subroutine (function or procedure), until 'returning to the caller'.
Typically used in combination with the 'Single Step' aka 'Step-In' command.
-
 View "CPU" (debugger code window)
-
Opens the disassembly view on the right
side of the script editor tab. Used for
hardcore-debugging (to track down stack problems,
etc).
While the disassembly-view is open, the single-step function executes one (virtual) machine code instruction per step, not one script-line !
-
 Script editor menu
-
Opens a popup menu with the less frequently used 'special functions', most
related with debugging and editing (e.g. line markers, breakpoints, trace history,
watches,.. - see screenshot further below).
In this menu, you can also enable/disable the editor's syntax highlighting, select fonts for editor and debugger, and configure a few other script-editor related parameters.
Hint: When available on your PC, 'DejaVu Sans Mono' often results in a better readable display than 'Courier New'.
-
 Find text
-
Finds a string of characters in the script editor. The string to find is
entered in the usual 'find' dialog. Then click the 'Find Next' button
("Weitersuchen" in german).
See also: 'Global Search' on all display pages, and in the entire script sourcecode,
invoked via context menu after right- or double-click on the to-be-searched word in the sourcecode editor.
-
 Import script from a file
-
Imports a script sourcecode from a plain text file. All breakpoints in the
previous script will be lost.
-
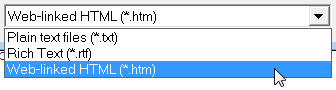
 Export script as a file
-
Exports the script sourcecode as a plain text file. Breakpoints will be lost
when saving and re-loading the program ! Note that the script is saved as
part of the terminal's display application (*.upt or *.cvt), so usually you
don't need this function. It can be used to transfer (copy) a script
from one application to another (as plain text), or to export the script (with syntax highlighting)
for documentation (as RTF oder HTML).
Hint: When exporting a script as *.HTM (HTML), links to the documentation will automatically be inserted. The author made heavy use of this option when writing this documentation, especially in the 'Examples' chapter.
The left border of the script editor shows sourcecode line numbers,
indicators for 'lines with executable code', breakpoints, etc.
Possible indicators on the left side of the sourcecode editor are:
-
 (green
arrow pointing right)
(green
arrow pointing right)
-
Current instruction pointer .
Shows the next line to be executed. Used during single-step debugging. -
 (small
hollow gray circle)
(small
hollow gray circle)
-
There is executable code in this line but the program has "not been here
yet" .
Code was produced for this line when compiling, but it has not been executed yet (since the script program was started).
During debugging, you can set a breakpoint in this line by clicking on this indicator. -
 (blue
solid circle)
(blue
solid circle)
-
"Been here since the program started".
Code was produced for this line by the compiler, and it has been executed at least once since the program started.
During debugging, you can set a breakpoint in this line by clicking on this indicator.
The 'Reset' function clears all 'been-here' markers (see toolbar buttons above). -
 (large
red solid circle)
(large
red solid circle)
-
A breakpoint has been set in this line, and the program has not
"been here" yet.
If the 'running' program hits this breakpoint, it will stop.
You can easily inspect variables then (because their values won't change while stopped). -
 (red circle with blue center)
- A breakpoint has been set in this line, and the program has 'been here' since it was last reset.
-
 (yellow triangle with black border)
-
Warning or error in this line .
Something went wrong in this line, either during compilation, or during runtime. Check the error message in the status line !
To get more details about the error, point the mouse on this symbol, and watch the text in the status line. Additional info about certain errors or warnings may be displayed on the programming tool's Errors & Messages tab.
Note that while editing, especially when inserting new lines in the sourcecode,
the code indicators will disappear. Breakpoints remain on their fixed positions
(unfortunately they cannot "move around automatically" when the sourcecode
is modifed, or moved to another location).
Clicking into the sidebar (line number or symbols shown above) with the right mouse button opens the sidebar's own context menu. It contains functions like 'Show execution point', 'Show first error in line xyz', 'Toggle breakpoint in line xyz', etc. Details about the sidebar's context menu are in the next chapter.
Clicking on the 'Menu'-Button ('wrench' icon) in the script editor's toolbar opens the following menu, which is mainly used while debugging:
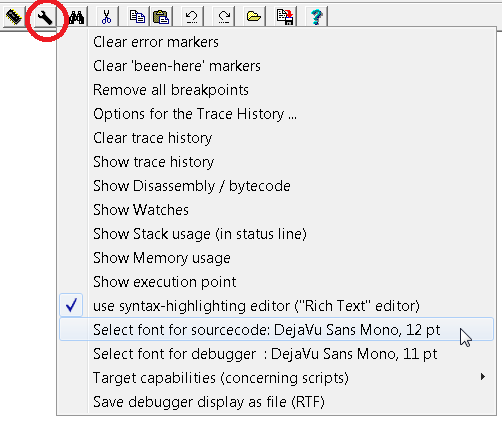
Screenshot of the 'debug menu' on the script editor tab
Hotkeys and Context Menus of the Script Editor
- CTRL-C
- Copy selected text into the windows clipboard
- CTRL-V
- Paste text from the windows clipboard
- CTRL-F
- Find text (opens the usual non-modal 'Find' dialog)
- CTRL-Z
- Undo last editing step
- SHIFT-CTRL-Z
- Redo ("undo undo")
- F1
- Extended help about a keyword in the script editor (sourcecode window).
Point the mouse on a keyword, and wait until the bubble hint shows a brief information.
If the brief information is not sufficient, press F1 (while the bubble is visible) to get more help, displayed in the web browser.
Unfortunately this only works with a 'good' browser, which can jump to (scroll to) a text mark (anchor) after loading the HTML document.
At the time of this writing (2013-08), Firefox and Iron/Chrome appeared to be 'good' browsers. - F7
- Single step (for debugging; details in the next chapter)
Right-click into the script editor (sourcecode) to open its context menu. For certain special functions,
the 'word' in the sourcecode (under the mouse pointer) will be evaluated then, for example
to add the name of a global variable as an 'expression' to the watch list,
or to get help about a certain keyword, function or variable:
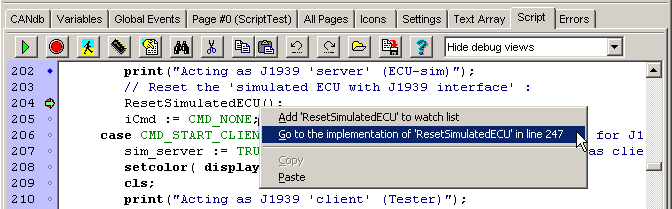
Screenshot of the script editor with context menu, after right-click on a certain word
Right-click into the 'Sidebar' (with line numbers and code execution indicators) opens another context menu:
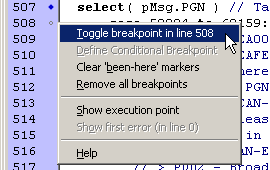
Screenshot of the sidebar's context menu, opened by right-clicking on a line number
Debugging
No non-trivial program will be free of errors right from the start.
The programming tool has some basic debugging capabilities, listed below.
To debug the code, in most cases you must run it in the programming tool.
Only newer devices like the MKT-View V have a built-in debugger.
A bit of 'remote debugging' on the real target is possible via
web browser (HTTP).
During a debug session, the screen may be split into two areas, with the
sourcecode in the left half, and some other information in the right half
(e.g. Bytecode, Symbole, or single Variables).
The blue-coloured splitter (between sourcecode and debugger) can be moved with the mouse.
The 'kind' of debugger display can be selected via menu, hyperlink (as in the symbol table),
or with the combo box on the right side of the toolbar:
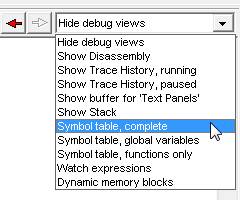
Selecting a debugger display mode via combo box,
with "BACK"- and "FORWARD" button as in a web browser.
-
Breakpoints :
Breakpoints can stop the execution of the script. To set or delete a breakpoint, click on one of the 'excutable code markers' on the left side of the editor window.
The left mouse button simply toggles a breakpoint (on/off), the right mouse button opens a context menu with advanced options.
-
Single step :
Stop the script using the 'Stop' (or single step) button in the editor's toolbar, and continue execution step-by-step (with the single-step button) .
-
Inspect variables :
Move the mouse over the name of a global variable in the sourcecode, and wait for half a second. The program will look up the word 'under the mouse' in the list of global script variables, and show the result if it finds one. This even works while the script is running ... at least for global variables.
Note: Inspecting local variables is not as easy as global variables, because during runtime, global variables don't have a name - just an address in the current stack frame - and thus it's extremely difficult to retrieve their values because (in contrast to global variables) their memory location cannot be found in the symbol table. Therefore, the debugger can only look up local variables if the program is currently 'pausing' in the user-defined function or procedure to which a local varible belongs. If user-defined functions & procedures call each other recursively, the debugger can only inspect local variables within the current stack frame (which is the stack frame to which the base pointer currently points).
In devices with a sufficiently large screen (MKT-View), script variables can also be examined in the device's system menu :
In the main system menu, scroll down to 'Script:', press ENTER (or similar) to open a submenu, and select 'Variables ..' there.
Scroll through the list via cursor up/down or rotary encoder. The list only shows the variable's name (left) and current value (right). For more details on a certain variable, press ENTER (or the rotary encoder knob) to select it and switch to the 'Script Var Details' (menu) on the programmable device.
-
Symbol table display :
The symbol table is generated by the script compiler. You can show the entire table, or only the global variables, or only the names of user-defined functions and procedures on the right side of the main window. Names, sourcecode line number, or code addresses shown in the symbol table can be clicked like a 'hyperlink' to scroll ("navigate") in the sourcecode.
-
Stack display :
While single-stepping, the status line of the editor may show the topmost elements on the script's stack. This function was mainly used during implementation of the script language, but you can use it to examine the stack - especially if your application makes heavy use of subroutines, and you want to find out "how the program got to the current point" (call stack).
The top of the stack (a few elements) can be displayed in the status line, or as a multi line text on the right side of the script tab.
Example for a single-line display, with six elements on the top of the stack displayed in the status line:
Details about the stack display (also as a multi-line list) can be found here.Stack[6] : tCANmsg 0 return_to_822 1 65230 0
-
Memory Usage Display :
After a test session in the simulator, you should occasionally check your application's memory consumption - especially if you use a lot of strings, especially when using strings in arrays.
To show the memory usage in the simulator / debugger, click on the script editor's menu button, and select Show Memory Usage .
The status line will now show the memory usage (continuously updated, while the script runs), for example:
Memory Usage : 5 of 256 stack items, peak=33; 7 of 200 variables; 62 of 1000 data blocks, peak=85- which means:
-
5 out of 256 items on the RPN stack are currently used;
the peak stack usage (since the script was started) was 33 out of 256 possible entries;
7 out of a maximum of 200 global variables are used;
62 out of a maximum of 1000 data memory blocks (with up to 64 bytes per block) are currently used;
the peak memory usage (since the script was started) was 85 out of 1000 possible entries.
-
This is a typical 'non-critical' example because all peak values are way
below the maximum allowed sizes.
If any of the three parameters (stack usage, number of global variables, or number of data blocks) gets critically close to the maximum, try to ...- reduce the 'stack' size by using less local variables, and less recursive procedure calls;
- reduce the 'block' memory consumption by decreasing the array sizes;
-
reduce the 'block' memory consumption by using less
strings, or assign empty strings to
string variables if you don't need their values anymore, like:
Info := ""; // clear this string to release its memory block
Note: The Memory Usage display on the Script tab only shows the memory used by the script.
This hasn't got anything to do with the memory used for the UPT's programmable display ( for icons, display pages, etc) ! The script uses its own memory pool, so the UPT display will remain operational even if the script runs out of resources, and stops due to a programming error.
The memory usage can also be checked in the script itself, using the function system.resources .
To check the target's remaining Flash memory space (after subtracting the size occupied by script, display pages, bitmaps (icons), display-variables, and other special items, use 'View' (in the tool's main menu), menu item 'Target Flash memory usage'.
-
Disassembly display (code window) :
Shows the bytecode in disassembled ("human readable") form. While this display is open, single-step in the debugger doesn't step through the sourcecode line-by-line, but instruction-by-instruction through the bytecode. More details in chapter 2.3.2.
Script editor toolbar, sourcecode (left), and debugger/disassembler (right) -
Trace History :
Shows the last 255 events (or even more) with ...- CAN messages which have been sent (transmitted) by the device
- CAN messages which have been received by the device
- Error messages and warnings (by the device firmware or simulator)
- Text messages and 'info lines' generated by the trace.print command
- Debug info from the Internet-related script functions (optional)
-
Watch Expressions :
Shows a user-defineable selection of 'expressions' (at the moment, limited to global script variables) on the debugger panel. These can be the current values of 'simple variables', but also complete arrays and user-defined types (structs) can be inspected this way. Details about the watch list follow in chapter 2.3.6.
- Hint:
- In a debug session, it helps a lot to have two monitors connected to the development PC. Move the programming tool's main window to one monitor, and the LCD simulator window to the other. If you're not that lucky (only one monitor), make the size of the simulator just as large as it needs to be (to see all pixels), and use the option 'stay on top' for the LCD simulator window. You can then move the simulator into the upper right corner of your screen where it doesn't obscure any 'vital parts' of the script editor. The simulator will remain visible, even after maximizing the tool's main window, and even when the keyboard focus is not on the simulator (but inside the script editor).
See also: Debugging via Embedded Web Server (and HTML Browser)
Breakpoints and Single-Step mode
Breakpoints can stop the execution of the script.
To set or delete a breakpoint, click on one of the 'excutable code markers'
on the left side of the editor window.
For Single step operation, you can either
stop the script using the 'Stop' (or single step) button in the editor's
toolbar, or use a breakpoint to let it stop there.
After that, continue execution step-by-step (with the single-step button) .
If the script stops (in the simulator) due to hitting a breakpoint, or after an error occurred,
the status line shows the the line number in which the program stopped (and some more info). Example:

Status bar of the script editor after hitting a breakpoint
In disassembly mode (see next chapter), single-step mode applies to single bytecode instructions rather than single lines of sourcecode.
- Hint:
- Some devices (like MKT-View II / III / IV, with Ethernet port and embedded web server)
support debugging without the UPT programming tool.
That 'remote' debugger is operated via web browser (and TCP/IP, HTTP, HTML, Javascript); it also supports setting multiple breakpoints during normal operation and single-stepping.
To operate it, enter the device's host name or numeric IP address in the browser's address bar, followed by /script/d ('d' is the option for "Sourcecode Debugger").
For some stupid browsers you may have to add the transport protocol (before the address), for example: http://upt/script/d .
Details about remote debugging are here (external link).
Devices without Ethernet (and thus without a fully-fledged web server) may contain a stripped down 'source-level debugger' which (when implemented) can be invoked via System Menu:
Main System Menu .. Script .. Sourcecode.. ▶ .
To allow showing the script sourcecode in the target, and collect info for breakpoints and 'been-here'-markers right from the start, use #pragma debug near the begin of your script.
Disassembler display (code window)
Only for advanced users !
The disassembly view can be opened through the script
editor's toolbar ("chip" icon). It's an extra display panel on the right
side of the editor, which shows the bytecode in disassembled ("human readable")
form. While this display is open, single-step in the debugger doesn't step
through the sourcecode line-by-line, but instruction-by-instruction through
the bytecode. This makes it possible to see how
numeric expressions ("formulas") are evaluated in the RPN
(Reverse Polish Notation), and how subroutines (functions) are invoked with
parameter passing via the stack.
Screenshot of script editor (left) with disassembly (right)
To scroll the disassembler display to the address of a certain function, click on the hexadecimal code address (e.g. c:0ABC) in the symbol table, right next to the name of the function or procedure.
To close the disassembly window, and resume normal single step mode (line-by-line, not instruction-by-instruction), use the combo box in the upper right corner of the script editor tab, and select Hide Debug View instead of Disassembly (etc) .
Trace History
The trace history can be used any time to check the events listed below, in chronological order.
It is implemented in the firmware of most devices (if the device supports scripting), but also
in the programming tool (simulator). Typically, up to 255 entries can be stored in the history;
more (newer) entries will overwrite the oldest part (as in a FIFO - first in, first out).
Events which can be recorded in the history are:
- CAN messages which have been sent by the terminal ("Tx")
- CAN messages which have been received by the terminal ("Rx")
- Error messages and warnings by the system (device firmware or simulator)
- Messages which have been "printed" into the history by the user application (script)
- Other events, when enabled by the trace.enable flags
Chapter overview: Trace History display format, Trace History usage, Trace History invocation .
Trace History display format
The display format of CAN messages in the Trace History is half-way compatible with Vector's
widespread "ASCII" format for CAN logfiles. Thus, even for devices without an integrated CAN logger / snooper,
it is possible to trace CAN-bus related problems (which is especially helpful when implementing
'exotic' CAN protocols in the script language).
CAN message format in the Trace History:
-
Timestamp Bus CAN-ID Rx/Tx d Length Byte 1 Byte 2 Byte 3 Byte 4 Byte 5 Byte 6 Byte 7 Byte 8 57.211 1 12345678 Rx d 8 F2 68 11 76 EE 86 6C 9D
A similar format can also be used when converting CAN messages (tCANmsg) into strings,
depending on CAN.string_format .
CAN-Identifiers with 11 bit (standard frames) are displayed with 3 digits.
29-Bit-Identifier (extended frames) are shown with 8 digits as in the example.
LIN-Bus-Frames are (optionally)
displayed like CAN messages in the trace history.
Messages (text lines) entered into the history by command ('trace.print') can have any format;
only the timestamp (in seconds, with three decimal places) are added automatically at the begin of each line.
The second counter starts at zero when the device is turned on, or when the simulator is started / reset.
Trace History usage
In the simulator (integrated in the programming tool), the Trace History can be displayed on the right side
of the 'Script' tab. To achieve this, select 'Show Trace History' in a combo box on the script toolbar:
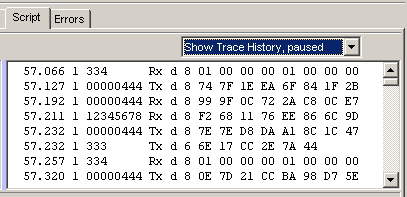
Trace History displayed in the programming tool
After selecting 'Show Trace History, paused' you can scroll back through the history, as long as the limited trace memory permits.
Switching to 'Show Trace History, running' will permanently append new entries at the end of the display, and the vertical scroller
will automatically be moved to the end of the list, so the newest entry is always visible.
Right-click into the Trace History (in the programming tool) opens the following context menu:
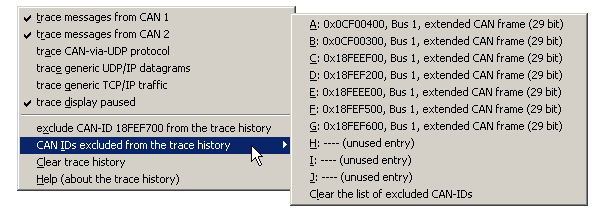
Context menu to control the Trace History in the programming tool
The menu shown above can be used to suppress certain CAN message identifiers in the Trace History.
This feature is often used to avoid 'flooding' the display with non-important, but frequently transmitted CAN frames.
On a real target device, the Trace History can be accessed (inspected) through the system menu. Select 'Diagnostics' .. 'TRACE History'
there. Details about the system menu are in document #85115
(System Menu and Setup in programmable CAN display terminals by MKT).
See also: 'Trace History invocation' in this document,
Wireshark-compatible Packet Capture
.
Excluding certain CAN message identifiers from the Trace History
To suppress ("blacklist") a certain CAN message identifier for the display, click on its hexadecimal identifier
with the right mouse button in the trace display, and select 'Exclude CAN-ID from the trace history'.
Alternatively items in the blacklist can be edited (in hexadecimal form) via context menu, sub menu titled
'CAN IDs excluded from the trace history'. This menu also shows a complete list of all currently black-listed
CAN message identifiers.
Suppressing certain CAN identifiers as described above only affects the trace history display in the programming tool (simulator),
but not the 'real' device (i.e. hardware like MKT-View III which also has a built-in trace history).
In a 'real' device (but also in the simulator), the script itself can access the CAN-ID-blacklist via
trace.can_blacklist[i] .
Accessing the Trace History via web browser
The easiest method to check the Trace History in a real device is through your web browser
(for all devices with Ethernet and embedded web server).
In most cases, you can access the device easily through its host name (which is "upt" by default,
but the name may have been changed in the device's network setup).
The full URL would be "http://upt/trace.htm",
but the protocol name (http) is usually added by the web browser internally, and not shown in the address bar.
Here for example the Trace History displayed in the author's favourite browser:
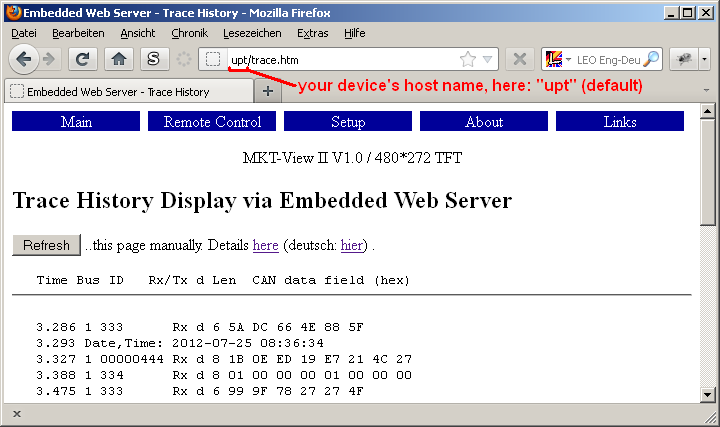
Trace History read via embedded web server, and displayed in a web browser
In case of problems with the network connection (or the web browser), see
'Troubleshooting'
in the description of the embedded web server.
Reading the Trace History via serial interface
Alternatively, and depending on the hardware, the trace history can be read as plain text through a serial port,
and saved as a text file on the PC.
To read the trace history via serial interface (RS-232 or Virtual COM Port), use a terminal program
like 'Hyperterminal', and enter the command ***trace*** followed by carriage return ("Enter" key).
The default baudrate for the serial interface is 19200 bits/second for most devices
with a 'real' RS-232 port (like MKT-View 2).
For device which only have a Virtual COM Port (looks like an USB device adapter from outside),
try 115 kBit/second.
Since the serial port might have been reconfigured by the application (script), theres no easy way
to tell the correct communication parameters here. Usually either "115200 8-N-1" or "19200 8-N-1" should work.
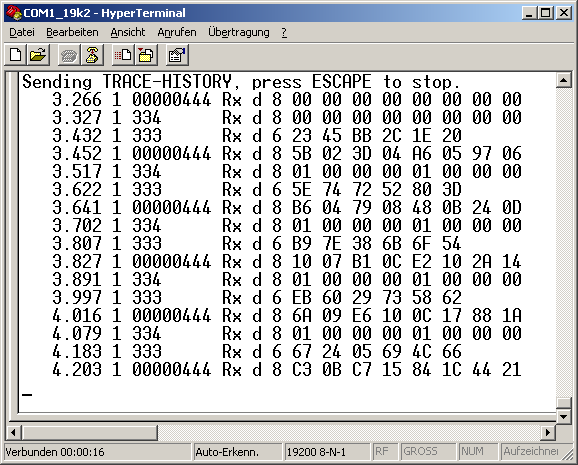
Trace History read via serial port, and displayed in 'HyperTerminal'
Saving the Trace History as a file
Last not least, if your PC (or your local network) refuses to establish a TCP/IP connection to the terminal, you can alternatively
retrieve the Trace History as a plain text file by saving it on the memory card: First invoke
the trace history on the device's own screen, press the 'Menu' button (softkey) there, and select 'Save Trace as file'.
The firmware will dump the trace memory as plain text files, beginning with the name 'TRACE000.TXT'. With each new call of
the 'Save as file'-function, a new file will be written (TRACE001.TXT, TRACE002.TXT, and so on).
The same function can be invoked directly from the script (trace.save_as_file).
The Trace History (in RAM) will be deleted when turning off the device, because it is only buffered in RAM for performance reasons.
It cannot (and shall not) replace the CAN logger / 'Snooper' which is integrated in certain devices.
The trace accumulated in the simulator (i.e. the programming tool) can be copied into an own document
(and thus be saved 'as a file' on the PC) as follows:
- Set the focus into the trace history display (via mouse click, etc)
- press CTRL-A (select all) or mark the interesting part of the trace via mouse
- press CTRL-C to copy the selected text into the windows clipboard (as usual)
- set the focus into your own document, and press CTRL-V to paste (insert) the text from the clipboard
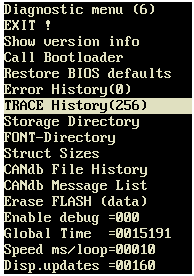
Trace History invocation
There are several methods to invoke the Trace History Display locally, i.e. show it on the terminal's own screen.
Here, for example, how to invoke the Trace History Display in the MKT-View II / MKT-View III :
- Draw the gesture 'U' on the touchscreen to enter the device's shutdown / system popup window.
Alternatively (for devices without a touchscreen), press F2 + F3 simultaneously to enter the system menu. - Select 'SETUP' (in the 'shutdown' window) if not already there.
- In the 'Main system setup', select 'DIAGNOSTICS'.
- Select 'Trace History'. The number in parenthesis (after the menu item) shows the number of entries which are currently stored in the Trace History.
 ---->
----> 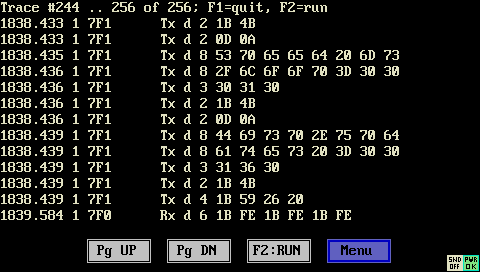
Invocation of the Trace History via system menu, and display on the device's "local" screen
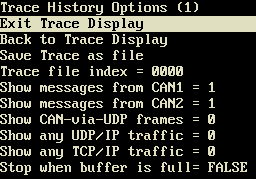
Menu with Trace History Options, here in an MKT-View III
Exit Trace Display- Leave the trace history display, and return to the caller (which is usually the system menu)
Back to Trace Display- Leave the 'Options' menu, and switch back to the trace history display
Save Trace as file- Saves the trace history buffer as a plain text file on the memory card. Details here.
Show messages from CAN1 = {0,1}- 1 (Default): Show CAN-messages sent to, and received from, the first CAN interface.
0: Don't show these messages (and don't enter them into the history buffer, from now on).
Show messages from CAN2 = {0,1}- 1 (Default): Show CAN-messages sent to, and received from, the second CAN interface. 0: Don't show these messages.
Show messages from CAN-via-UDP = {0,1}- 1: Show CAN-messages 'tunneled' via UDP (Ethernet). 0 (Default): Don't show these messages.
Stop when buffer is full- Special option to trace problems during startup / network boot / initialisation.
TRUE : The trace history will be stopped when the history buffer is full. Thus only the 'oldest' entries are available.
FALSE: The trace history will continue running (even when the buffer is full), thus only the 'newest' entries are available.
The default setting is 'FALSE', i.e. the trace historie will not be stopped (at least not automatically), and (depending on the firmware) only the last 255 or 511 entries can be viewed or exported.
See also: Reading the trace history via web browser (remotely),
Wireshark-compatible Packet Capture (also supports CAN, as an alternative for the TRACE history)
Error messages / Error History
If errors occur during compilation, or during script runtime, they will be added to the error history (not only in the programming tool, but also in the device firmware).In the programming tool, the error history is displayed on the 'Errors' tab.
In the device's System Menu, the error history can be inspected via 'Diagnostics'..'Error History'.
Details about invoking / reading the error history is here.
Stack Display (with caller addresses and local variables)
While single-stepping, the status line of the editor may show the topmost elements on the script's stack. This function was mainly used during implementation of the script language, but you can use it to examine the stack - especially if your application makes heavy use of subroutines, and you want to find out "how the program got to the current point" (call stack).The top of the stack (a few elements) can be displayed in the status line, or as a multi line text on the right side of the script tab.
Example for a single-line display, with six elements on the top of the stack displayed in the status line:
Stack[6] : tCANmsg 0 return_to_822 1 65230 0 |
To display the stack completely (including all values, also of structured data types like CAN-messages), select 'Show Stack' in the combo in the upper right corner of the 'Script' tab. Example:
|
In the example shown above, the topmost entry (pushed to the top of the stack at index 5) contains a CAN message (format: ID, number of data bytes, data bytes, hexadecimal). The entry at index 3 is a return address (pushed before calling a procedure or function). By clicking the line number (here: sourcecode line 822, underlined) that part of the script can be scrolled into view in the script editor. Entries without a type indication are integer or floating point numbers. Strings are enclosed by double quote characters (as usual in "C").
Note: The topmost stack element has the largest index. The initial stack index (when the stack is empty) is zero.
Symbol Table with variable display
In the programming tool, the symbol table can be displayed on the right side of the main window.
Select the item 'Symbol table, complete' or 'Symbol table, global variables' in the combo box
in the scipt editor's toolbar. The 'complete' symbol table also shows the names and locations
of local variables (which cannot be inspected). The display with 'global' variables only shows
global symbols (global variables of the script, functions, procedures, and constants).
In the tabular display, all symbols are sorted by name, which makes this display a valuable tool
for 'navigation': Click on the 'Line number' (which is shown like a hyperlink) to scroll
the script editor to the line in which a variable (or function, procedure, constant, etc) is defined.
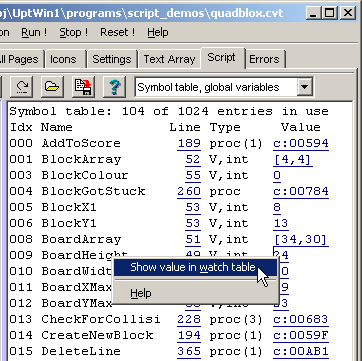
Screenshot of the script symbol table in the programming tool
'Show value in watch list' will add the symbol (usually a global script variable) to the 'watch list' shown in the next chapter.
Clicking on a blue underlined code address (e.g. c:0ABC) switches from the symbol table display into the disassembler.
- Hints:
- For devices with Ethernet connector and embedded web server (like MKT-View III),
global script variables can also be inspected via
HTML browser.
In devices with a sufficiently large screen (e.g. MKT-View III/IV/V), script variables can also be examined in the device's system menu. Follow this link for details.
Watch List (shows values of a selection of variables)
In contrast to the symbol table display, the
watch list only shows a user-defined selection of global script variables.
This works with 'simple' script variables, arrays and
user defined types.
(for experts: the evaluation of arbitrary expressions is not supported yet)
New items can be added to the watch table is via the symbol table, as explained
in the previous chapter, or via the script editor's context menu.
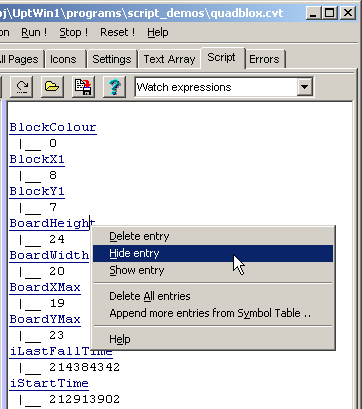
Screenshot of the script editor's Watch List in the programming tool
- Delete entry
- deletes the previously clicked item from the watch list
- Hide entry
- temporatily hides the display of the value, without deleting the item from the list.
For arrays and larger structures, this can save a lot of screen space in the watch display. - Show entry
- Makes the value visible again, after it was hidden as explained above.
- Delete all entries
- Quickly removes all entries in the watch list. Usefull after switching from one project to another, before adding new items to the watch list.
- Append more entries from symbol table
- Switches to the symbol table, from which you can select more items (usually global script variable) to be displayed in the watch list.
List of memory blocks dynamically allocated by the script
To see details about the current usage of dynamic memory (allocated by your script), select Dynamic memory blocks in the combo-box in the upper right corner of the 'Script' panel.The right half of the script panel will then show a list of all with all blocks, including the names of all script variables attached to those blocks.
|
( sample display of dynamically allocated memory blocks )
Similar as in most other debugger views, you can switch to the declaration
of the variable by left-clicking on the blue underlined ("link-like") variable name.
Testing the application in the target's RAM (instead of FLASH)
To save precious time during the development phase, an application (incl. script) can be uploaded
directly into the target system's main memory (RAM), without storing it permanently in "Flash" memory.
This eliminates the time for erasing and reprogramming the FLASH memory (which may take dozens of seconds,
depending on the FLASH memory technology), thus the "modify - download - test" cycle is significantly
faster this way, regardless of the transfer medium.
To transfer the application from the programming tool into the target's RAM ('without Flashing'),
select the following function in the main menu:
Transfer .. Send application to terminal without flashing .
- Note:
- We strongly recommend to test new applications not only in the simulator, but also
on the 'real' hardware on which the application is supposed to run !
The execution speeds depend a lot on the CPU. For example, a script which runs 'fluenty' and without any problems on an MKT-View IV (with 200 MHz Cortex-M4) may be much slower on an MKT-View II (with 72 MHz ARM7TDMI), causing timeouts as explained in chapter about event handling.
Back to the overview about 'Debugging'
Interaction between script and display ("programmable display pages")
In some applications, the script only works "silently in the background", for example process signals from received CAN messages,
or run protocols which are not implemented in the firmware.
In most applications, the script and the "programmable display pages" directly interact with each other. Examples:
- The operator presses a button (on the touchscreen), and the button's "reaction" (interpreter command line) modifies the value of a script variable (which is then, a few milliseconds later, processed in the script's main loop);
- The operator presses a button (on the touchscreen), and the button's "reaction" (interpreter command line) invokes a procedure written in the script language;
- The script detects a critical value in one of the 'display variables' (connected to CAN) and changes the background colour of a display element from green to red (just as an example);
- The script can intercept certain user actions by an event handler (advanced topic "for later")
See also (links to other chapters in this document) :
- Accessing display variables from the script
- Accessing script variables from the display interpreter
- Accessing display elements (on the current display page) from the script
- Invoking script procedures from the display interpreter
- Invoking script
functions from display pages (to retrieve a text strings for
the display, used for internationalisation)
Calling a script procedure as reaction when pressing a button
Before the implementation of the script language, the 'reaction' on pressing a button
was specified as a display interpreter command (for example, g(pn+1) to switch to the next page).
For compatibility reasons, that is still possible. But for more advanced applications,
a graphic button's "reaction" (when the button is operated via touchscreen or rotary encoder knob)
should better be implemented in the script.
To achieve that, there are several possibilities (listed in the introduction of chapter 3).
In the following example, we will define a graphic button on one of the UPT's display pages,
and let that button call a user-defined procedure when the button is pressed.
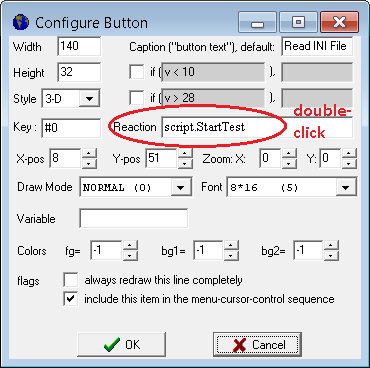
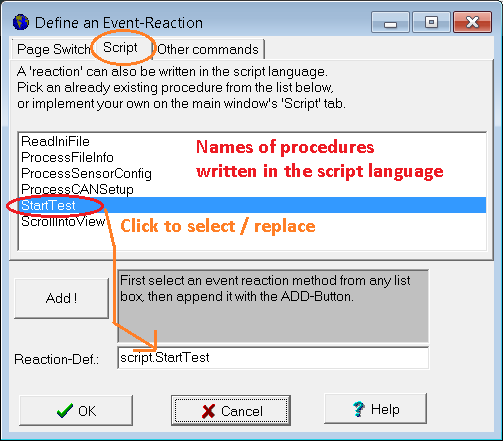
Screenshots from the programming tool, details in the document
about programmable buttons
Pick one from the list(in this example, "StartTest"), or (for advanced users preferring the keyboard) enter the name of the script procedure manually on the tab labelled 'display line properties':
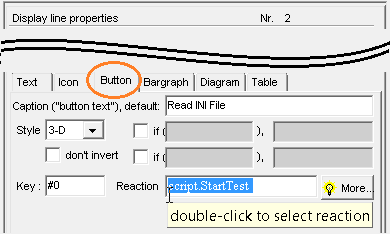
Screenshots from the programming tool, "Display Line Properties" for a Button
If the button's "Reaction" field already contains the call of a script procedure, you can quickly switch from the page definition ("Display Line Properties" shown above) to the script editor by double-clicking into that field. The script editor will automatically scroll to the begin of the procedure. The (script-) code below shows a simple example (taken from the "Ini-File"-demo):
proc StartTest // Called from the DISPLAY (a button's "reaction"). Starts the "test"....
  iStartTest := TRUE; // here: only SET A FLAG, and do the rest in the script's MAIN LOOP
endproc;
This avoids runtime problems like blocking the display task for "too long" (-> timeout), as explained in the yellow box in chapter 4.11, Event Handling .
Modifying display elements via script (texts, colours, etc)
The script has 'full control' over all elements on the current display page.
As already mentioned in the introduction of chapter 3, the script
can access any display element to modify its colour, text, position, size, etc.
For advanced users, this topic is explained in chapter 4
(use display.elem[] or display.elem_by_id[] to access the display element).
The recommended way to access a certain display element is either by its
name (as in the example below),
or by its symbolic control ID.
The following code snippet from a script's main loop changes the background colour
of a button, using an if..then..else condition :
while(1)  // endless loop for the script's MAIN THREAD

  if( iStartTest ) then
    if( ReadIniFile( "memory_card/IniDemo1.ini") ) then
       display.elem["ReadIni"].bc = clGreen; // paint the button with a GREEN background
    else  // could NOT read the ini-file :
       display.elem["ReadIni"].bc = clRed;   // paint the button with a RED background
    endif;
    iStartTest := FALSE;
  endif;

  // ... insert other main task activities here ...

  wait_ms(50);  // give the CPU to someone else for 50 milliseconds
endwhile; // end of the main thread loop
The above code was taken from the 'Ini Files' demo, which is contained in the subdirectory 'programs/script_demos'
after the installation of the programming tool. Many more examples can be found in chapter 5.
Language Reference
The scripting language was once a subset of the BASIC programming language (without line numbers), and was later modified to be more 'PASCAL'-like. Some elements were borrowed from other programming languages. From PASCAL, BASIC, and IEC 61131 "Structured Text", this language inherited the case-insensitivity, so it's up to you to write keywords in upper or lower case (but please don't mix upper and lower case for keywords, and don't use "Camel Casing" if it makes no sense..). If there are CamelCased symbols in your program, they should be self-defined variables, data types, self-defined functions or procedures but not standard language keywords . Top-level keywords of the script language are (just for example, but also as a quick reference):
-
if..then..else..endif
for..to..next
while..endwhile
repeat..until
select..case..else..endselect
proc..endproc func..endfunc
const..endconst var..endvar typedef..endtypedef
addr append float int local ptr string
int string CAN cop.(CANopen) display. file. gps. inet. Math. system.
time. trace. tscreen. wait_ms wait_resume
For compatibility with the original BASIC-like language, colons ( : ) can
be used to separate commands in one line. But we recommend to use only
one command (function call, variable assignment, loop statement,
etc) per line. Using one line per command also simplifies debugging, because
you can set breakpoints only at the begin of a
line.
The hash mark (#) at the begin of a line marks the begin of a compiler directive.
For example, the compiler can be instructed to accept only declared variables
(directive #pragma strict).
To mimick more 'modern' programming languages, a semicolon can also
be used to separate two commands in one line. But unlike "C", Pascal, and
Java, the end of a line has a syntactic meaning (it also separates two commands
or statements), so in most cases, neither the colon nor the semicolon
should be necessary if you follow the style recommended above ... use ONE
LINE PER STATEMENT . A few examples with the recommended style follow below.
Leading spaces have no syntactic meaning for the compiler, but you should
generously use leading spaces (indentations) to increase the readability
of your code. For example, with a bit of imagination it's obvious what this
code does :
Sum := 0.0; // calculate PI ...

      for Loop:=1 to 10000  // do 10000
      iterations

         if (Loop & 1) <> 0 // odd or even loop count ?

           then Sum := Sum + 4.0 / (2 * Loop + 1); // odd

           else Sum := Sum - 4.0 / (2 * Loop + 1); // even

         endif;

      next Loop;

      print( "PI is roughly ", Sum );
- Suggestions about the coding style (not mandatory, but the highly recommended by the author):
-
-
Use at least two space characters per indentation level.
Any function body (between 'proc' and 'endproc') shall be indented, too.
Only the 'main code' (typically at the begin of the script, executed immediately after program start), and the keyword pairs const/endconst, var/endvar, proc/endproc, func/endfunc shall not be indented (because they always sit at the script's 'main level' - there are no nested functions as in Pascal). - It's not necessary to write keywords in upper case. Keywords were sometimes written in upper case in this document, when it seemed important to mark them as such (because bold or italic characters don't work in a plain text file). Since the script editor can automatically highlight keywords, the author of the script language uses keywords in lower case, and only user-defined CONSTANTS in UPPER CASE . This is what most "C" programmers prefer.
-
Don't ever use tabs in sourcecode, because different editors use different
default settings (some editors use 8 characters per tab, some use 4, others
3 by default, etc...), so using tabs in sourcecodes will sooner or later
turn everything into a mess, which can often be seen in open-source projects.
Use two or three spaces per nesting level, and align the 'ending' statement
(like next, until, endif) to the same column as
the matching 'beginning' statement (like for, repeat,
if) as in the example shown above.
If you consider comments and indentation (leading spaces to emphasize nesting) a useless waste of time, stop developing software.
-
Use at least two space characters per indentation level.
The following subchapters explain most of the script language's syntax elements. Special commands, keywords, and runtime library functions are explained later.
See also: Keyword list, Operators (numeric), User-defined Functions and Procedures, Program Flow Control, Other Functions and Commands .
Numbers and numeric expressions
Numbers are integer by default. Their notation is usually decimal, but
hexadecimal and binary is also possible (see examples below).
Numbers may be integer or floating point. A number's data type is stored internally, along with the value.
- 1234 is an integer number in decimal notation (which is the default)
- 1234.0 is a floating point number (because the compiler recognizes the decimal point)
- 0xABCDEF is an integer number in hexadecimal notation (thanks to the "0x" prefix)
- 0b10000001 is an integer number in binary notation (the prefix "0b" means "binary").
Use integer numbers wherever possible. But, if an expression uses some floating point variables as input, you should also use floating point numbers (constants) because the compiler will emit floating point constants as such if it's obviously a floating point notation. This eliminates type conversions at runtime, and makes the script run faster. Example (with Sum being a floating point variable, and Loop an integer):
Sum := Sum + 4.0 / (2 * Loop + 1);
does not calculate the same result as
Sum := Sum + 4 / (2 * Loop + 1);
Look at the right term in the above formula: It contains only integers. When the compiler produces bytecode for the right term, it will use integer numbers because they were much faster on older target systems (without hardware floating point unit). This also includes the DIVIDE instruction : If both operands are integers, the division will be an integer, too. If one, or both, inputs for the DIVIDE operation are floating point numbers, the division itself will be performed using a (slow) floating point operation. If you definitely need a floating point operation, use floating point numbers (constants) as in the upper example shown above. BTW, the example is taken from the application 'ScriptTest2.cvt', contained in the installation archive, which calculates the number 'PI' using the Gregory-Leibniz formula.
To convert 'binary data' (like received CAN messages) from a sequence of bytes into floating point numbers, use functions like BytesToFloat, BinaryToFloat, or BytesToDouble.
See also: Numeric functions, "Math", DSP.
Strings
String constants must be enclosed in double quote characters, as in most
programming languages (except Pascal).
To declare a variable as a string, use the keyword
string, or (if you prefer not to declare
variables as in ancient BASIC dialects), use the 'dollar suffix' ($) to let
the compiler know that your variable is a string.
In most places where the compiler expects strings, you may also use a
string expression like A$+" some text "+B$ .
Example (using a properly declared string variable)
var

         string MyString;

      endvar;

      ...

       MyString := "This is another string";
For certain applications, static byte-arrays (i.e. in global script variables)
can be treated like strings. Beware, the character encoding gets lost then,
and the receiver (or reader) of the string doesn't know if the characters must be treated
as ASCII, "ANSI", or UTF-8. Example:
        TP_Transmitter.buffer := "Test string sent via ISO 16765-2 'TP' .";
        TP_Transmitter.iTotalSizeInByte := strlen( TP_Transmitter.buffer );
        IsoTP_StartSending( &TP_Transmitter ); // start sending an ISO-TP message
-
(in that example, TP_Transmitter.buffer is a struct component declared as 'BYTE buffer[1024]',
and TP_Transmitter.iTotalSizeInByte is the total 'payload size', measured in bytes.
When copying the string, an trailing zero-byte is appended, which strlen() does NOT count as a character. Beware, when copying strings into static arrays this way, the string may be truncated.)
The script language contains a few string processing functions, like itoa ("integer to ASCII"), hex (integer to hexadecimal ASCII), chr (turns an ASCII value into a single-character string) .
Strings with different character encodings
For simple string variables (not strings in arrays or structs),
the character encoding of a string may vary, depending on the assigned value.
For simple string variables, the 'string' data type contains internal flags which specify the
encoding. For example, if a string was read from a Unicode text file (using
the function file.read_line), the string will
contain a sequence of UTF-8 encoded characters. This way, the character encoding
type is passed along with the string when calling subroutines and functions,
or when assigning the string to another variable. If necessary, a string's
character encoding can be queried as in the following example :
select(
      char_encoding( MyString ) )

         case ceDOS :
      // string contains "DOS"-characters (codepage 850)

             ...


         case ceANSI : // string contains
      "ANSI"-characters (Windows-1252)

             ...


         case ceUnicode : // string contains
      "Unicode"-characters (encoded as UTF-8)

             ...


         case ceUnknown : // the string's
      character-encoding is unknown

            // This means the encoding type has not been
      specified,

            // or doesn't matter because all characters in the
      string

            // have code values below 128

            // (in that case "DOS", "ANSI", and Unicode are almost identical)

              ...


      endselect;
The same constants can be used to define the file type / file format when
creating new text files via file.create.
Specifying e.g. char_encoding=ceUnicode (as an optional
named parameter for file.create) causes any string appended to
the file later to be converted to UTF-8.
Note: Just because the script language supports Unicode (to be precise, UTF-8
encoded strings) doesn't mean your application will be able to render those
characters on the display ! The fonts used by MKT's LCD driver date back
from the days of DOS, and only contain glyphs for the 255 characters defined
in the old 'DOS' character set (Codepage 850) !
When showing an UTF-8 encoded string on the display, the firmware will try
to find a match for the Unicode 'code point'. Thus, at least the common western
characters (like German 'Umlauts') will appear correctly on the display,
regardless of the string's character encoding type (
ceDOS, ceANSI,
ceUnicode ).
Arrays and struct members of type 'string' are always stored as UTF-8
internally, because there are no individial character-encoding flags stored
in memory for each array element.
If, for example, a 'DOS'- or ANSI-encoded string is assigned to an array element,
all characters with codes > 127 will be converted to UTF-8 sequences automatically.
Thus, when reading those strings from the array, they have the encoding type ceUnicode !
If necessary, the character encoding of string literals (i.e. string constants in the script sourcecode) can be specified by the following single-lowercase-letter prefixes. When not speficied, the compiler may decide to use ANSI, or (more likely) UTF-8:
-
a"Text"
"ANSI"-encoded characters (precisely: Windows CP-1252, 8 bits per character) -
d"Text"
"DOS"-encoded characters (precisely: DOS Codepage 850, 8 bits per character) -
u"Unicode-Test"
Unicode (precisely: characters encoded in UTF-8, with a variable number of bytes per character)
Note: The double-quote character, which marks the begin of a string constant (literal), must follow immediately after the prefix character (a,d,u) !
Example (assigns a Unicode string literal to a string variable) :
   MyString := u"Falsches Üben von Xylophonmusik
      quält jeden größeren Zwerg.";
Wherever possible, special characters (as in the german pangram above) will
be translated into their proper encoding by the compiler.
The character encoding of the script sourcecode is assumed to be
"ANSI" (Windows
CP-1252), not "DOS"-encoded characters !
This may change in the far future, if the script editor in the programming
tool can be convinced to emit its content in UTF-8 instead of Windows
CP-1252.
Until then, use Unicode escapes (after
backslash-u) for all characters which you don't
find on your PC's keyboard. Example:
   MyString := u"Falsches
      \u00DCben von Xylophonmusik
      qu\u00E4lt jeden
      gr\u00F6\u00DFeren Zwerg.";
More examples can be found in the 'String
Test' application.
String usage and storage format
Most characters in a string are internally stored as an 8-bit number. A zero-byte marks the end of a string (but you don't need to care about this, because the compiler adds the zero automatically when encountering a string constant in the sourcecode). Depeding on the string's character-encoding type, characters with a code value above 127 (!) may occupy one or more bytes in memory. 8-bit "DOS" or "ANSI" characters are stored as such in memory. A few of those 255 possible codes are reserved for special control characters, line "carriage return" and "new line" - see 'backslash sequences' further below. In addition, strings can be stored as UTF-8 sequences in memory.
During runtime, string memory is dynamically allocated from a common memory pool. The amount of memory required depends on the number of strings used in your application, and their individual lengths. For example, consider an array of structures, declared as :
typedef tStringTableEntry = // user defined
      data type..

         struct // structure for an entry in a
      "string table"

            int valid;    // 0: invalid
      or "deleted" entry, 1:valid

            int iRefNo;   // string reference number
      (integer)

            string sInfo; // the string itself
      (any length!)

         endstruct; // end of a structure
      definition

      endtypedef; // end of type definitions


      var // declare GLOBAL variables, here: an array of
      structs

         tStringTableEntry StringTable[1000];

      endvar; // end of variable declarations
Initially, each tStringTableEntry only occupies 12 bytes (2
* 4 bytes for the integers, plus 4 bytes for a pointer to a string object
in some other memory area).
Later, when the sInfo entries in the 'StringTable' array are
filled (and the strings are not "empty" anymore), each string will require
additional memory .
In other words, the amount of memory used by your script may increase
at runtime. Thus, to make sure your application doesn't run out of memory
later, consider how many strings may be used by your application at runtime
at worst case, and how long each of those strings may grow (because
the compiler doesn't know this). Let your application run in the programming
tool's simulator, and test every function in your script. When finished,
examine the peak memory usage in the
debugger, and make sure the 'data memory' usage isn't critically close to
the maximum.
String constants with special characters
The compiler doesn't know for what a string will be used later. It doesn't
know anything about languages, fonts, character sets. For this reason, it
doesn't try to convert any special characters (especially not German umlauts,
etc). If you know the string will be displayed on the LCD screen later, using
one of the DOS-compatible fonts, replace the Umlaut (etc) with the hexadecimal
equivalent ( backslash x followed by two hex digits, in the double-quoted
string constant ), or use the prefix 'd' ("DOS") before the double-quoted
string to let the compiler convert the string from the sourcecode format
(which is usually 'ANSI') into DOS.
- Examples:
-
Test$ := "
\x99rtliche Bet\x84ubung\x9Abelkeit"; // string with hex codes for Ö, ä, Ü if a 'DOS font' is used for rendering
Test$ := d"Örtliche Betäubung kann Übelkeit hervorrufen"; // string converted into 'DOS characters' by the compiler
Hexadecimal codes for certain 'special' characters in DOS fonts (as used in most of MKT's programmable displays) :
| Hex. Code |
Character (here: ANSI) |
Name |
| 84 | ä |
a diaeresis |
| 94 | ö |
o diaeresis |
| 81 | ü |
u diaeresis |
| 8E | Ä |
A diaeresis |
| 99 | Ö |
O diaeresis |
| 9A | Ü |
U diaeresis |
| DF | ß |
German sharp s |
| . | ||
| . |
Beware: The script language isn't aware of the font used to render a character
on the screen. The compiler doesn't know what 'will happen' with a string
later (if you will print it on the screen later, write it into a file, etc).
Thus, \x94 may print a German 'ö' (o diaeresis,
or "o Umlaut") on the screen, but only if the font used to render the string
is the old-fashioned 'DOS font', aka 'codepage 437' or 'codepage 850'.
A complete 'DOS' character table ("Codepage 437") can be found here . Rows and columns use hexadecimal numbers, making it very easy to find the 8-bit hex code for any desired 'special' character. The Text Screen example uses some of those characters to draw lines and boxes on the text screen.
Strings with backslash sequences
Besides the sequence \x to insert a special character
(by its hexadecimal code), the following backslash sequences
have a special meaning in the script sourcecode:
- \\
-
Inserts a *single* backslash in the string .
- \r
-
Inserts a carriage return character ( aka CR, chr(13) ) .
- \n
-
Inserts a new line character ( aka "linefeed", chr(10) ) .
- \x
-
Inserts an 8-bit character by its hexadecimal code (not Unicode!).
See details in chapter 'string constants with special characters' .
- \u
-
Inserts a Unicode "character"
(code point), specified
as 4-digit hexadecimal value.
The compiler (!) replaces the unicode value with an UTF-8 sequence.
Note that only very few of those 1114112 possible Unicode code points can later be rendered on the display !
Details in chapter 'strings with different character encodings' .
- \"
- Inserts a double quotation mark in the string (without a backslash, the double quote is the string delimiter, so it cannot be a part of the string itself ) .
Don't confuse the backslash sequences inside the script language (listed above) with the backslash sequences in the display interpreter ! The simple control characters (like 'new line', etc) have the same meaning in both types, but the internal functions are entirely different !
See also: Invoking script functions from a backslash sequence on a display page
String processing
Strings can be concatenated with the '+' operator (formal "addition"). Example:
  var
    string Info; // Declaration of a string variable
  endvar;
  Info := "First part";
  Info := Info + " second part";
The following string processing functions had been implemented at the time
of this writing (2013-11-05) :
-
append( <destination>, <source> [, <index_variable>] ) -
Appends a string ('source') to the end of another string ('destination'),
or to an array of bytes.
Example 1: Appending a string to another string
In the example above (with destination = string), the third function argument ('index') is neither required nor recommended.var string s1,s2; // declare two string variables endvar; s1 := "Don't mix apples"; s2 := " and oranges"; append(s1,s2); // Append s2 to s1, result in s1 : "Don't mix apples and oranges" print( s1 ); // show result on a text panel
Example 2: Appending multiple strings to a 'binary block' (array of bytes)
In this example, the 3rd function argument ('index_variable') is an integer variable which is incremented by the number of bytes appended to the destination in each call of the 'append' command. The array 'TxBuffer' is filled with multiple strings, which are delimited by a ZERO byte (as in the "C" programming language).var byte TxBuffer[1024]; // declare an array of bytes int TxByteIndex; // index variable for 'TxBuffer' endvar; TxByteIndex := 0; // begin filling TxBuffer[0] here append( TxBuffer, "First string.\r\n", TxByteIndex ); // Note: append() will increment TxByteIndex by the // NUMBER OF BYTES appended to the buffer ! TxBuffer[TxByteIndex++] := 0x00; // append a ZERO BYTE as string-end-marker append( TxBuffer, "Second string.\r\n", TxByteIndex ); TxBuffer[TxByteIndex++] := 0x00; // append another ZERO BYTE append( TxBuffer, "Third string.\r\n", TxByteIndex ); StartSendingBlock( TxBuffer, TxByteIndex/*nBytes*/ ); // user-defined procedure
Because in the script language, a zero-byte also marks the end of a string, the trailing zero cannot be part of the 'netto' contents of the string itself. Thus, in the example shown above, the string delimiter is appended to the binary data block with the command
TxBuffer[TxByteIndex++] := 0x00;
The post-increment-operator '++' increments 'TxByteIndex' by one after the access.
Concatenating strings via append() is faster than 'adding' them (i.e. use append(s1,"Hello") instead of s1 := s1+"Hello"), because in many cases append() doesn't need to free and re-allocate a block of memory for the string (due to the internal memory management, which allocates strings in chunks of N times 64 bytes, leaving a reserve of up to 63 characters in memory).
-
chr( N ) -
Converts an integer code (N, 0..255, usually from the "DOS" character set)
into a single-character string.
If 'N' is above 255, it is assumed to be a UNICODE value, but you should better use unicode_chr( N ) for that purpose.
Example: chr(32) returns the 'space' character.
If 'N' originates from a stream of characters in ANSI code (e.g. from a serial port / terminal), use ansi_chr() instead.
-
ansi_chr( N ) -
Converts an integer code (N, 0..255, usually from the "DOS" character set)
into a single-character string.
If 'N' is above 255, it is assumed to be a UNICODE value, but you should better use unicode_chr( N ) for that purpose.
Example: ansi_chr(176) returns the 'degree'-character aka 'ring' (°), as in '°C' for 'degrees Celsius'.
-
unicode_chr( N ) -
Almost the same as chr(N), but unicode_chr(N) converts an integer code (N,
0..0x10FFFF) into a single-character unicode string, regardless of whether
this character can be rendered on the screen or not ! Example:
unicode_chr(0x20AC) returns a string with the internal representation (which
is UTF-8) of the 'Euro Sign' character.
-
CharAt( string s, int char_index ) -
Returns the code of the N-th character in the string s. As usual, the index starts counting
at zero for the first character. The result is a 32-bit
Unicode value, which, for 'normal' western characters,
is the same as the ASCII value (codes 1 to 127). The 'CharAt' function is
aware of the string's character encoding
type, and supports UTF-8. Note that for UTF-8, there is a big difference
between the 'character index' and the 'byte index'. CharAt always treats
the 2nd parameter as a character index, not a byte index. If
<char_index> is negative, or exceeds the length of the string, CharAt
returns zero which means "there is no character at this index".
-
char_encoding( string s ) -
Returns the string's character encoding
type. The result will be one of the following constants:
ceDOS("DOS"-characters),ceANSI("ANSI"-characters),ceUnicode, orceUnknown.
-
ftoa( float value, int nDigitsBeforeDot, int nDigitsAfterDot ) -
"floating-point to ascii" .
Converts a floating point value (1st argument) into a decimal string, using the specified number of digits 'before' and 'after' the decimal dot. Example:
Info := "Tire Pressure="+ftoa(fltTirePressure, 4, 1)+" bar";
If the 'number of digits before the decimal dot' is larger than required, the string returned by ftoa() will be padded with leading spaces (not zeroes). If the 'number of digits after the decimal dot' is larger than required, the string returned by ftoa() will be padded with trailing zeroes (not spaces). If the 'number of digits after the decimal dot' is zero, the decimal point ('.') will also be omitted. itoa( int value [, number of digits])-
"integer to ascii" .
Converts an integer value (1st argument) into a decimal string, using the specified number of digits (2nd argument). Example:
Info := "Timestamp="+itoa(system.timestamp,8);
If the value doesn't fit into the specified number of digits, the result (string) will only contain the least significant digits. Example:
itoa(1234,2)returns 24 (as string), not "1234" !
If the number of digits is not specified, or zero, itoa will produce just as many digits as required (without leading zeroes).
See also: ftoa, which emits leading spaces instead of zeroes. -
atoi( string value [, int number_of_digits [, int start_index]] ),
atof( string value [, int number_of_digits [, int start_index]] )
-
"ascii to integer" , "ascii to float" .
Converts a decimal string into an integer or floating-point number (a numeric value), using the specified number of digits (2nd argument, optional), or the entire string.
An optional third argument can be used to specify the start index (=index of the first character to be parsed).
If the optional parameter 'start_index' is passed by reference (using the address-taking operator before an integer variable), then that variable will receive the zero-based index of the next character after the parsed number.
Examples:
atoi("1234567"); // returns 1234567 as an integer value.Indices start counting at ZERO, not ONE. The first character in a string is at index zero.
atoi("1234567",3); // returns 123 (parse 3 digits, beginning at char-index 0).
atoi("1234567",3,2); // returns 345 (parse 3 digits, beginning at char-index 2).
start_index := 0; // begin parsing here (start_index must be declared as int somewhere)
value := atoi("1234567",10, &start_index); // increments start_index by 7 (# parsed chars).
Both atoi and atof recognize a trailing 'minus' character for negative numbers.
-
hex( int value, int number_of_digits )aliasHexString( .. ) -
Converts an integer value (1st argument) into a hexadecimal string,
using the specified number of digits (2nd argument)
-
BinaryString( int value, int number_of_digits ) -
Converts an integer value (1st argument) into a binary string,
using the specified number of digits (2nd argument)
Example:
BinaryString( 0x12345678, 32 )returns 00010010001101000101011001111000 as string.
-
strlen( string s ) -
Returns the number of characters in the string (not 'the number
of bytes', especially not for UTF-8).
Example:
strlen("How long is this string ?")returns 25 .
-
strpos( string haystack, string needle[, int startindex] ),
stripos( string haystack, string needle[, int startindex] ),
strrpos( string haystack, string needle[, int startindex] ),
strripos( string haystack, string needle[, int startindex] ),
strpos2( string haystack, string needle[, int start_index] )
-
Finds the first (or last) occurrence of a search string (needle) in a larger
string (haystack), beginning at the optionally defined start-index (zero-based
character index).
The functions strpos and strrpos are case-sensitive ('a'..'z' are different from 'A'..'Z'), stripos/strripos are not (i="insensitive").
The functions strpos and stripos try to find the first occurrence of the needle, strrpos/strripos try to find the last (r="reverse").
The return value is a character index (index zero = first character in 'haystack'), or a negative integer if the needle couldn't be found in the haystack.
In contrast to strpos(), strpos2() doesn't return the character index of the needle's first character within the haystack, but the index of the next character after the needle. In other words, strpos2() skips the needle if it finds one. With strpos2(), a parser can easily process the trailing string as shown in the examples further below.
If the 3rd argument (start index) is omitted, strpos/stripos start searching at index zero, i.e. at the first character in the 'haystack'. This can be used for a simple string parser. Example:
  haystack := "This test string is 38 characters long";

      needle   := "is"; // string to be found in the haystack

      i := strpos(haystack,needle);     // find the first needle (result: i=2)

      i := strpos(haystack,needle,i+1); // find the next needle (result: i=17)
After finding the keyword, the trailing value can be converted to int or float using atoi(ascii-to-integer) bzw. atof(ascii-to-float):
 i := strpos2(haystack,"VBat=");   // find index of the next char AFTER the needle

      if( i>0 ) then // found the needle (keyword) in the haystack, parse the following value

         iValue := atoi( haystack, 5/*digits*/, i/*start*/ ); // parse number after keyword

      endif;
Because atoi and atof also accept the start index as optional (3rd) parameter, it's unnecessary to copy strings in the example shown above.
-
substr( string s, int start [, int length] ) -
Returns a sub-string of the first argument, beginning at the zero-based character
index 'start', and consisting of 'length' characters.
If the parameter 'length' is omitted, the returned string (result) includes all characters from 'start' up to (and including) the end of the source string.
If 'length' is specified and positive, the result will never have more than 'length' characters.
If 'start' or 'length' are negative, the result will be an empty string. ParseInteger( string value [, int max_digits [, int start_index]] )-
Alias for "C"-function atoi() ("ASCII to integer"), with a few extensions.
If the argument 'start_index' is not specified, parsing starts at the first character (same as start-index zero).
If the argument 'max_digits' is also not specified, parsing ends after the last digit, end-of-string, etc.
If the optional parameter 'start_index' is passed by reference (using the address-taking operator before an integer variable), then that variable will receive the zero-based index of the next character after the parsed number.
This also applies to the other string-parsing functions listed further below. For an example, see ParseFloat().
ParseFloat( string value [, int max_digits [, int start_index]] )-
Alias for "C"-function atof() ("ASCII to float"), with a few extensions.
Similar to ParseInteger(), but returns a floating point value, and accepts fractional parts after a '.' (dot).
Example:
  sLine := "U=23.4V T=22.7°C";

        start_index := strpos( sLine, "U=" );

        Ubat := ParseFloat( sLine, 10/*max_digits*/, start_index+2 );

        start_index := strpos( sLine, "T=" );

        Temp := ParseFloat( sLine, 10/*max_digits*/, start_index+2 );
ParseHexString( string value [, int max_digits [, int start_index]] )-
Inverse to HexString. For an explanation of parameter 'start_index', see atoi().
If the string (value) begins with 0x (prefix for 'hexadecimal' as in "C" or Python), these two characters will be skipped. They are also included in the count of 'max_digits' just like any other character 'consumed' by the parser.
ParseBinaryString( string value [, int max_digits [, int start_index]] )-
Inverse to BinaryString. For an explanation of parameter 'start_index', see atoi().
If the string (value) begins with 0b (prefix for 'binary' as in Python), these two characters will be skipped. They are included in the count of 'max_digits' just like any other character 'consumed' by the parser.
-
string( value [, number of characters] ) - "Convert whatever it is into a string, using the default format" (*) .
If the value (first argument) is a byte array, it will be treated like an UTF-8 encoded string.
- (*) For certain source data types, the string format can be customized,
e.g. CAN.string_format if 'value' is a tCANmsg.
- (*) For certain source data types, the string format can be customized,
-
string( source_array, iFirstByte, iMaxBytes ) - This string-constructor function also converts the contents of a byte array (first argument),
beginning at the specified zero-based array index (second argument),
with a maximum of N bytes (third argumet), into a string of characters (return value).
Also in this case, the content of the byte array is assumed to be UTF-8 encoded. Example:
s := string( b256ReceivedData, iBeginOfPayload, iPayloadLength ); // inefficient call-by-value
As already mentioned in chapter 4, large objects (like structs and arrays) should better be passed as pointer ('call by reference' instead of 'call by value'). This way, the unnecessary and wasteful duplication of the array (to 'call by value') can be avoided:
s := string( &b256ReceivedData, iBeginOfPayload, iPayloadLength ); // more efficient call-by-reference
More examples for the string processing functions listed above can be found in the 'String-Test' application .
< To Be Completed >
See also : Keyword list , file I/O, table of contents .
Constants
Built-in constants
A few constants are hard-coded inside the script compiler. Don't rely on the actual value (that's why we don't show them in the table below).
For the sake of readability, most constants are prefixed with a lower-case 'c' (for constant). Despite that, the script compiler is case-insensitive !
| Constant name | Description |
| . | |
| __LINE__ | Retrieves the current sourcecode line number during compilation, similar as in "C". Example: trace.print("Problem in line ", __LINE__ , " :\r\n"); |
| arLeftScale,arRightScale, arTopScale,arBottomScale, arCurve1, arCurve2 |
'area codes', used in touchscreen event handlers for diagrams. |
| ceDOS | Character encoding type for strings
with 'DOS' characters, actually DOS
'Codepage 850' . For historic reasons, this is the encoding used by most of MKT's build-in bitmap fonts. |
| ceANSI | Character encoding type for 'ANSI' characters, in fact Windows 'CP-1252' . |
| ceUnicode | Character encoding type for Unicode strings. |
| ceUnknown | Dummy character encoding type for strings without 'special characters'. |
| clBlack | black colour (don't care about the actual value, it may be hardware dependent) . Like the colour constants below, this colour can be used in the setcolor-command. |
| clWhite | bright white . This is the second standard colour available on ALL targets. |
| clBlue | pure, saturated blue |
| clGreen | pure, saturated green |
| clRed | pure, saturated red |
| clLtBlue | Light Blue |
| clLtGreen | Light Green |
| clLtRed | Light Red |
| clCyan | cyan colour (mixture of blue and green) |
| clMagenta | red-purple, aka "fuchsia", sometimes called "pink" (which in fact it's not). Note: If this is not the kind of magenta/fuchsia/pink/purple/violet you were looking for, use the rgb-function to 'compose' the colour as a mixture of red, green, and blue. |
| clYellow | yellow colour |
| clOrange | Orange |
| clBrown | Brown |
| clDkGray | dark gray / dark grey :o) |
| clLtGray | light gray |
| clTransparent | Dummy colour value, usable as back- or foreground colour of certain display elements. |
| cRedrawAll (etc) | "Redraw All". Used, for example, to redraw a graphic 'table' on the screen. |
| csOff | Cursor Shape "Off" (text cursor invisible) |
| csUnderscore | Cursor Shape "Underscore" (text cursor visible, displayed as an underscore) |
| csSolidBlock | Cursor Shape "Solid Block" (text cursor visible, displayed as a filled block) |
| csBlinking | Cursor Style "Blinking" (slowly flashing text cursor) |
| . | |
| cCanRTR | RTR-flag (Remote Transmission Request) for the CAN bus |
| cCANStatus... | CAN Status Flags. For details, see CAN.status |
| cCanBus1 | 'Bus-Number' representing interface 'CAN1' when calling can_add_id. On some adapter cables for the MKT-View, this port was labelled 'KFZ-CAN1' . |
| cCanBus2 | 'Bus-Number' representing interface 'CAN2' when calling can_add_id. On some adapter cables for the MKT-View, this port was labelled 'KFZ-CAN2' . |
| cCanBusAny | As a 'dummy bus number' in can_add_id, represents any
CAN-like port for reception, and (for transmission) all currently available CAN-like ports. |
| cCanIdBit_Bus2 | Bitmask (bit 30) for the CAN-bus-number, encoded as part of tCANmsg.id . When set, a CAN message was received from (or will be sent to) the second bus - unless cCanIdBit_Bus3 is also set. Actually, cCanIdBit_Bus2 (bit 30) and cCanIdBit_Bus3 (bit 31) form a two-bit number to encode up to four different buses in the "CAN message id": cCanIdBit_Bus2 not set, cCanIdBit_Bus3 not set : first CAN interface. cCanIdBit_Bus2 set , cCanIdBit_Bus3 not set : second CAN interface. cCanIdBit_Bus2 not set, cCanIdBit_Bus3 set : third CAN interface. cCanIdBit_Bus2 set , cCanIdBit_Bus3 set : fourth CAN interface or LIN-bus. An example is in the "CAN gateway" demo (CANgate1.cvt). |
| cCanIdBit_Bus3 | Bitmask (bit 31) for the CAN-bus-number, encoded as part of tCANmsg.id . Details above. |
| cCanIdBit_LIN | Bitmask (bit 31+30) to use a CAN-"Message" on "CAN4" as a LIN bus frame . |
| cCanIdBit_Extd | Bitmask (bit 29) for the CAN-bus-number, encoded as part of tCANmsg.id . When cleared, the lower 11 bits of the CAN-ID field are an 11-bit CAN message ID. When set, the lower 29 bits of the CAN-ID field are a 29-bit CAN message ID. |
| cCanTx_Normal, cCanTx_NoWait |
Options for CAN transmission via can_transmit. |
| . | |
| cFileAttrNormal | File attribute : "Normal file, no special attributes". Used when reading 'disk' directories in tDirEntry.attributes. |
| cFileAttrRdOnly | Read only attribute (file may be read but not written) |
| cFileAttrHidden | Hidden file (at least on FAT file systems) |
| cFileAttrSystem | System file (don't touch this..) |
| cFileAttrLabel | Not a real file but the 'disk volume label' (used by FAT file systems) |
| cFileAttrDir | Directory |
| cFileAttrArch | Archive. Only used on FAT file systems (DOS) |
| cFileAttrDevice | Not a storage medium but an I/O device (serial port, etc) |
| cFirmwareCompDate | firmware compilation date as a string, for example "Aug 25 2010" . |
| . | |
| cPI | number "PI" (approximately 3.141592653589793238462643 ) |
| . | |
| cTimestampFrequency | frequency of the system's timestamp generator in Hertz ("ticks per second") |
| . | |
| dtUnknown | data type code for 'unknown data type'. See notes on typeof() |
| dtFloat | data type code for 'floating point' |
| dtInteger | data type code for 'integer' |
| dtString | data type code for 'string' |
| dtByte | data type code for a single 'byte' (8 bit unsigned) |
| dtWord | data type code for a 16-bit unsigned 'word' |
| dtDWord | data type code for 'unsigned 32 bit' aka 'doubleword'. Used for CANopen ( -> SDO ). |
| dtColor | data type code for a colour (hardware dependent) |
| dtChar | data type code for a 'single character' |
| dtError | data type code for an 'error' (used as return value by certain functions, e.g. cop.sdo) |
| . | |
| TRUE | boolean 'true', actually 1 (one) as integer value |
| FALSE | boolean 'false', actually 0 (zero) as integer value |
| . | |
| keyEnter, keyEscape, .. keyF1, keyF2, keyF3, .. keyLeft, keyRight, keyUp, keyDown |
keyboard codes. Returned by getkey. Used in low-level event handlers. |
| kmEnter, kmEscape,.. | Bitmasks for the keyboard matrix. Used with system.dwKeyMatrix and OnKeyMatrixChange. |
| . | |
| NULL | Value for an invalid pointer or invalid address. |
| . | |
| O_RDONLY, .... | file-open-flags. Used in the function file.open . |
| pfOpen | Flag to draw open polygons, for example in display.dia.poly.draw |
| pfClosed | Flag to draw closed polygons, for example in display.dia.poly.draw |
| pfFilled | Reserved for drawing filled polygons (not implemented yet) |
| pfNoScroll | Flag to draw a polygon that does not scroll along with the 'curves' in a diagram. So far, only used by display.dia.poly.draw. |
| sfVectorASC, ... | Constant to specify 'String Formats', e.g. when converting tCANmsg to string. |
| smOff, smCell, smRow, smColumn |
selection mode. Details in the description of the 'table' display element. |
| . | |
| wmXYZ | 'widget messages' or, sometimes, 'windows message'. Used in
event handlers. Allows the script to intercept touchscreen-, and similar low-level system events. |
| . |
User-defined constants
In addition to the fixed constants shown above, you can define your own
constants.
This sometimes improves readability, especially when you need the constant's
value more than once in your script.
The keyword 'const' begins a list of constant definitions, the keyword 'endconst'
ends such a list.
-
Each constant is defined using the following syntax : - <constant_name> = <value> ;
- or (with the definition of the data type, which may be necessary if the value isn't easily recognizeable, or ambiguous) :
- <data_type> <constant_name> = <value> ;
- or (to define a constant array, as described further below) :
- <data_type> <constant_name> [array_size] = <value> ;
Example (please note the coding style - indentation
between const & endconst) :
const // define a few constants...

         C_HISTORY_BUF_SIZE = 1000; // a decimal integer

         C_CANID_RX_A   = 0x333;    // a hexadecimal
      integer

         C_CANID_RX_B   = 0x334;

         C_CANID_TX_ACK = 0x120;

      endconst; // end of 'constant' definitions
User-defined constants must be defined at the begin of the script (or, at least, before they are used).
Notes:
-
Use constants instead of 'magic numeric values' which no-one else (besides
you) will understand,
especially in long select..case statements, and as control identifiers in message handlers. - Like the names of variables, data types, and similar elements, the name of any constant is limited to 20 characters.
- A script may use a maximum of 256 different const...endconst blocks. The number of constants (in these blocks) is only limited by the available bytecode memory, which is target specific (usually 64 kByte total bytecode memory).
-
The old UPT display interpreter can access user-defined script constants
without the need to prefix the constant's symbol by "script." .
But this only works if the symbol does not exceed the maximum length of a display variable (!), which is usually 8 to 16 characters.
The maximum length of a constant's name in the script itself is virtually unlimited.
'Calculated' constants (constants 'calculated' at compile-time, not at runtime)
To force the evaluation of simple expressions as numeric constants at compile-time, use the hash character before the constant expression in parentheses.
Example:
- The expression in the command
-
N := #(1+2+3) -
will be evaluated (calculated) at compile-time (by the compiler
itself),
In contrast to that, -
N := 1+2+3 -
will be calculated at runtime, resulting in a slightly reduced execution
speed.
The compiler's own formula-evaluator is reduced to very basic calculations; it doesn't support parentheses, it doesn't support different operator precedences; and it only works with integer constants ( symbolic or numeric ).
Constant tables (arrays)
For some applications, it was necessary to store constants in arrays. One could use an array variable for this purpose, and fill the array at runtime using a long list of assignments. But there is a more elegant method to achive this: Constants can be defined like a formal array (and thus be accessed like an array with "read-only" access at runtime). Such constant-arrays could then be used to initialize (fill) variables-arrays in a loop, etc; because each element of the array can be accessed through an index.
Example (actually taken from the
'quadblocks' demo) :
CONST

        int BlockColors[7] = // seven block colours : BlockColors[0...6] !

          { clBlue, clRed, clCyan, clYellow,
      clGreen, clMagenta, clWhite };

      ENDCONST;
See also : constants (overview), variable arrays, displaying tables (graphic/control element).
Built-in and user-defined data types
The script language supports the following three 'basic' built-in data types :
-
int(alias "integer") : signed 32-bit integer .
This is the preferred data type for most numeric operations, and also to identify files (handles) and internet communication endpoints (sockets). -
float: 32-bit 'single precision' floating point. Contains an 8-bit exponent, a 23-bit mantissa, and a sign bit.
This type can store fractional decimals like 0.12345. In numeric operations, it was slower than integer due to the lack of a floating point unit in older target systems (without a hardware floating point unit).
If necessary, a floating point value can be 'constructed' from single bytes (with exponent and mantissa) via BytesToFloat() or BinaryToFloat(). Floating point numbers can be formatted into strings via ftoa() ('float to ASCII'). -
double: 64-bit 'double precision' floating point. Offers a higher accuracy in numeric calculations than 'float', at the expense of speed.
Thus this type should only be used if single precision float is not sufficient, for example...
- to store date and time with with high resolution in a single value, e.g. as 'Unix time' (fractional seconds),
- for calculations using latitude and longitude from precise GPS receivers (with spatial resolution in the centimeter range),
- to store the value returned by function BytesToDouble(), if you really need the maximum resolution.
-
string: A string of characters. The characters of a string are stored in a separate memory region, the length may vary during runtime.
(In struct- and array size calculations, a string only seems to occupy four bytes in memory, but this is just a *pointer* to the actual characters.
Details about the string type are here ). -
char: A single character (8 bit). Typically used as an array for strings with a fixed length, for example when describing data structures (more on that later).
In addition to the above 'basic' types, the following 'simple' types can be
used in struct- or array declarations. When used in calculations (formulas,
expressions), they are automatically converted to integer:
-
byte: unsigned 8-bit integer (value range 0 to 255) .
This type occupies one byte in arrays or structures. It's actually the smallest 'integer' type which can be used for arrays. -
word: unsigned 16-bit integer (value range 0 to 65535) .
Occupies two bytes when used in arrays or structures. -
dword: unsigned 32-bit integer (cannot be converted into 32-bit integer without 'losses' - only used for storage !) .
Occupies four bytes when used in arrays or structures. -
bool: Similar as integer, but optimized to store the 'boolean' values TRUE (1) or FALSE (0). Up to date (2019-01) treated like int in expressions and comparisons (e.g. TRUE plus TRUE gives 2 (two!), which is quite nonsense but 'works' because when testing the result (e.g. in an if-condition), all that matters is if the integer value is zero or nonzero. Thus, 2 (two) will have the same effect as 1 (TRUE). In future revisions of the script compiler, arrays of type 'bool' may have a more compact storage format (using only one bit per element) than arrays of integers. -
tColor: Also an integer, but with the special meaning 'colo[u]r'. Used by some functions, for example to draw polygons into diagrams. The function rgb(red,green,blue) returns a tColor 'mixed' from the three colour components.
Type conversions between the 'basic' and 'simple' types listed above are performed automatically during runtime as necessary. Example:
        var
          int   i;  // declaration of an integer variable
          float f;  // declaration of a floating-point variable
        endvar;

        i := 1234;    // integer value assigned to an integer variable
        f := i;       // integer value automatically converted to float
        // (in older versions, an explicit conversion was required here, like
        //  f := float(i);   // convert integer to float, then assign to 'f' )
Furthermore, there are a few built-in structure definitions (belonging to
the built-in data types), like :-
tScreenCell: Data type describing one cell of the text screen buffer . Components of this structure are:
.bChar: character code, usually ASCII or even DOS character set, 0..255
.bFlags: Bit 7 = Flags to force redrawing this cell.
.bFontNr: reserved for future use
.bZoom: reserved for future use
.fg_color: foreground colour (each character cell has an individual colour ! )
.bg_color: background colour
-
tCanvas: Data type for a 'painting canvas', which the script can use to create graphics at runtime.
Component names were unknown at the time of this writing (12/2017) - they may be similar as in HTML5 (width,height,data).
Directly accessable components of a tCanvas:
.width: width in pixels,
.height: height in pixels.
A pointer to a canvas can be used in OnPageUpdate() for Z-ordered painting into the framebuffer.
See also: Canvas functions and methods for 'painting'.
-
tMessage: Data type used by the message handling functions. Components are:
.receiver: identifies the receiver of the message (if any, may be zero for 'broadcast' messages)
.sender: identifies the sender of the message. If the sender is not a windowed control (but the system), this value may be is zero.
.msg: message type code (integer). Should be one of the 'wm' ("windows message") constants, or user defined .
.param1: first message parameter. Usage depends on the message type.
.param2: second message parameter. Usage depends on the message type.
.param3: third message parameter. Usage depends on the message type.
For details about tMessage, see the chapter on message handling .
-
tCANmsg: Data type for a single CAN message . Not to be confused with the 'tMessage' type !
Used (as 'pointer to tCANmsg') as function argument to pass a received CAN message to a self-defined CAN-receive handler, and (optionally) as function argument for the can_transmit commmand.
Components of the data type tCANmsg are:
.id: Combination of bus-number (in bits 31+30), Standard/Extended-Flag (in bit 29),
and the 11- or 29-bit CAN-ID (in bits 10..0 or 28..0).
.tim: Timestamp (for received CAN messages, this field contains a precise timestamp filled out by the CAN driver)
.len: Length of the 'netto' data field in bytes. For CAN messages, only 0 (zero!) to 8 bytes are possible, for CAN FD up to 64.
.b[0] .. b[7]: Data field as byte array (eight times 8 bits)
.w[0] .. w[3]: Data field as word array (four times 16 bits)
.dw[0] .. dw[1]: Data field as doubleword array (two times 32 bits)
.i32[0] .. i32[1]: Data field as array of two 32-bit integer values, little endian ("Intel")
.f32[0] .. f32[1]: Data field as array of two 32-bit floating point values, little endian
.f64[0]: Data field as array of 64-bit 'double precision' floats, little endian (for CAN, only one element)
.bitfield[<Bit index of the LSB>,<number of data bits>]: Bit field as in 'can_rx_msg' and 'can_tx_msg'
To simplify communicating via J1939 protocol, the following aliases for parts of the 29-bit CAN ID were added:
.PRIO: 'Message Priority'. Alias for CAN-ID Bits 28 to 26.
.EDP: 'Extended Data Page'. Alias for CAN-ID Bit 25.
.DP: 'Data Page'. Alias for CAN-ID Bit 24.
.PF: 'PDU Format'. Alias for CAN-ID Bits 16 to 23.
.PS: 'PDU Specific'. Alias for CAN-ID Bits 8 to 15.
.SA: 'Source Address'. Alias for CAN-ID Bits 0 to 7, at least for J1939.
.PGN: 'Parameter Group Number', with up to 18 bits. Alias for 'DP'+'PF'+'PS'.
To simplify communicating via ISO-TP / ISO 15765-2, even more aliases for parts of the 29-bit CAN ID were added.
Beware: ISO 15765-2 supports an awful lot of different addressing modes, and the following aliases only apply
to "Normal fixed addressing" (but not "Normal addressing"), and "Mixed addressing with 29 bit CAN identifier" !
.ID28_26: Bits 28 to 26 in a 29-Bit-CAN-ID. For ISO-TP with "normal fixed addressing", usually contains 0b110 (binary) .
.ID25_24: Bits 25 to 24 in a 29-Bit-CAN-ID. For ISO-TP with "normal fixed addressing" almost always contains 0b00 (binary) .
.ID23_16: Bits 23 to 16 in a 29-Bit-CAN-ID. For ISO-TP with "normal fixed addressing, TAtype=physical", contains '218' (decimal).
Etc, etc, etc. You see, ISO 15765-2 can be awfully complex.
.ISO_TA: ISO 15765-2 'Target Address'. Alias for CAN-ID Bits 15 to 8.
.ISO_SA: ISO 15765-2 'Source Address'. Alias for CAN-ID Bits 7 to 0. Note the surprising similarity with J1939.
If a variable of type tCANmsg, or a pointer to (aka 'the address of') a variable type tCANmsg, is converted into a string, the result may be a string in Vector ASCII Format (depends on CAN.string_format). This can be used for logging a moderate amount of CAN traffic (via script, even in devices without a built-in CAN logger). An example is in the CAN 'ASCII' Logger demo.
For devices with CAN-FD compatible controllers, the script language also supports the new tCAN_FD_msg type with up to 64 bytes per data field, in contrast to the older tCANmsg where the data field was restricted to 8 bytes (aka "classic CAN").
-
tTimer: Data type for a programmable timer, with the following components:
.period_ticks: Cycle duration of the timer, measured in 'Ticks' of the timestamp generator
.expired: >=1 (TRUE) if the timer is expired, otherwise 0 (FALSE)
.ts_next: Current value of the timestamp generator (system.timestamp) at the next planned expiration of this timer
.running: >=1 (TRUE) if this timer is currently 'running', otherwise 0 (FALSE). See note further below.
.user: A freely useable 32-bit integer value assigned to this timer,
for example an event counter or an index (see timer event demo)
The tTimer type is used by the setTimer command, and (passed as 'pointer to tTimer' in the argument list) when periodically calling a timer event handler.
A timer's "user"-field can also be used to store a pointer to a user-defined data type. This allows accessing user-defined data inside the timer event handler without global variables.
Note: Trying to start a timer by setting 'timerX.running := TRUE' is meaningless.
A non-running timer can only be started by calling setTimer.
Reason: An assignment to 'timerX.running' doesn't reload the timer's counter.
-
tTable: Data type for the graphic display of a 'table' (tabular data) on the screen.
An instance of a 'tTable' doesn't contain the data shown in the table itself; it merely connects a data source (e.g. array, etc) with a visible control element ("\table").
Details about tables (as graphic control- or display elements) are in an extra document (table_01.htm).
-
tDirEntry: Data type for reading directories from a file storage (memory card, etc). Details in the chapter about reading 'disk' directories.
The keyword 'ptr' or '*' (in addition to the data type) allows the declaration of pointers
in der script language.
In contrast to Pascal (etc), 'ptr' is not a data type itself, but must be combined with other data types, resulting in "typed pointers".
Some of the script language functions may return different data types as their 'return value'.
If the caller needs to examine the type of the result, he can use the typeof operator
(operating on the returned value), and use a select..case statement to implement different processing for
each data type. For this purpose, use symbolic constants like dtFloat, dtInteger,
dtString, etc in the case marks; and declare the variable
(for the return value) as 'anytype':
-
anytype: Placeholder for the data type to declare a variable (or function argument) which can accept 'any type'.
After assigning a certain value to such a variable, the actual type can be examined with the typeof() operator.
Example:
var
     anytype result;
endvar; // end of variable declarations
     ...
     result := cop.sdo(0x1234, 0x01);  // read something via CANopen (Service Data Object)
     select( typeof(result) )  // what's the TYPE OF the returned value ?
        case dtInteger:  // the SDO transfer delivered an INTEGER
           ...
        case dtByte:     // the SDO transfer delivered a BYTE
           ...
        case dtString:   // the SDO transfer delivered a STRING
           ...
        case dtError:    // the SDO transfer returned an ERROR CODE
           ...
     endselect;
Besides the data types listed above, own data types can be defined. Example:
 typedef
   tHistoryBufEntry = // this is the name of a user-defined data type
      struct         // begin of a user-defined data structure
         int iRefNo;     // 1st member: an integer variable
         int iSender;    // 2nd member: another integer
         float fUnixTimestamp;  // 3rd: a floating point variable
         string sInfo;   // 4th member: a string
         int x,y,z;      // 5th to 7th: 3 members widh the same type
      endstruct;     // end of the user-defined data structure
 end_typedef; // alias endtypedef, end of the data type definition
Notes:
- A block of 'typedefs' may define more than one data type; the semicolon is required to separate the entries.
- Types must be defined before they can be used to declare variables. Put all typdefs at the begin of your program.
- using a lower-case 't' as suffix for own type definitions is not mandatory, but recommended to make the script easier to read.
- components within a type definition must be separated with semicolon (a colon doesn't work here) .
- The keyword typedef begins a type definition, the keyword end_typedef (alias endtypedef) ends it.
- The keyword struct begins a structure definition, the keyword endstruct ends it.
- Structures can only be accessed component wise. Copying a complete struct to another as in "C" is not possible (yet?).
At the moment, structures ("structs") can only be composed of basic data types. Nested structures, and structs with arrays as components, were just future plans (at the time of this writing).
See also: var..endvar to define a list of global script variables.
Explicit type conversions (typecasts)
In a few situations, it may be necessary to explicitly convert one data type into another.
The syntax of the typecast-operator is similar as in the "C" programming language:
(<data type name>)<value to be converted>
As an alternative to the 'typecast'-style shown above, explicit type conversion can also be
made 'like a function call', using the data type as function name, and passing the to-be-converted value
like as argument in parentheses:
<Data type>( <value to be converted> )
Example from application programs/script_demos/StringTest.cvt :
s1 := string(n); // default method to convert "anything into a string"
The type converter function returns a type of the same name (here: string).
Caution: If a 32-bit integer value is converted into a pointer, the script runtime system
cannot (always) find out if the result is valid. Internally, pointers also contain the
type of the object, and the memory class to which they point (code, constant, variables, other data).
All this information gets lost when converting a pointer into a 32-bit integer and back !
That's why explicit type conversions with pointers should be avoided wherever possible !
Rules for converting certain built-in data types into strings:
- int: uses the format also used by itoa() (decimal, sign only emitted when negative)
- tCANmsg: Format configurable via CAN.string_format:
CAN.string_format := sfVectorASC produces a Vector ASC Format compatible string, but without Carriage Return and New Line.
The timestamp (1st column in a Vector ASC file) can be shifted by CAN.timestamp_offset.
An example is in programs/script_demos/CAN_ASC_Logger.cvt .
Variables
The script language supports local and global variables (more on local vs
global in the next chapter).
In addition, the script can also access
variables of the display
interpreter (defined for the UPT display application).
As in most programming languages, variables should be declared before using them, but this is not necessarily the case (for BASIC-compatibility).
Deprecated (not recommended for new developments): For non-declared 'automatic' variables, the data type was defined by their suffix, like '%' for "integer", '&' for "long integer", '$' for "string", and '!' for floating point.
Again, using 'non-declared' variables is deprecated, and should be avoided.
Instead you should declare variables properly (with data type) before using them,
as explained in the following chapters.
The directive #pragma strict (in a single line)
instructs the compiler to use declared variables only, and reject
the 'deprecated' stuff mentioned above with an error.
Rationale: In the past, those 'automatically created' global variables caused hard-to-find bugs,
for example if a single character was missing when referencing global variable (a "typo"), the compiler
'automatically' created a second variable (with the name used in the "typo").
- Hint for developers:
- Global variables can be inspected at runtime
by the built-in debugger (values listed in the symbol table)
or remotely using the device's
embedded web server / 'script' page.
Local variables cannot be inspected that way because they only exist during a function call, and may exist in multiple instances on the stack.
Variable declarations in the script
As mentioned in the previous chapter, any kind of variable should be declared
along with its type, prior to using it.
- Hint:
- With the option '#pragma strict', variables must be declared before being used.
Global script variables
Only variables with user-defined types, array, or anything else which is not a simple variable must be declared before use. This is what the keyword 'var' is for. After the 'var', place the type name before the name of the variable. A variable-definition-block must end with the 'endvar' keyword (alias end_var). Example for the declaraction of some global variables (please note the coding style - indentation between var & endvar) :#pragma strict // 'strict' compilation: ANY variable must be declared before being used !
var // global variables (accessable from all subroutines) ...
int nHistoryEntries; // declares an integer variable
tHistoryBufEntry History[100]; // declares an array of tHistoryBufferEntries
// Note: the indices for an array with 100 entries run from 0 (ZERO) to 99 !
logged: // The following variables may be recorded by the built-in CAN logger:
// Signals from J1939 PGN 61443 = "Electronic Engine Controller 2" :
int AccelPedalKickdown; // SPN 559 "Accelerator Pedal Kickdown Switch"
int AccelPedalPosition1; // SPN 91 "Accelerator Pedal Position 1"
private: // The following variables shall NOT be 'logged':
int iSomeInternalStuff;
...
endvar;
Between the keywords 'var' and 'endvar' (i.e. within the declaration of global script variables), the following attributes can be speficied (they apply to the varibles declared after the attribute):
- private:
- The subsequent variables shall only be accessable inside the script;
they shall not appear in the selection lists for defining display pages,
and they shall not be logged.
- public:
- The subsequent variables shall be accessable outside the script, too.
The programming tool will include them in the selection list for defining display pages.
- logged:
- The subsequent variables may(*) be recorded by the logger which is integrated in certain devices.
To end a list of 'loggable' variables, use the attribut 'private:'.
(*) The 'logged' attribute doesn't mean subsequent variables are always logged.
In addition, the option + script variables declared as 'logged' must be set in the CAN- Logger Configuration to log such variables, besides CAN-messages and GPS data.
- noinit:
- Variables declared with this attribute shall, if possible, not be automatically initialized when executing
a new application via system.exec().
This is only possible with simple data types like int, but not with dynamically allocated types like string, because before the script is compiled, and when initialising the script runtime is (re-)initialized, all dynamically allocated memory blocks are freed.
Global variables (regardless of being 'private' or not) can be inspected during runtime by the built-in debugger (values listed in the symbol table) or remotely using the device's embedded web server / 'script' page.
Local script variables
Inside user-defined procedures or functions, local variables can be declared (see following example). Local variables use the stack for storage, thus they only 'exist' inside the procedure / function until it returns to the caller. Example:
proc Test
   local int x,y,z; // define three local integer variables
      ....
    print( x,y,z );
endproc  // local variables (x,y,z) cease to exist at this point
As soon as a function returns to the caller, its local variables (in fact stack locations) are freed automatically, and their addresses become invalid.
See also: Debugging ... Stack Display
Pointers (pointer variables and address operations)
Similar as in the 'C' programming language, variables can be declared as 'Pointers' for special purposes. But, as in 'C' (and as explained further below), pointers must be treated carefully, because the runtime system cannot always check if a pointer points (or still points) to a valid location, and if the type of the pointer is really compatible with the target location.Similar as in 'C', if a pointer varible (or a reference) shall initialized with an 'invalid' pointer, assign a NULL-pointer to it.
Example for the declaration of a variable with the type 'Pointer to Integer':
int ptr myPointerToInteger; // declaration of a typed pointer, preferred
For developers familiar with "C", the keyword 'ptr' may be replaced with a single asterisk (*) between the basic data type and the name of the variable:
int * myPointerToInteger; // declaration of a typed pointer, "C"-style
Purposes of pointers may be...
- the manipulation of 'binary data blocks' (which are neither simple array nor described as a structure)
- passing large data blocks 'by reference' (to avoid lengthy and slow block-copy operations)
When using pointers, ...
- use them with caution !
- make sure the pointer's address is still valid when you de-reference ("use") it
- beware that the address of any local variable gets invalid, as soon as the function (in which the local variable was declared) returns to the caller
- thus, only set pointers to global script variables (which remain at fixed addresses throughout their lifetime)
For linked lists, trees, tables and similar data structurs, pointers are (almost) inevitable.
Assigning the address of a variable to a pointer
To set a pointer to a certain variable, the address of a variable (or whatever) must be taken. This can be achieved by the operator function addr:The term addr(
<variable> ) returns the address of the variable inside the argument list.Example for the declaration and initialisation of a pointer, to have it pointing to a 'simple' variable :
var // declare global variables...

        int myIntegerVar;   // declare an integer variable

        int ptr myPtrToInt; // declare a variable with a pointer to an integer value

      endvar;


      myPtrToInt := addr( myIntegerVar );  // assign address of 'myIntegerVar' to pointer 'myPtrToInt'
To de-reference a pointer (i.e. "access the object to which the pointer points"), append a formal array index in squared brackets after the name of the pointer (unlike "C", there is no '*' operator for this).
The formal array index is almost always zero, which means 'use the element to which the pointer points, without offset'.
In contrast to 'real' arrays, the runtime system cannot check the validity of the pointer's formal array index (=offset), because a pointer only carries a data type along, but not an array size.
Thus, as in "C", the developer is responsible for the validity of a pointer !
If the formal array index is non-zero, it will be multiplied by the size of the pointer's data type, to calculate the address offset which is added to the address to dereference the pointer (for example, multiply the offset by four for a 'pointer to integer'). For typeless pointers ("pointers to anything"), the formal array index must only be zero.
Examples to de-reference a pointer (aka 'access the data via pointer'):
        myPtrToInt[0] := 12345; // pointer access as a formal array, here: index zero = first array element

        myPtrToInt[1] := 0; // here ILLEGAL, because in the example myPtrToInt only points to ONE value !
When accessing a single component of a structure (also a user defined type) via pointer, the pointer will automatically be dereferenced (unlike "C", where you'd use '->' to access a struct component via pointer, and '.' to access a struct component directly).
Example to access a component of a structure via pointer:
      typedef // define data types and structs...

        tMyStruct = struct

          int iRefNo;

          string sName;

        endstruct;

      end_typedef;


      var // declare global variables...

        tMyStruct myStruct;   // declare a variable of type 'tMyStruct'

        tMyStruct ptr myPtr;  // declare a pointer to a 'tMyStruct'

      endvar;


      myPtr := addr( myStruct );  // take address of 'myStruct' and assign it to pointer 'myPtr'

      myPtr.iRefNo := 12345;     // actually sets myStruct.iRefNo

      myPtr.sName := "Hase";     // (in 'C' this would be myPtr->sName)
Passing function arguments (parameters) via pointer
When passing arguments to functions, procedures, or event handlers, pointers are often used
instead of passing larger structures directly ('pass by reference' instead of 'pass by value').
The reason is that a pointer only occupies four bytes in memory, thus a pointer can be passed
to a subroutine much faster than copying an entire structure in memory.
More on this in the chapter about User-defined functions and procedures.
For example, a CAN-Receive-Handler uses a pointer to a CAN message as argument,
which actually points to the CAN message in the system's CAN-receive-FiFo, rather than copying the entire
CAN message to the stack (i.e. call-by-reference, not call-by-value).
Another example where pointers must be used (in a function's argument list)
are the event handlers OnGetCellText, OnGetEditText, and OnSetEditText for the UPT 'table' element,
because especially the OnGetCellText event may be fired many thousand times per second,
and thus the text is passed as a pointer (not as a huge memory copy, see 'out').
In the argument list of certain commands, the 'addr' can be ommitted (for example, if the compiler
knows that the called function always expects 'the address of something').
Experienced "C" developers may use the '&' operator instead of 'addr',
for example when calling can_receive or can_transmit (in the CAN gateway demo):
if (can_receive( &my_can_message ) ) then ...
The above code actually has the same effect as without the ampersand, because the compiler "knows" that can_receive, if used with a function argument list, always expects a "pointer to a CAN message".
Accessing script variables from a display page
Using the prefix "script.", any 'simple' variable in the script
can be read or modified by the display application (display interpreter).
For example, when the user presses a button, the button's reaction (a display interpreter command)
may set a script variable, which is then polled in the script's main loop to complete the operation
(for example, modify a parameter in a CAN-controlled ECU using a self-defined CAN protocol).
Beware: The display application and script are not synchronized per se.
The script runs 'in the background', possibly in a multitasking environment,
and the display application 'doesn't know what the script is doing' when it accesses the script's variable).
Some of the script examples use this feature to inspect
variables on the terminal's screen.
See also:
- Synchronisation between script and display by pausing the display (while the script 'calculates a new set of results')
- Interaction between script and display application : Chapter 3
Accessing display variables from a script
In some cases, the script code may need to read or modify the value in one of the display variables (defined on the 'Variables' tab). This is more complex than you may guess, because the script may be called while the display is being updated (especially if the display update is quite slow). For this reason, any access to a display variable from the script code must use the prefix "display." before the name of a display variable. The system will make sure that the value of a "display variable" cannot be modified during the display page update, or during the handling of programmed 'display events' .Example (with 'Oeldruck' being a display variable connected to a 'CANdb'-Signal, which turned it into a network variable) :
   if ( ! display.Oeldruck.va ) then
      print( "Oil pressure isn't valid !");
   else if ( display.Oeldruck < 1.2345 ) then
      print( "Oil pressure is too low !");
   endif;
Note: For reasons explained above, accessing display variables from a script may slow down the script significantly (because it may have to "wait" for the display).
Never use display variables inside the script for anything else than 'showing them on the display' !
See also:
- Special components of a display variable (flags, counters, non-scaled "raw value on CAN", scaling parameters, value table, etc.)
- Controlling the programmable display pages from the script (page switching, etc)
- More about interaction between script and display application:
- Accessing display variables from the script
- display.GetVarDefinition (access the definition, not the value, of a display variable)
- Accessing display elements (on the current display page) from the script
- Accessing script variables from the display interpreter
- Invoking script procedures from the display interpreter
- Invoking script functions from display pages (to retrieve a text strings for the display, used for internationalisation)
- Keywords
- Examples
-
Overview (of this document)
Arrays
Variables and constants can both be declared as arrays. The syntax is similar to the "C" programming language (there is no "array" keyword) :Squared brackets (not parentheses!) are used for array sizes, and -later, when accessing the array elements- as the array index.
As already mentioned in the chapter about variable declarations, array indices run from zero to < array-size MINUS ONE > !
Example: 3D-Array, organized in "pages", "lines", and "columns"
 var

        int ThreeDimArray[10][20][30];

      endvar;

          ...

        z := 1; // "page" index, valid: 0..9

        y := 2; // "line of page", valid: 0..19

        x := 3; // "column of line", valid: 0..29

        ThreeDimArray[z][y][x] := 1234;
Notes on arrays:
-
The maximum number of dimensions in an array is THREE.
Four-dimensional arrays are impossible.
Arrays of arrays are also impossible, pointers to arrays are impossible, and pointers inside arrays must be treated carefully. -
Certain data types (like strings) are problematic in arrays, because a 'string'
is in fact just a pointer to a different memory area.
Thus, the contents of an array cannot easily block-copied :
Block-copying an array of strings would only copy their addresses, but would not duplicate their contents (copy characters). -
For that reason, partial array references (as in C) are forbidden.
Trying to "copy" an entire page (1st dimension of the sample 3d-array shown above) like
ThreeDimArray[z] := ThreeDimArray[z+1]
is impossible (at least, as of 2010-10-14) . -
The content of an entire array can be inspected at runtime in the programming tool:
Enter the name of the array (as a global script variable, without indices) in the Watch List. - An array of BYTES can be used as a storage for any kind of 'binary' data. The append() command can be used to append strings of characters (without the trailing zero, which is specific for the script language) to such an array.
-
When filling an array element-by-element, consider using the '++' operator
to increment the index variable:
TxBuffer[TxByteIndex++] := 0x00; // append a ZERO BYTE to the array -
To pass arrays to functions or procedures without copying elements,
use an empty pair of array brackets in the declaration (argument list)
after the argument name as in the example shown below.
Knowning the array's basic element type (here: byte) and knowing that 'SrcBitmap'
is an array allows the compiler to check the syntax. The callee can use the
reference (here: "SrcBitmap[]") like an array:
     func DrawSprite( tCanvas ptr pDestCanvas, byte SrcBitmap[] )
          pDestCanvas.drawImage( SrcBitmap );
     endfunc;
Passing arrays this way (by reference, i.e. without copying) consumes very little CPU time. But the callee (called function) can modify the array data, which may not be the caller's intention.
Maximum size (capacity) versus momentarily used length (.len) of an array
The maximum number of array elements (also known as 'capacity') can be queried via member function 'size'. For multi-dimensional arrays, specify the dimension in parentheses, e.g.: maxPages := ThreeDimArray.size(0); // how many "pages" (first array dimension) ?
maxLines := ThreeDimArray.size(1); // how many "lines per page" (second array dimension) ?
maxColumns:=ThreeDimArray.size(2); // how many "columns per line" (third array dimension) ?
To avoid the ambiguity of 'size' (which can have very different meanings in various programming languages),
you can use '.cap' (capacity measured in array-elements), similar as in the "Go"
programming language. At the time of this writing (2018-10-08), '.cap' returned the same value as '.size'.The momentarily used number of array elements ("length") can be retrieved by member function 'len':
  numPages    := ThreeDimArray.len(0); // used number of "pages" (first array dimension) ?

       numLines    := ThreeDimArray.len(1); // used number of "lines per page" (second array dimension) ?

       numColumns:=ThreeDimArray.len(2); // used number of "columns per line" (third array dimension) ?
Without the specification of the dimension (in parentheses) directly after the keyword ".len" or ".size" / ".cap", the length or capacity along the first Dimension will be retrieved (or modified via assignment). Thus, for one-dimensional arrays, you can always omit the dimension, as in this example:
currentLength := TxBuffer.len; // number of array elements currently "in use"
Similar as in "Go" (for slices), the script language draws a distinction between "capacity" (.cap) and "length" (.len). As long as no array elements have been set, the array has its declared "capacity", but the "length" is initially zero. When appending new elements to the array (function append()), the length (.len) may grow up to the maximum size, alias capacity (.cap).
Some other functions (for example file.write) use the .len member, when data from the array shall be processed and there is no other (explicit) indication about how many elements to process.
In contrast to slices in "Go", an array in the script language cannot be resized dynamically. Arrays have a 'fixed' maximum size, to know the memory requirements already at compile time, instead of running out of dynamically allocated memory later at runtime (in the target).
Other elements of an array-header
Not translated from the German document yet.Arrays used as FIFO (ring buffer with 'first in, first out'-principle)
Not translated from the German document yet.Sampling interval and timestamp of the newest array element
<array-name>.t_sample- Sampling interval in seconds. Internally stored as a floating point value (float).
The sampling interval (aka sampling period) is the inverse of the
sampling rate (sampling frequency),
which is more common in digital signal processing.
After a (forward-)FFT, this component contains the FFT bin width in Hertz instead of the sampling interval.
<array-name>.unix_time- Timestamp of the first ("oldest") sample stored in the array, at index zero.
As for system.unix_time, the unit is defined as "number of seconds elapsed since January 1st, 1970, 00:00:00 UTC". Since this value is internally stored as a 64-bit integer in microseconds, the value read from <array-name>.unix_time will always be a multiple of 1e-6. This resolution should be succicient for all sampling rates achievable with an MKT-View (a few kHz).
At the time of this writing (2018-11), a few DSP functions were planned for the MKT-View IV, which operate on arrays, and automatically adjust the timestamp to compensate the group delay of a digital lowpass filter (etc), which may be important when displaying multiple channels in a Y(t)-diagram.
Examples for the use of arrays
An example demonstrating the use of arrays can be found in the test
application "ScriptTest4.cvt" (contained in the installer, subfolder 'programs').
A more sophisticated example using arrays of constants and variables is in
the 'quadblocks' demo.
Another example with arrays used for signal analysis (FFT),
displayed as diagrams is in application programs/DAQ_Test.cvt.
The application script_demos/diagrams.cvt
uses arrays to store polygon coordinates plotted into diagrams.
To efficiently convert byte-arrays into strings, use the constructor
string( <byte-array>, <start index>, <length> ).
This way, even without slicing the array, a part of the array can be converted
into a string. This is typically used when processing data from a receive-buffer (byte array)
as strings.
Operators
The script language uses almost the same numeric operators as the UPT display interpreter (even though the internal evaluation of those operators are totally different - see the chapter about bytecode if you are curious about the details). At the time of this writing (2013-11-08), the following operators have been implemented :
| Operator | Alias | Precedence | Remarks |
| ** | 5 (highest) | Exponentiation (e.g. A ** 2 = 'A squared', similar to Math.pow() ) |
|
| * | 4 | multiply | |
| / | 4 | divide | |
| % | MOD |
4 | modulo (remainder). For floating-point values, use Math.fmod instead. |
| + | 3 | add | |
| - | 3 | subtract | |
| << | SHL | 3(?) | bitwise shift left |
| >> | SHR | 3(?) | bitwise shift right |
| == | = (*) |
2 | compare for 'equality' |
| != | <> |
2 | compare for 'not equal' |
| < , > , .. | 2 | other compare operators | |
| || | 1 (lowest) | logical (boolean) OR | |
| && | 1 | logical (boolean) AND | |
| | | BIT_OR |
1 | bitwise OR |
| & | BIT_AND | 1 | bitwise AND (a binary operator) |
| ^ | EXOR | 1 | bitwise (!) EXCLUSIVE-OR |
! |
NOT |
1 | boolean negation |
| ~ | BIT_NOT |
1 | bitwise NOT (complement) |
| addr(variable) | & (prefix) | 1 | Retrieve the address of a variable |
| (data type) | 1 | explicit typecast | |
| ++ (suffix) | 1 | post-increment | |
| -- (suffix) | 1 | post-decrement | |
| := | Assignment, e.g. A := B; // copy 'B' to 'A' (*) |
- (*) Avoid using a single '=' character as the 'compare-equal' operator. You should also avoid using the single '=' character as the assignment operator.
-
- Suggestion to resolve this ambiguity :
-
Use ':=' to assign a value (right of the operator) to a variable (left of
the operator). This operator is borrowed from PASCAL.
Use '==' to check for equality. This operator is borrowed from the "C" programming language (which also inspired Java many years later).
-
Without this, the compiler would have to guess if '=' means "assign" or "compare
for equality". It usually makes a correct guess, at least in the obvious
cases.
-
- In case of doubt about operator precedence, use parentheses. Don't leave anything to fate ! Especially for the bitwise and boolean "AND" and "OR" operators, there are no different precedence levels (there is no "AND" before "OR" as in 'C' yet), so you are forced to use parenthesis in cases like this:
-
Warning := EngineRunning AND ( ( WaterTemp < 5
) OR ( WaterTemp > 95 ) )
The 'address taking operator' ('&' or 'addr')
The ampersand, when used as unary operator, takes the address of the object right next to it. This is similar as the 'address taking operator' in the "C" programming language:If 'MyVariable' is the name of a variable (local or global), then &MyVariable retrieves the address of that variable in memory.
This operator is typically used when passing arguments to functions by reference rather than by value (i.e. pass the address of something to a subroutine instead of passing a copy of the value itself on the stack).
For example, see inet.recv() . The 'output arguments' are in fact addresses, thus the name of variables must be prefixed by the address-taking operator in this special case.
We suggest to use the more descriptive 'addr()'-operator instead of the ampersand. Both 'address taking' operators have the same purpose.
- Note:
- When passing arrays as function argument, address-taking operators are not required, because arrays are generally passed by reference (avoids wasting CPU time).
Increment- and Decrement-Operator ('++', '--')
The '++' operator, when used on the right side of an integer variable inside an expression, increments the value of the variable after retrieving the current value.This is similar as the 'post-increment operator' in the "C" programming language.
In a similar fashion, '--' decrements the value of the variable after retrieving the current value.
Example:
j := i++; // first copy 'i' to 'j', then increment 'i' by one
      j := i;   // copy 'i' to 'j'
      i := i+1; // increment 'i' by one
One of the examples for the append() command also uses the '++' operator to append data to an array:
TxBuffer[TxByteIndex++] := 0x00; // append another ZERO BYTE
Back to the overview of operators .
User-defined functions and procedures
Procedures should replace the ancient 'gosub-return'-subroutines.
Their main purpose is to give a script a cleaner structure,
allow parameter passing (through a well-defined
argument list after the procedure name),
and allow recursive algorithms (by virtue
of local variables on the stack). Details about efficiently passing arrays
to functions or procedures, see chapter 4.6.
Unlike user-defined functions,
procedures do not return a value directly to the caller, and thus
cannot be used in expressions.
User-defined procedures
Here is a simple example for a user-defined, recursive
(*) procedure which prints a decimal number
to the text screen (taken from the TScreenTest
example).
Please note the indentation between 'proc' and 'endproc', and use a similar
coding style in your own scripts. The compiler
doesn't care for these leading spaces, but they make the sourcecode much
easier to read.
      //--------------------------------------------------------

      proc
      PrintDecimal( int i )

        // Simple RECURSIVE procedure to print a decimal number .

        if( i>10 ) then

            PrintDecimal( i / 10 );    // print upper digits, recursively

        endif;

        print( chr( 48 + (i % 10) ) ); // print least significant digit

      endproc; // end PrintDecimal()
Example to call the procedure defined above (explained in the chapter about recursive calls) :
N := 123456;

      PrintDecimal( N );  // call user-defined procedure
Internally, shortly before the call of the procedure, the value of N is read,
pushed to the stack. The procedure (or function) uses the value on the stack
like a local variable. Inside the procedure, 'i' (=name of the local variable,
here: function argument) has its own storage location for each new call.
If you're interested in the details: The virtual machine which executes the
script code uses a register called BP (base
pointer) to access function arguments as well as local variables.
In contrast to the rule 'exactly one line of sourcecode per instruction', the headline of a user-defined procedure or function (~~ 'function prototype' in "C") may extend over more than one line of sourcecode. Example (from the 'TimeTest' demo) :
 //--------------------------------------------------------

      proc SplitUnixSeconds(

              in int unix_seconds,
      // one input, six outputs...

              out int year,
      out int month, out int day,

              out int hour, out int min, out int sec )

      // Procedure to split 'Unix Seconds' into

      // year (1970..2038), month (1..12), day-of-month (1..31),

      // hour (0..23 ! ), minute (0..59), and second (0..59) .
4.8.2 User-defined functions
User-defined functions work almost the same as user-defined procedures. The
main difference is that a function returns a value to the caller.
Simplistic example: User-defined function to add two integer values.
      //--------------------------------------------------------

      func Sum2( int a, int b) // adds two integers,
      returns the sum

         return a+b;

      endfunc;


      Summe := Sum2( 1, 2 );   // invoke the user-defined function
Note that the function header doesn't specify a type for the return value
! The reason is just a future plan:
Script functions may return different types of results, similar to JavaScript
(not Java).
In a user defined function, the 'return' command, followed
by a value, will return to the caller with the specified value as the function's
"result" (aka "return value").
If the program counter reaches the end of a function ("endfunc") without a 'return' instruction, the function returns 0 (zero) as an integer value.
Functions with certain 'special names' can be called as event handlers. In that case, the function call will interrupt the normal program flow (at any point), and the event-handler's return value defines whether the event shall be processed by the system (using the system's default message handler) or not.
You will find other (less simplistic) user defined functions and procedures in the script examples.
Invoking script functions through a backslash sequence from a display page
User-defined functions (written in the script language) can be invoked from a display page, to replace the text in one of the display page's format strings. For the display interpreter, the function call must be embedded in a backslash sequence in a display format string (so the display interpreter recognizes it as a function call, not ordinary text).
- Syntax (in the format string of a display line definition):
-
\script.<function_name>(<arguments>)
where <function_name> is the name of a user defined function (defined in the script language);
and <arguments> are the arguments passed to the function. The number of arguments, and their data types, must match the called function - see example below.
- Example (for the format string in a display page definition):
-
\script.GetText(123)
where GetText is the name of a user-defined function, written in the script language, which takes an integer argument (here: a 'text reference number') as input, and returns a string. The maximum string length returned to the display-interpreter this way is 1024 characters (limited by the display's static string types, not by the script language). This example is based on the 'multi language demo' (script_demos/MultiLanguageTest.cvt) :
//------------------------------------------------------------

     func GetText( int ref_nr ) // User defined function
     .

     // Returns strings in different languages .

     // Input: ref_nr = reference number for a certain text,

     //        may run from zero to 9999 .

     // Currently selected language in variable 'language',

     //    which may be 10000(=LANG_ENG) or 20000(=LANG_GER), etc.

       select( ref_nr + language )
....
case #(123 + LANG_ENG): return "onehundredandtwentythree";
case #(123 + LANG_GER): return "Einhundertdreiundzwanzig";- ....
else: return "missing translation, ref_nr="+itoa(ref_nr);endselect;
endfunc; - ....
Note: Similar as for event handlers, the function invoked from a backslash sequence should return 'as fast as possible' to the caller. Long loops, file I/O, and other slow operations must be avoided. Otherwise the device would appear to be non-responsive (or, from the operator's point of view, "reacts sluggish" or even "crashes"). A watchdog in the runtime system terminates the function call, if the function doesn't return to the caller within a few hundred milliseconds (time specified in the chapter about event handling). This also applies to functions invoked from the display interpreter via backslash sequence, etc. Such a limitation does not exist in the normal script context ("main loop"), due to the pseudo-multitasking. If the maximum time is not sufficient for whatever-your-function-needs-to-do, and if nothing else helps, you can avoid this by feeding the watchdog in the script yourself - but beware of the consequences (sluggish response to user actions, protocol timeouts, etc).
See also: More about interaction between script and display application :
- Accessing display variables from the script
- Accessing script variables from the display interpreter
- Invoking script procedures from the display interpreter
Invoking script procedures from the display interpreter
In a few rare cases, you may need to invoke a procedure (or a function) written in the script language from a display interpreter commandline. For example, call your script from the 'Reaction' of a programmable button:- Definition of a button (in the UPT display application):
-
\btn($2,"German",60,script.SetLanguage(LANG_GER))
The prefix 'script.' tells the
display interpreter that a procedure
(or a function) written in the script language shall be called.
In the example shown above 'SetLanguage' is the name of a user-defined procedure,
called when the button is pressed.
There a some restrictions of 'what may be done' in a procedure (or function)
called from the display interpreter. Most important: The procedure must not
block the caller for more than a few dozen milliseconds, as explained for
Event Handlers written in the script language.
Reason: In contrast to the normal script execution, the display interpreter
cannot 'wait for a long time' when updating a display page, or checking for display-events
- the system would seem to 'freeze' from the operator's point of view.
For details about the maximum time spent in the called function, see system.feed_watchdog.
A complete example can be found in the
'Multi-Language-Test'.
See also: More about interaction between script and display application :
- Accessing display variables from the script
- Accessing script variables from the display interpreter
- Invoking script functions from display pages (to retrieve a text for the display, used a backslash sequence in the display element's format string)
- Event handling in the script language (as a replacement for the 'events' defined in the UPT display pages)
Input- and output- arguments
By default, all parameters in a procedure's (or function's) argument list are "inputs", which means the procedure can read their value, but cannot modifiy the value in the caller's variable. Only arguments after the keyword 'out' in the formal argument list may affect the caller's variable. Arguments declared as 'in' (input), or without in / out, cannot affect the caller's variables in any way (last not least because the script language doesn't support pointers or call-by-reference yet). Example :
proc AddInteger( in int A, int
      B, out int Result )

        Result := A + B;

      endproc

      ...

      var

        int N;

      endvar;

      AddInteger( 1,2, N ); // CALL of the procedure. Output copied to 'N' when returning .
The 'in' keyword was only added for clarity, to emphasize that an argument is NOT an 'output' but 'input' (read-only from the procedure's point of view) .
Note that the parameter passing mechanism for arguments declared with
the 'out' keyword doesn't have anything to do with pointers,
or 'call-by-reference' as known from other programming languages. In fact, arguments
declared as outputs are 'written back' to the variable (from which they were
read before the call) by the caller ! This has the side effect that
the modified output value does NOT have an effect on the caller's variable
until the procedure (or function) returns. In other words,
all 'outputs' become effective at the same time --- in the moment the function
/ procedure returns to caller !
Recursive calls
In this context, a recursive call means that a procedure (or user-defined function) may call itself ... as long as there is sufficient stack memory available. For each call instance, a new set of local variables (which includes the parameters in the argument list) is allocated on the stack, and freed when the procedure (or function) returns to the caller.
To understand recursive function calls, look at the
PrintDecimal example from a previous
chapter again :
proc PrintDecimal( int i )

        if( i>10 )

          then PrintDecimal( i / 10 );

        endif;

        print( chr( 48 + (i % 10) ) );

      endproc;
In a sample call, PrintDecimal( 123456 ), the first instance is created with
i = 123456 (as a local variable on the stack). Because 'i' is greater than
ten, the procedure calls itself ( = recursion ! ) with i = 12345 . For the
second (recursive) call, a new instance is created, occupying additional
stack space. In that instance, 'i' is still greater than ten, so the recusion
continues, until 'i' is less than ten (actually, it will be one then, which
is the most significant digit, which is printed to the screen first). This
results in the following 'call history' ( -> means
"calls", <- means "returns to caller" ) :
PrintDecimal( 123456 )

        -> PrintDecimal( 12345 )

            -> PrintDecimal( 1234 )

                -> PrintDecimal( 123 )

                    -> PrintDecimal(
      12 )

                        ->
      PrintDecimal( 1 )


       (no further recursion; prints "1")

                        <- (procedure
      returns to the caller)

                       (caller now
      prints 12 modulo 10 = "2")

                    <-

                   (caller now prints 123 modulo
      10 = "3")

                <-

               (caller now prints 1234 modulo 10 = "4")

            <-

          (caller now prints 12345 modulo 10 = "5")

        <-

       (first instance finally prints 123456 modulo 10 = "6")

      <-
Recursive calls can also involve more than one procedure, calling each other.
Even though they may be an elegant solution in some cases, their
stack usage is hard to predict. So, in many
cases, loops and similar constructs (see next chapter) are a better, more
'robust' alternative.
Program flow control
The script language supports program flow commands like- if..then..else..endif
- for..to.. [step] .. next
- while .. endwile (checks the condition at the begin of the loop body)
- repeat .. until (checks the condition after the loop body, i.e. loop runs at least once)
- select .. case .. else .. endselect
-
goto (jumps to a label within the same function ... please forget about line numbers!) -
gosub .. return (deprecated, use procedures wherever possible) - stop : stops the execution of the script's "main program". Only special calls (from event handlers) are possible after this command.
-
end_script : Optional text marker for the "end of the main script".
Generates a special bytecode instruction which (at runtime) prevents the
program counter from unintentionally running into the first subroutine (procedure or function).
If this marker isn't explicity specified, the script compiler will generate it automatically
(bytecode instruction inserted before the first implementation of a function or procedure).
Note: As in BASIC and IEC 61131 "structured text" (and in contrast to languages like "C" and Java), built-in commands and keywords are case-insensitive. Some users prefer to write keywords in all UPPER CASE. See notes about case-insensitivy and recommended coding style.
In the broader sense, user-defined functions and procedures are also suitable (very suitable) to control the program flow. Since the introduction of procedures and functions, you should not use 'goto', 'gosub' and 'return' in a new appication. They only remain part of the language for backward-compatibility.
if-then-else-endif
Simple example:
if A<100 thendo_something_if_a_is_less_than_onehundred; ... elsedo_something_else; ... endif;
In contrast to the rule 'exactly one line of sourcecode per instruction', the condition between if and then may extend over more than one line of sourcecode. This allows complex and nested constructs as presented in the 'examples' section of this document.
To simplify a chain of 'else','if' and 'endif', the 'elif' (else-if) command can be used as in the following example:
      if ( A < 0 ) then
          print( "Negative !");
      elif ( A==0 ) then
          print( "Zero");
      elif ( A==1 ) then
          print( "One");
      elif (A >= 2) and ( A <= 3 ) then
          print( "Two to Three");
      elif (A == 5) or (A == 7) then
          print( "Five or Seven");
      else
          print( "Some other value (",A,")" );
      endif;
for-to-(step-)next
This construct impements a loop using an index variable, which runs from the specified start value to the specified end value.Simple example:
 for Loop:=1 to 100

        do_something_a_hundred_times

      next Loop;
The name of the loop variable (in the above example: 'Loop') after the keyword 'next' may be omitted,
but it's recommended to improve readability (especially with deeply nested loops).
If the name of the loop variable is specified after 'for' as well as after 'next',
the compiler can check if there is a matching 'next' for each 'for'.
When using the option '#pragma strict', the compiler shows
a warning if the name of the loop variable is not specified after 'next'.
Optionally, the stepwidth of the index variable can be specified, using the STEP keyword:
 for Loop:=0 to 200 step 2

        do_something_a_couple_of_times

      next Loop;
If the counter-variable shall be decremented rather than incremented, use a negative STEP value (the compiler cannot use a negative stepwidth automatically, because he doesn't see the start- and end value at compile time). For more examples, study the 'LoopTest' application.
while..endwhile
Syntax:
 while <condition>

        <statements>;

      endwhile;
Loops while the condition, checked at the beginning of each loop, is TRUE (non-zero) .
Simple example:
 I:=0; // make sure 'I' starts at some defined value

       while I<100

        I := I+1 ;

        some_other_statements ;

      endwhile; // .. or END_WHILE for IEC61131-similarity
Note that the statements inside a while - endwhile loop may be executed ZERO times (if the condition is initially FALSE).
With the condition set to 1 (one, i.e. 'always TRUE'), while(1) .. endwhile forms an endless loop.
As in the example from the introduction, this is often used for the 'main loop' in the script.
In such cases, the loop speed should be limited by calling wait_ms(50), which means
the script waits for 50 milliseconds in each loop, during which the display is updated.
Otherwise, the script would waste a lot of CPU time in the loop.
repeat..until
Syntax: repeat
<statements>;
until < stop_condition >;
Loop with a STOP-condition, checked at the end of the loop (specified after the keyword "until" ).
Example:
 I:=0; // make sure 'I' starts at some defined value

       repeat

        I := I+1;

        some_statements

      until I>=100;
Note that the statements inside a REPEAT-UNTIL loop are executed at least once !
goto
Unconditional jump. Try to avoid using 'goto' whereever possible ! Using too many goto instructions in your code will turn it into a difficult-to-maintain nightmare, aka 'Spaghetti-Code'. Or, as Niklaus Wirth put it, "GOTO Considered Harmful" . To discourage the use of 'goto', it usually doesn't not work inside user-defined functions and procedures.Simple, and deliberately poor, example:
if divisor==0

        then goto ErrorHandler;

        else quot := dividend / divisor;

      endif;
... some other code in the same subroutine ....
ErrorHandler: // we shouldn't get here...

        Info$ := "Something went wrong";

        STOP
gosub..return
Simple subroutine call without parameter passing. Deprecated, see note below (use procedures instead of 'gosub' / 'return') ."Gosub" works a bit like "goto", but places the address of the next instruction to be executed (in the caller) on the stack.
"Return" returns to the address on the top of the stack, i.e. continues execution at the caller's next instruction.
Note: Unlike user-defined procedures,
stoneage gosub-return subroutines don't have their own stack frame; therefore
you cannot define local variables in such subroutines.
Wherever possible, use procedures,
and avoid gosub-return (as well as you should avoid 'goto'). 'Gosub'
only exists for compatibility reason.
select..case..else..endselect
This construct may replace a long nested sequence of if-then-else statements,
but only compares INTEGER- OR STRING CONSTANTS in the case-marks.
In contrast to "C", the 'case' construct supports an extended syntax.
A complete range of values can be specified as "case <Value1> to <Value2>".
The code after that case-label is executed if the select-value is between (and including) 'Value1' and 'Value2'.
Thus, "case 4 to 6:" in the following example checks if 'X' is 4, 5, or 6.
Simple example using a bit of pseudo-code ("do_something") :
 X := can_rx_msg.id;
 select X
    case 1 :      do_something_if_X_equals_one();
    case 2 :      do_something_if_X_equals_two();
    case 3 :      do_something_if_X_equals_three();
    case 4 to 6 : do_something_if_X_is_between_four_and_six();
    else   :      do_something_if_X_is_none_of_the_above();
 endselect;
Important: In contrast to the "C" programming language, there is no 'break' statement
required at the end of each case-block, if the case-block is not empty.
The program doesn't "fall through" from one case to the next, with the exceptions listed below:
-
If there are two or more case marks, with nothing in between
(empty case-block with no 'executable instruction'),
the first statement after the case-marks is executed.
Here is a (rather braindead) example:
select X
   case 1 : // same handler for cases 1, 2 and 3 ...
   case 2 : // with no code between cases, 'fall through' as in "C".
   case 3 : // We could use "case 1 to 3" here instead
            print("X = One,Two,or Three");
   case 4 : print("X = Four");
   else   : print("X is less than one, or larger than four");
endselect;
-
The keyword 'enter_next_case' at the end of a case-block
forces "fall through" into the next case (as the "C" programming does by default):
Output:for A:=0 to 6 print("A=",A,": "); select A case 4 : // "fall through" from one case to the next .. case 5 : // .. only if there is nothing in between print("four or five."); case 3 : print("larger than two, "); enter_next_case; // aka 'fall through' to the code after the next case label, as in "C" case 2 : print("larger than one, "); enter_next_case; case 0 to 1 : print("non-negative."); else : print("negative, or larger than five."); endselect; print("\r\n"); // carriage return + new line (-> nächste Zeile) next A;
A=0: non-negative.
A=1: non-negative.
A=2: larger than one, non-negative.
A=3: larger than two, larger than one, non-negative.
A=4: four or five.
A=5: four or five.
A=6: negative, or larger than five.
If a case-mark without following executable code
shall actually 'do nothing', use the break statement.
When used inside a select-endselect block, break actually jumps
to the next endselect. Example:
-
 select X

       case 1 :

          break; // do nothing

       case 2 :

          break; // do nothing as well

       case 3 :

          print("X = Three");

       case 4 :

          print("X = Four");

       else   :

          print("X is less than one, or larger than four");


     endselect;
A simple example for the select-case construct is in the display application 'ScriptTest1.cvt'.
A longer example for the select-case construct is in the display application 'ScriptTest3.cvt'.
A 'case' mark isn't restricted to integer constants - it also support strings. In the demo application to read INI-files, this possibility is used to branch by the names of 'Sections' and 'Keys' in an INI file, which is read sequentially from the memory card.
The applications mentioned above are contained in the programming tool's installer.
wait_ms .. wait_resume
Waits for "something to happen", while the CPU can perform other tasks (like updating the display).
- wait_ms( N )
-
blocks the normal script execution for the specified number of milliseconds
(N) .
While the script is 'waiting', the normal display program runs faster because all CPU time can now be used for the display.
Without waiting in the main loop (endless loop), script and display-update would still run side-by-side, but the script's main loop would consume an unnecessarily large amount of CPU time.
Recommended waiting intervals (for the script's main loop) are 10 to 50 milliseconds.
Do NOT call wait_ms() from event handlers and other 'interrupt-alike' functions !
See also: system.timestamp.
- wait_ms(0) : Special case to 'give the CPU to someone else', e.g. an event handler.
- With a delay of "zero milliseconds", wait_ms() lets the system handle any pending
timer event (etc), similar to co-operative multitasking.
The purpose of wait_ms(0) is similar to sched_yield() in Linux, or Sleep(0) in the windows API.
It is intended to be called from the main loop to reduce the latency of timer events. Example:
Note: wait_ms(0) will not wait for a display update (which could consume dozens of milliseconds).while( ! file.eof(fh) ) // repeat until end of file... temp := file.read_line(fh); // read next line of text ImportFromCSV( temp ); // process text line from CSV (may take some time) wait_ms( 0 ); // let event handlers work (co-operative multitasking) endwhile;
- If no timer event is pending, and the previous call of wait_ms(0) is less than 10 ms ago, wait_ms(0) will do nothing.
- wait_resume
-
lets the blocked script continue, even if the interval specified in the wait_ms command has not expired yet.
Because the normal script execution is blocked, the only place where wait_resume makes sense is an event handler.
See also: system.timestamp, Contents, Keyword List, Quick Reference .
Other functions and commands
In addition to the program flow control commands from the previous chapter, the script language also contains functions and commands for special purposes.
Some of them will be explained in this chapter, while others (like the obvious math functions; random; etc) are only mentioned in the keyword list .
See also: Contents ,
string processing,
file I/O functions,
CAN bus functions, screen
output, system functions,
date- and time conversions,
User-defined functions and
procedures .
Numeric functions, "Math", and digital signal processing
Most of the functions and procedures listed below can process integer or floating point values.Data types like 'byte', 'word', and 'dword' are automatically converted to integer before processing.
See also: Numbers and numeric expressions.
Simple numeric functions
limit(variable,min_value,max_value)-
Limits the value stored in <variable> to the specified range.
This is a shorter and more efficient replacement for the following statements:if ( variable < min_value ) then variable := min_value; endif; if ( variable > max_value ) then variable := max_value; endif; random-
Returns a pseudo-random number between zero and <N> minus one.
Math.abs(x); Math.abs(x,y)- Returns the absolute value, or (with two arguments) the length of a 2d-vector.
Implements the formula abs(x,y) := sqrt( x ** 2 + y ** 2 ) .
Together with Math.atan2, Math.abs is used to convert cartesian into polar coordinates.
Math.atan2(y,x)-
Returns the four quadrant arctangent value in radians.
This function is often used to convert cartesian into polar coordinates, without the need for case distinctions of the ancient 'atan' (where only y/x was passed as argument, which was very unpractical). Details at Wikipedia on atan2.
Math.fmod(x,y)-
Returns the floating point remainder of x/y.
If both arguments are integers, use the modulo-operator ( % ) instead.
Math.log(x)-
Returns the natural logarithm (base 'e') of 'x'.
Math.log10(x)-
Returns the base 10 logarithm of 'x'.
Math.pow(base,exponent)-
Returns 'base' taken to the power of 'exponent', similar as the operator 'base' ** 'exponent'.
Both inputs, and the return value, are floating point numbers (float or double, depending on the target CPU's capabilities).
Example (from script_demos/MathTest.cvt): f := pow( 2.0, 0.5 ); // actually the square root of two
Math.sqrt(x)-
Returns the square root of 'x'.
'x' must be a non-negative floating point number.
Math.sin(x)-
Returns the sine of argument (angle) 'x'.
'x' must be a floating point number. The unit is radians (not degrees) !
Math.cos(x)-
Returns the cosine of argument (angle) 'x'.
'x' must be a floating point number. The unit is radians (not degrees) !
Advanced math functions for digital signal processing
The following functions are only usable (i.e. "are fast enough for real-time processing") in devices with a hardware floating point unit, e.g. MKT-View IV. To find out if these functions are available for a certain device, please check the Feature-Matrix (column titled "Specials", "DSP functions").Math.cfft(input,output)-
Forward Fast Fourier Transformation with complex in- and output.
The input may be a array with 256, 512, 1024 or 2048 floating point elements (must be a power of two).
The output must be an array with the same size as the input. Example:float fltFFTin[1024]; // FFT input (complex time domain samples, aka I/Q signal) float fltFFTout[1024]; // FFT output (complex frequency bins) ... Math.cfft( fltFFTin, fltFFTout ); // Fast Fourier Transform with complex in- and output
real part of 1st sample, imaginary part of 1st sample,
real part of 2nd sample, imaginary part of 2nd sample, ... .
If the input signal had been acquired with 10000 samples per second, the complex FFT in the example shown above would deliver a spectrum with 512 complex 'frequeny bins'. Each bin represents a narrow frequency band, approximately 10000 Hz / ( 2 * 512 ) = 9.8 Hz wide.
See also: Math.rfft (forward FFT with real input), Math.ComplexToMagnitudes, data acquisition .
Recommended reading about the FFT and DSP in general :
The Scientist and Engineer's Guide to Digital Signal Processing by Stephen W. Smith.
Math.rfft(input,output)-
Forward Fast Fourier Transformation with real input, and complex output.
The input may be a array with 2^N floating point elements (size must be a power of two).
Even a 'real FFT' produces a complex result (complex spectrum of the input signal) ! For example, a real FFT with 1024 input samples in the time domain produces 512+1 complex frequency bins. With two array elements per complex frequency bin, the output array must be at least the same capacity:
   float  fltFFTin[1024];    // FFT input (real time domain samples)
   float  fltFFTout[1024+2]; // FFT output (complex frequency bins, with 'Nyquist bin')
     ...
   daq.read_channel( 7, fltFFTin );  // read input for the FFT from the DAQ into an array
   Math.rfft( fltFFTin, fltFFTout ); // Fourier Transform with real input, complex output
Math.ComplexToMagnitudes(input,output,reference)-
Converts an array with complex value pairs (typically the output from an FFT, i.e. complex spectrum)
into "Decibels" of any flavour. The 'reference' value (scalar) can be used to adjust the 'dB' output
to include the gain of a sensor (e.g. sound pressure level), and to compensate the FFT 'gain' (which
depends on the FFT length as explained further below).
In the 'DAQ-Test' application (programs/DAQ_Test.cvt), this function is used to convert a complex spectrum into dBfs (*) for a combined spectrum/spectrogram display in a diagram with background image:... Math.rfft( fltFFTin, fltFFTout ); // forward FFT with real in- and complex output ref := 32767.0 * C_FFT_SIZE; // reference for 0 dBfs (*) from 16-bit A/D converter Math.ComplexToMagnitudes( fltFFTout, fltLogSpectrum, ref ); // logarithmize spectrum (-> dB)
- (*) dBfs : "decibel over full scale"
- 0 dBfs is the magnitude where the peaks of a single, pure sine wave would just touch
the clipping point at the input of the A/D converter (here, a 16-bit converter with an output
range of +/- 32767 - thus the left factor in the reference value).
A pure sine wave with amplitude A, fed into a FFT with <C_FFT_SIZE> samples in the time domain, will give a peak in the frequency domain of A * C_FFT_SIZE (!) - thus the second part (factor) in the reference value.
For each complex value pair (re,im) in the input, Math.ComplexToMagnitudes() performs this operation :
output[i] := 20 * log10( sqrt( re^2 + im^2 ) / reference ); // principle - not the implementation
Timers and Stopwatches (in the script language)
Timers to fire events or periodic intervals
The command setTimer starts a timer in the script language, for example:
      var
        tTimer timer1;  // Declare an instance of a timer as a global variable of type 'tTimer'
      endvar;
         ...
      setTimer( timer1, 200 ); // Start 'timer1' for a 200-millisecond interval,
                               // here without a timer event handler
         ...
      if ( timer1.expired ) then
        timer1.expired := FALSE;  // clear the 'expired' flag; will be set again 200 ms later
        system.beep( 1000, 1 );   // short beep (1000 Hz, 1 times 100 ms duration)
      endif;
Regardless of when exactly the 'expired'-Flag has been cleared by the application (as in the above example), the timer keeps running synchronously in the background.
As optional third parameter, 'setTimer' accepts the address of a Timer Event Handler. Any number of timer event handlers can be implemented in the script language, and (if a handler's address is passed to 'setTimer') the handler will be invoked periodically. Details about that in the chapter about Timer-Events.
See also: wait_ms(), system.ti_ms, system.unix_time, StartStopwatch(), ReadStopwatch_ms() .
StartStopwatch / ReadStopwatch (simple interval-polling 'stopwatch' timers)
In some cases, the timer described in the previous chapter (using setTimer( tTimer ) ) is certainly 'Overkill'.
If all you need is measure the time (in milliseconds) between to actions (or script operations),
with out firing events, you can use a simpler alternative described below.
It works like simple old-fashioned stopwatch on a running track:
- when the runner passes the start point, start the stopwatch. In the script: call StartStopwatch();
- when the runner reaches the track's end, read the time from the stopwatch: ReadStopwatch_ms() returns the number of milliseconds.
(a stopwatch doesn't need to be "stopped" just to read it - in contrast to a bulky dot-net-component, we can read it on-the-fly)
In this case, you can have as many stopwatches running 'simultaneously'. In fact, each of these stopwatches requires one integer variable, in which the script stores the 'start time'. A running stopwatch doesn't cost any CPU time (only starting and reading it consumes a few microseconds, which is neglectable) :
- by calling StartStopwatch( < Integer-Variable > ), the current value of the timestamp generator (system.timestamp) will be copied into the specified value (passed in 'by reference', i.e. address).
- when calling ReadStopwatch_ms( < Integer-Variable > ), the system first calculates the difference between the current timestamp generator value and ("minus") the value stored in the integer variable, and converts it into milliseconds.
Example:
 var
   int MyStopwatch;  // Declare a simple (but global) integer variable
 endvar;
    ...
   StartStopwatch( &MyStopwatch );
   Do_Something();
   if( ReadStopwatch_ms( &MyStopwatch ) > 500 ) then
       print("Surprise: 'Do_Something()' took over 500 milliseconds !");
   endif;
    ...
print, gotoxy, cls & Co (output into a multi-line text panel)
The following commands can be used to display text on a multi-line text panel
(on any of the programmable display pages, using
a "\panel" element in the display
page definition).
-
cls: "clear screen" -
Here: Clears the contents of the text "screen" buffer. Precisely, the buffer
is filled with space characters, and all cells are set to the current foreground-
and background colour. The script doesn't have direct access to the (graphic)
video RAM.
-
clreol: "clear to end of line" -
Clears the rest of the current text buffer line, beginning at the current
output cursor position. The cursor position itself is not
affected by this command.
-
setcolor(foreground,background): Set the drawing colours for following text output into the text buffer. -
Sets the colour for subsequent calls of print, cls, and clreol. You should
not use numeric colour values (because the colour codes may be hardware
dependent), but any of the colour-constants listed here,
or use rgb to compose a colour.
If any of the two colours shall not be modified, pass a negative value as function argument (e.g. -1 = "don't modify"). -
rgb( red, green, blue ) : Function to compose a colour from three components. -
Besides the colour constants (like clBlack, clWhite, etc),
this is the only recommended method to define colours in your script program.
The value range for each of the three colour components is 0 to 255, regardless
of the display's actual number of "bits per pixel". Depending on the display's
colour model, not all of the 2 ^ 24 possible colour combinations can be exactly
realized ! In such cases, the firmware will try to pick the 'best possible'
colour.
Don't assume anything about the format of the colour returned as tColor by the RGB function - it's hardware dependent ! The 'Loop Test' application uses rgb() to produce a colour pattern in a text panel. -
gotoxy(x,y): sets the text output cursor into column 'x', line 'y'. -
The first argument is the zero-based 'X' coordinate (text column, ranging from 0 to 79),
the second argument ('Y') is the text line number (ranging from 0 to 24).
For example, gotoxy(0,0) will place the text output cursor in the upper left corner of the text screen / text panel. -
print: prints a list of values (numeric and/or strings) to the text screen / text panel. -
The output cursor position (X) will be incremented for each printed character.
If the cursor reaches the end of a line, it wraps to the next.
To 'print' more than one value in a single call, separate the values in the argument list with commas, as in this example:
print("\nResults A,B,C = ",A," ",B,"
     ",C)
(Remember: backslash-n in a string constant means "new line").
For numeric values (integer or float), print always uses the shortest possible notation, without leading zeroes. If you want fixed lengths, or leading zeroes (as in date and time displayed on the screen), use the itoa function (integer-to-ascii) to convert the numbers into strings with leading zeroes and a fixed width. Example (from 'TimeTest.cvt', shows a calendar date in ISO 8601 format) :
print( itoa(year,4), "-", itoa(month,2), "-",
     itoa(day,2) );
-
tscreen: wrapper object for the 'text screen buffer'. -
-
tscreen.cell[Y][X] -
accesses the character cell in the Y-th line, and X-th column of the text
screen buffer as a tScreenCell structure.
Most built-in fonts use DOS-compatible character sets from 'codepage 437' so the text screen has limited graphic capabilities - see TScreenTest example !
-
tscreen.cell_width -
Width of a single text cell in pixels, as currently rendered on the screen.
-
tscreen.cell_height -
Height of a single text cell in pixels, as currently rendered on the screen.
If a display page was automatically scaled for a new screen resolution,
cell_width and cell_height may be different from the 'designed' values.
-
tscreen.cx -
returns the text output cursor's current 'x' coordinate (zero-based column
index).
-
tscreen.cy -
returns the text output cursor's current 'y' coordinate (zero-based line
index).
tscreen.cx and cy are read-only. To modifiy the cursor position, use gotoxy(column,line) .
-
tscreen.cs -
Cursor Shape / Cursor Style. Defines if and how the text output cursor shall be displayed.
The script can use a bitwise combination of the following constants for this purpose:
csOff (Cursor off; default), csUnderscore, csSolidBlock, csBlinking.
The VT100 Emulator example uses this feature to emulate an old-fashioned virtual terminal's cursor display.
-
tscreen.xmax -
returns the max. allowed 'x' coordinate of the text buffer (column index).
tscreen.xmax is also writeable - see details in tscreen.ymax !
The default value of tscreen.xmax is 79 (i.e. 80 characters per line, indexed 0..79). -
tscreen.ymax -
returns the max. allowed 'y' coordinate of the text buffer (line index).
Per default, tscreen.xmax is 79, and tscreen.ymax = 39; but the 'geometry' of the text screen buffer can be adjusted (within certain limits) by assigning new values to tscreen.xmax (first) and tscreen.ymax (second). Most devices are limited to the following values:
- tscreen.xmax must not exceed 99 (i.e. up to 100 characters per line)
- The product of (tscreen.xmax+1) * (tscreen.ymax+1) must not exceed 8000
(because the text screen buffer was limited to 8000 tScreenCell elements in 2013-03-20)
           tscreen.xmax := 39;  // only need 40 characters per line (index 0..39), but..

           tscreen.ymax := 99;  // 100 lines (0..99) in the text screen buffer !
Note that (unlike the two functions below), tscreen.xmax and tscreen.ymax do not depend on the visible text panel element on the current display page .
-
tscreen.auto_scroll -
This flag can be set to TRUE by the display application to enable automatic scrolling
of the text screen buffer, whenever tscreen.cy exceeds tscreen.ymax .
By default, automatic scrolling is disabled (tscreen.auto_scroll := FALSE), which causes excessive lines to get lost (not printed into the text buffer at all).
An example for an automatically scrolling text panel is in the Internet demo application.
-
tscreen.vis_width -
Returns the currently visible width (in characters) of the text screen, which
depends on the size, borders, and font of the first visible
text panel element on the
current display page. For example, if the text panel is 320 pixels
wide (without borders), and uses an 8-pixel wide fixed font, the visible
width of the text screen will be 40 characters.
-
tscreen.vis_height -
Returns the currently visible width (in characters) of the text screen, which
depends on the size, borders, and font of the first visible
text panel element on the
current display page. For example, if the text panel is 240 pixels
high (without borders), and uses a 16-pixel wide fixed font, the visible
width of the text screen will be 15 characters.
The 'QuadBlocks' demo uses this function to automatically adjust the size of the 'playing field' (actually a text panel) to the size of the screen, if the application (which was designed for a 320*240 pixel screen) is loaded into a device with 480*272 pixels.
-
tscreen.scroll_pos_x,
tscreen.scroll_pos_y
-
Contains the current horizontal and vertical scrolling position
for the display of the 'virtual' text screen on a text panel.
With tscreen.scroll_pos_x=0 and tscreen.scroll_pos_y=0, the upper left corner of the text panel will show the character in the first column (x=0), and the first line (y=0) of the virtual text screen (text buffer). An example for the usage of the scroll position can be found in the application 'ScriptTest3.cvt', function 'ScrollIntoView'. By calling the user defined function 'ScrollIntoView' in that demo, the last line 'printed' into the text buffer is made visible, by bringing the scroll-position close enough to the current cursor position. By virtue of a bargraph with 'write access', the vertical scroll indicator can even be used as an interactive control element to scroll the text manually (as far as the size of the screen buffer permits).
-
tscreen.modified -
is TRUE as long as the screen buffer has been modified, but not updated on
the LCD yet.
The script can set it ( tscreen.modified := TRUE ) to let the system redraw the (text-) screen as soon as possible, for example after modifying the screen buffer with the tscreen.cell property. The system will automatically clear this flag when a text-screen-update is 'done'. This function is also used in the TScreenTest example to force an update of the screen, and to find out if (and when) the screen has been updated.
-
- Note:
-
The output will be 'printed' into the text buffer for a multi-line text panel.
If no such panel is visible on the current display page, you will not see
it on the screen immedately. But despite that, the text will become visible
(immediately without further print-calls) as soon as the display program
switches to a page which contains a 'Multi-Line Text Panel'.
In the programming tool, the contents of the text screen buffer can be displayed in der right half of the Script tab. In the combo box in the upper right corner, select 'Show buffer for Text Panels' instead of 'Hide debug view'.
To create such a text panel (in the definition of one of your display pages), enter the backslash sequence panel in the format string column on the display page definition tab, or change the type of an already existing display line from 'Text' (which means a single-line text display) to 'Multi-Line Text Panel'.
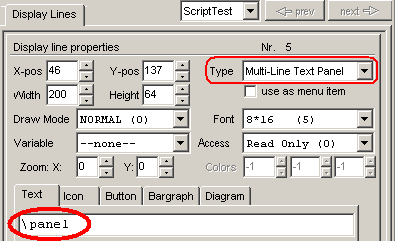
Definition of a text panel on a display page
The colour of the character cells inside the text panel is controlled by the script, not by the display page definition. Each character can have its unique foreground- and background colour. The sample application 'LoopTest' contains an example which uses foreground- and background colours composed with the rgb() function. The example 'TScreenTest' uses the text array as the 'playfield' for a simple video game ('snake' moving on the screen, controlled via cursor keys), which requires read- and write-access to the characters in the text buffer, without modifying the colours.
See also: multi-line text panel in
the display page definitions (external link, only works in the HTML-based
help system, not in a PDF document).
Canvas functions (painting on a tCanvas)
Rudimentary 'canvas' painting functions were already implemented at the time of this writing,
but still in an early state - too early to be described here.
Please check the online version
of this file for the most recent information about painting on a canvas.
Objects of type tCanvas must be declared as global variables,
i.e. between var and endvar in the script.
Only in that case, they will be recognized by the programming tool, and their names listed
where applicable (e.g. as background image in diagrams and similar display elements.
Example from application 'DAQ-Test.cvt', where a tCanvas (name "spectrogram") is used as a diagram's background image:
var
   tCanvas spectrogram; // graphic time / frequency representation of spectra ("waterfall")
     ...
endvar;
Because the size of a display element (and thus the size of the canvas) may be automatically scaled to the
display's physical resolution, it's good practice to use the object's width and size property whenever the script
paints something into the canvas. This way, your application will still work fine when loaded into a device
with a larger screen (e.g. original design for MKT-View III with 480 * 272 pixels, scaled to 800 * 480 pixels
when loaded into an MKT-View IV).
Pixel-wise access (tCanvas method)
The method pixel[Y][X] can be used to access individual pixels in the entire canvas (tCanvas). This is the most simple, but also the slowest way to manipulate the image in a canvas. Example :
   for y:=0 to spectrogram.height-1  // spectrogram: variable of type tCanvas
      for x:=0 to spectrogram.width-1
          spectrogram.pixel[y][x] := rgb(x,y,x+y);
      next x;
   next y;
Filled rectangle (tCanvas method)
rect(x1,y1,x2,y2,c) fills the rectangle between x1/y1 (upper left corner) and x2/y2 (lower right corner) with the specified colour (c).Horizontal scroll (tCanvas method)
hscroll(x1,y1,x2,y2,n) horizontally scrolls the rectangular area between x1/y1 and x2/y2 by the specified number of pixels (n).With n<0, hscroll scrolls left (towards decreasing 'x' coords),
with n>0, it scrolls right (towards increasing 'x' coords).
Vertical scroll (tCanvas method)
vscroll(x1,y1,x2,y2,n) vertically scrolls the rectangular area between x1/y1 and x2/y2 by the specified number of pixels (n).With n<0, vscroll scrolls up (towards decreasing 'y' coords),
with n>0, it scrolls down (towards increasing 'y' coords).
Example from application 'DAQ_Test.cvt' :
   xmax := spectrogram.width-1;  // spectrogram: variable of type tCanvas
   ymax := spectrogram.height-1;
   spectrogram.vscroll( 0,0, xmax, ymax, 1/*scroll DOWN by one pixel*/ );
File I/O functions
... are only implemented on systems with a suitable hardware - not necessarily a memory card slot, because the file I/O functions can also access other media (for example, a ramdisk in some devices, or a part of the built-in data FLASH memory in other devices). All file access functions begin with the keyword 'file.' to avoid namespace pollution. The file I/O functions in the script language may have to be unlocked before use (at least on devices like MKT-View II).
File I/O function overview (follow the links for details) :
- file.create(name, max_size_in_bytes) : creates a new file with the specified name (for write access)
- file.open(name, o_flags) : opens an existing file (only for read access)
- file.write(handle, data) : writes data to a file
- file.read(handle, destination_variable) : reads data from a file (usually 'binary')
- file.read_line(handle) : reads a line of characters from a text file, and returns it as a string
- file.seek(handle, offset, fromwhere) : sets the file pointer
- file.eof(handle) : checks for end-of-file
- file.close(handle) : closes a file, and releases the file handle .
- file.size(handle) : returns the size of an opened file, measured in byte.
- file.delete(name_or_pattern) : Deletes file(s) in certain volumes, e.g. file.delete("ramdisk/*.*").
- directory.open(path_and_mask, options) : Opens a directory to read it. Returns a handle when successful.
- directory.read(handle, dir_entry) : Reads the next entry from an opened directory. Returns TRUE when successful.
- directory.close(handle) : Closes the directory after reading it. Don't forget !
Don't miss the notes on the
pseudo-file-system about restrictions of writing and deleting files,
and how to simulate the pseudo-file-system in the programming tool.
See also: 'File Test' demo (uses most of the file I/O-functions listed above).
Most of MKT's programmable devices don't really support subdirectories or
"folders". Many devices don't even have a memory card interface built inside.
Despite that, some of the internal memory (FLASH ROM and/or RAM) can be accessed
like a file storage medium ("disk volume"). The principle of pseudo directories
is the same as used for the file transfer. In fact, files created this way
can be accessed through the
file transfer utility
or via embedded web server
:
-
"
font_flash"
This is another onboad FLASH memory chip (not a FLASH memory card) used to store user defined fonts (*.fnt), but it can be used to store a few other files, too. When creating a file in this directory, the maximum expected size must be specified in the 2nd argument of the file.create function. When closing the file again, unused FLASH sectors will be available for other files again. This also applies to the other "..._flash"-folders listed here. -
"
audio_flash"
Yet another onboard FLASH memory chip (not a FLASH memory card) used to store audio files (*.wav), but it can also be used to store a few other files.
Note: In a few devices which support audio output, but don't have an extra FLASH chip to store the digitized audio, the contents of the 'font_flash' and 'audio_flash' directory may physically be the same. Files placed in this directory can be played back using the interpreter command 'audio.play' . -
"
data_flash"
This is an internal FLASH memory chip (not a FLASH memory card) used for internal data storage (display pages, imported bitmaps, etc).
Except for an upload of a single *.upt or *.cvt file (via a modified YMODEM-protocol), this directory is not accessable. -
"
memory_card"
This pseudo-directory can be used to access the removable memory card. If this entry is missing in the pseudo root directory, the device (or firmware) doesn't support such a storage medium. The contents of the 'memory_card' folder will be empty if no card is inserted, or the card's file system is not supported.
In the programming tool, the device 'memory_card' is simulated by default as a subdirectory named 'sim_mc' (simulated memory card) on the local harddisk. The path to that device is configurable. -
"
ramdisk"
This pseudo-directory can be used to store temporary files, for example bitmap files which may be displayed on the screen without permanently saving them in FLASH memory. When creating a file in this directory, the maximum expected size must be specified in the file.create function. The ''File Test' demo uses this pseudo-disk-drive to create a text file, write a few lines into it, close it, open it for reading, and read back the lines which had previously been written. Note that all files in the 'ramdisk' get lost when the device is turned off, or switched into power-down mode.
When simulating a device (with RAMDISK) in the programming tool, the RAMDISK is emulated internally - it is not mapped into the host's (PC's) own file system ! To check the contents of the RAMDISK during a simulation, select this entry in the tool's main menu:
View .. Simulated file system .. RAMDISK .
In addition to the storage media listed above, the following devices may be accessed like files (whether they exist depends on the hardware):
-
"
serial1"
Allows accessing the device's first serial port (RS-232) like a file; at least for read- and write operations.
In rare cases, the script may need to change the serial port settings when opening it. This can be achieved by appending a string with the port settings after the pseudo-devicename, for example:
hSerial1 :=
     file.open("serial1/9600");
// try to open 1st serial port, and configure it for 9600 bits/second .
Other examples for accessing the serial port(s) from the script language can be found here ("GPS Simulator").
Like all other 'extended' script functions, accessing the serial ports (through the file I/O functions) is only possible if the 'extended script functions' (auf deutsch: "Erweiterte Script-Funktionen") have been unlocked !
If a serial port is used as a LIN bus interface, then it should not be accessed 'like a file'. Instead, to transmit and receive LIN frames, use the CAN-bus-API (Application Interface). Details in the LIN bus documentation. -
"
serial2"
Similar for the second serial port (if such a port exists, otherwise file.open("serial2") will return zero, which is an illegal handle value.
An example for accessing this particular port from the script language can be found here ("GPS Simulator").
In the 'MKT-View II', the second serial port is a dedicated port for a GPS receiver.
This is not a standard RS-232 port ! Do not try to connected it to the PC with a standard 9-pole "Null-modem cable" ! You may damage your PC, because the 9-pole GPS connector feeds the supply voltage into the external GPS receiver ! Refer to the hardware manual for details, or (if you are unable to find the hardware manual), look here (pinouts of a few 'serial port' connectors).
Important Notes on the Pseudo File System (PFS)
-
The PFS is not a normal file system (not FAT, NTFS, ext2,3,...) .
Except for the "memory_card" device, each file is stored as single contiguous
block on the storage medium, so they can be directly accessed
via pointer by the CPU - without the need to copy them, sector by sector
(at least for read access).
For that reason, certain operations (which you may know from a 'normal' file system) are impossible here:
-
For FLASH files, the expected file size must be specified upon creation .
It may be closed with a 'shorter' size later, but the file cannot 'grow' larger than the pre-allocated size while writing. - Write-operation is only possible for 'new' files (i.e. after file.create, not after file.open)
- Deleting a single file may be possible, but due to the large FLASH sector sizes (64 kByte or even 128 kByte), the space occupied by the file cannot be freed, because there may be multiple files stored in a single FLASH sector (much in contrast to a normal file system, where each file occupies at least one (disk-) sector of 512 bytes).
-
Deleting a single file in a RAMDISK cannot move the other files in memory
(because other files may be accessed via pointer for reading, as explained
above). Deleting a single file in a RAMDISK (without re-formatting the RAMDISK)
is only possible if that file is still the last file written to the disk.
For this reason, delete temporary files which your script may have created on the ramdisk as soon as possible. Deleting it 'too late' will not free the memory. - Remember that the RAMDISK is not battery-buffered: It will automatically be reformatted whenever the system is booted, and all files in it will be lost !
To simulate the various STORAGE MEDIA in the programming tool, real 'disk files' are used. The directories ("folders") used for those files can be configured on the 'Settings' tab in the programming tool. Double-click into the table to open a file selector if you need to change these entries: -
For FLASH files, the expected file size must be specified upon creation .
-
Directiories for the simulation of storage media in the programming tool- For example, to access files in the "audio_flash" folder, copy the required files into that directory, or change the directory location (inside the programming tool) to the place on your harddisk where the program tool can find the files.
It is very advisable that while developing your application, you make a list of all files which your application may need later (during runtime on the "real target"). Such files may include (but are not limited to) the following:- The display application itself (*.cvt or *.upt)
- user-defined fonts (*.fnt)
- bitmaps (*.bmp) which your application may load from a storage medium, i.e. from one of the pseudo-file folders (not the "normal" bitmaps, which are imported in the programming tool, because those icons will be saved and transferred along with your *.cvt or *.upt file)
- audio files (*.wav)
-
text files (*.txt) in different languages. For example, see the
'MultiLanguageTest': In that application, the script reads the texts from
an external file, to separate the display program and the displayed text
strings.
- Remember to backup and distribute all those files along with your application !
- For example, to access files in the "audio_flash" folder, copy the required files into that directory, or change the directory location (inside the programming tool) to the place on your harddisk where the program tool can find the files.
4.10.5.2 Creating or opening a file
- file.create(name, max_size_in_bytes) : creates a new file with the specified name (for write access)
-
If the file already exists, it will be overwritten. If it doesn't exist,
it will be created, with an initial length of zero.
The second parameter ('maximum size in bytes') is used for files in the RAMDISK, to pre-allocate the maximum required file size in advance. This avoids fragmentation, if multiple writeable files are opened simultaneously. When successfull, the function returns a positive 'handle' (= an integer value which identifies the file).
Otherwise, the function returns a negative error code.
The filename may contain a pseudo-directory to specify the storage medium.
The parameter 'max_size_in_bytes' (maximum expected size of the file, measured in byte) must already be specified when creating the file, to avoid fragmentation of the storage medium (see notes about the RAMDISK).
Example to create and write a small file in the RAMDISK, with minimum error checking :
   var

         int fh; // file handle

       endvar;

       fh :=
     file.create("ramdisk/test.txt",4096); // max 4096 bytes

       if( fh>0 )
     then   // successfully created the file ?

         file.write(fh,"First line in the test file.\r\n");

         file.close(fh); // never forget to close files !

       endif;
- file.open(name [, o_flags] ) : opens an existing file or a device
-
When successful, the function returns a positive 'handle' (= an integer value
which identifies the file or device).
Otherwise, the function returns a negative error code.
Depending on the storage medium, some (not all, depending on the medium) of the following optional 'open flags' are supported:- O_RDONLY : Open for read-only, i.e. the file can only be read but not written. Works on all media.
- O_WRONLY : Open for write-only, i.e. the file can only be written but not read. Not supported yet.
- O_RDWR : Open for read- and write access. At the moment (2011-09), doesn't work with FLASH memory !
-
O_TEXT : Open the file as a text file, and check for a BOM
(byte order mark) to find out the encoding-type
automatically.
- O_CREATE : If the to-be-opened file doesn't exist yet, create it. UNIX purists may use the glorious abbreviation 'O_CREAT' instead of 'O_CREATE'.
Regardless of the file-open mode (O_RDONLY, O_WRONLY, O_RDWR, O_TEXT, O_CREATE), the file pointer will be set to the begin of the file. This behavious equals the _rtl_open command, which may be familiar for 'C' developers. To append new data at the end of an existing file (after re-opening it), the file pointer must be set to the end of the file, before writing data to it. Use the function file.seek for this purpose.
Example to open a text file, read it line-by-line, and dump the lines to the screen:
   var
        // declare global variables:

         int fh;      // an integer
     for the file handle

         string temp; // a string named
     'temp'

       endvar;

       fh :=
     file.open("ramdisk/test.txt",O_RDONLY | O_TEXT);

       if( fh>0 )
     then // successfully created the file ?

         while( !
     file.eof(fh) )

           temp :=
     file.read_line(fh);

           print( "\r\n ", temp ); // dump the line to the screen

         endwhile;

         file.close(fh);

       endif;
After successfully creating or opening a file, the file's handle (integer value
returned by file.create or file.open) can be used to write to, or read from the file.
The following script functions can be used for this purpose.
- file.write(handle, data): writes data to a file
-
In most cases, 'data' will be a string, one or more a string variables, or
a string expressions.
(In fact, binary data are not supported yet, because they always turn into a nightmare because you need to worry about the host's endianness aka "byte order", different storage formats for all kinds of data types, etc etc - so forget about binary files for a while).
An example for the file.write function can be found under file.create . - file.read(handle, &dest1, separator1, &dest2, ...) : reads structured data from a file
-
The file.read function can read one or more data fields from a file (in a single call).
Compared to file.read_line, it's more complex,
but very flexible. When successfull, it returns the number of data bytes read from the file.
The format (structure) of the data in the file can be specified by the function's argument list.
Each datum (singular of data) must be passed by reference (preferrably with the
address-taking operator & as prefix before the variable name), e.g.:
nBytesRead := file.read(handle, &sName, ",", &sAddress,",", &sInfo,"\r\n" );
Constant strings between the names of the to-be-read variables are interpreted as 'separators' between data fields.
Alternatively, to read files with fixed field widths, those widths can be speficied in the function call after the name of the variable to which the width applies, separated by colon in the argument list. Example:
nBytesRead := file.read(handle, &sName,20, &sAddress,40, &sInfo,"\r\n" );
In the above example, the string-variable 'sName' will be read with a fixed width of 20 characters (bytes), and 'sAddress' with 40 characters. The rest of the text line (up to the separator "\r\n", which means Carriage Return + New Line) will be stored in variable 'sInfo'.
For strings read from a file, it's sometimes necessary to restrict the character set to certain classes of characters. This can be achived in the argument list of file.read by appending the following tokens (beginning with a colon) directly after the name of the string-variable with restricted character set:- :NAME
Valid characters are A..Z, a..z, '_' (underscore), and -except for the first character in the name- the digits '0' to '9'.
Spaces and control characters like Carriage Return (\r) and New Line (\n) are not allowed. - :NUMBER
Valid characters are only the digits '0' to '9', the decimal point ('.'), and the character 'e' or 'E' which indicates the exponent (in scientific notation like 472.5e3).
Simplified excerpt from the INI file demo, to read test file IniDemo1.ini :if( file.read( handle, "[", sSection:NAME, "]", "\r\n" ) > 0 ) then // entered a new SECTION in the INI file : // .. elif( file.read( handle, sKey:NAME, "=", sValue, "\r\n" ) > 0 ) then // successfully read a key=value pair from the INI file : select (sSection) case "FileInfo" : // .. case "SensorConfig" : // .. case "CAN1Setup": // .. // ... endselect; elif( file.read( handle, sGarbage, "\r\n" ) > 0 ) then // successfully read a line with "something else" (possibly an EMPTY line) : // .. else // didn't read anything so guess we reached the end of the file: file.close( handle ); return TRUE; endif;- Explanation of the above example:
- With the three calls of file.read(), all possible syntaxes of a line in an INI file are 'tried'.
Only one of those three calls will return a positive result, when reading an INI file line-by-line (loop not shown here).
The third call (file.read( handle, sGarbage, "\r\n" )) will 'skip' any line which fits neither a section header [Section-Name] nor <Key>=<Value> .
Because the character set for variable 'sKey' is restricted to 'NAME', 'sKey' will only contain single names, but not multiple lines like the comment lines which may be placed anywhere in an ini file.
Reason: Comment lines (in INI files) begin with a semicolon, which is not a valid character for a 'NAME'. Without this precaution, the variable 'sKey' might be filled with data read from multiple lines, up to the first "=" (separator between 'key' and 'value').
In each call of file.read, a maximum of 2048 bytes can be read (parsed) from the file. Each call of file.read is either completely successfull or won't read (skip) anything from the file at all. This feature is used in the example explained above to tell comment lines, section header lines, and data lines from each other.
Complete examples for the file.read function can be found in the 'VT100-Emulation' and in the INI-file reader application. - :NAME
- file.read_line(handle) : reads a line of characters from a text file (or a serial port), and returns it as a string
-
An example using 'file.read_line' can be found under
file.open .
To read the lines of a text file line-by-line, you should open the file with the O_TEXT flag as explained in the file.open command,
because strings read from a file read that way will have the proper character encoding type ( ceDOS, ceANSI, or ceUnicode ).
- file.eof(handle) : checks for end-of-file
-
Returns FALSE (0) as long as the end of the file has not been reached yet,
and TRUE (1) when the end-of-file has been reached (for example, after file.read_line has read the last line of a file).
An example using 'file.eof' can be found under file.open .
-
file.seek(handle, offset, fromwhere) : sets the file pointer.
-
'offset' is the absolute or relative file position, measured in bytes.
'fromwhere' (aka 'origin') specifies the meaning of 'offset'. This parameter may be one of the following constants:SEEK_SETPosition file relative to the beginning (offset 0 = first byte in the file)SEEK_CURPosition file relative to the current positionSEEK_ENDPosition file relative to the end (offset 0 would be the end of the file)
For 'SEEK_END', the offset may be zero (i.e. warp to the end of the file) or negative ! Positive offsets in combination with 'SEEK_END' would reference a position past the file's end, which is illegal.
An example using 'file.seek' is in programs/script_demos/FileTest.cvt .
- file.close(handle) : closes a file, and releases the file handle .
-
An example for the file.close function can be found under
file.create .
Never forget to close files ! Especially after a file has been 'written' but not been closed yet, there may be data waiting in an internal buffer which have not been flushed to disk yet. Closing the file will flush all buffers, and (if it's a "real disk file") update the directory and the FAT (file allocation table).
By default, text files are assumed to be 'plain text with 8 bits per character'. Esoteric formats like *.doc or *.docx are not, and never will be, supported. When specficying the O_TEXT flag in file.open(), the runtime library will examine the file for a so-called Byte Order Mark (BOM), to find out if the file's encoding types automatically (and skip the BOM, so the BOM will not be read by the first call of file.read_line) :
- UTF-16 with big-endian byte order (BOM = 0xFE, 0xFF)
- UTF-16 with little-endian byte order (BOM = 0xFF, 0xFE)
- UTF-8 (BOM = 0xEF, 0xBB, 0xBF, not really a byte order mark in this case)
If the file contains Unicode text (in one of the encodings listed above),
the strings returned by the file.read_line function will be re-encoded as
UTF-8 (not UTF-16 !).
For more info about the byte order mark in text files, see
Byte order mark
on Wikipedia.
To retrieve a list of files on the memory card (or similar storage media accessable via ),
the following functions were added in the script language (2015-03):
- directory.open( string path_and_mask)
- Opens a directory for reading. Returns a positive handle (integer value) when successful.
Don't assume anything about the value of the handle - just store it in an integer variable and use it in subsequent calls of directory.read().
- directory.read( int handle, tDirEntry *dir_entry)
- Reads the next entry from an opened directory.
The second argument must be a pointer to a tDirEntry (see example further below).
Returns TRUE when successful.
- directory.close(int handle)
- Closes the directory after reading it, and frees resources. Don't forget !
When reading the directory entries (via directory.read), the result is stored in a structure type 'tDirEntry'. A tDirEntry contains the following members:
| name | filename in the classic 'DOS' format (8+3 characters) |
| attributes | 'DOS'-compatible file attributes. Bitwise combination of cFileAttr constants |
| year | full year number of the file's last modification |
| month | month number (1..12) of the file's last modification |
| mday | day-of-month (1..31) of the file's last modification |
| hour | hour-of-day (0..23) of the file's last modification |
| minute | minute (of the hour, 0..59) of the file's last modification |
| sec | second (of the minute, 0..59) of the file's last modification |
| size | file size, measured in bytes |
| medium | storage medium. Only for testing |
An example for directory.open / read / close is in the the 'App-Selector' example, function ReadDir().
See also: Overview of file I/O functions, pseudo file system, accessing files via web server, string processing, string processing, keywords, contents .
Reception and Transmission of CAN messages (via script)
Note: Not all programmable terminals support the reception of 'raw' CAN messages (or LIN frames)
as explained in this chapter.
Devices with CANopen do not support the functions mentioned below
(except CAN.status, which is always available) .
The CAN functions in the script language may have to be unlocked before use (on
devices like MKT-View II,III,IV).
Overview with the most important CAN functions : can_add_id, can_receive, can_transmit .
Use the command can_add_id or CAN.add_filter
to register some CAN- or LIN-bus identifiers for reception through the can_receive function (or via CAN-receive-handler).
For LIN (instead of CAN), bitwise OR the mask cCanIdBit_LIN to the message identifier.
Besides that, the treatment of LIN frames is almost identical to the treatment of CAN messages throughout this document.
After registering CAN messages (or LIN frames) for reception, you can use the can_receive function
to poll for messages waiting in the FIFO, and to read the next message from the FIFO.
If can_receive returns TRUE, it has read another message (aka "telegram") from the FIFO,
and copied it into a global variable (structure) named can_rx_msg where your script can process it.
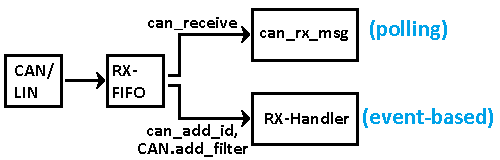
CAN reception via polling or events
The common data type used for transmission and reception of CAN frames is the tCANmsg structure. It is frequently used when passing a CAN frame as function argument in CAN-receive-handlers to implement higher-level protocols in the script language.
For normal display-applications, CAN reception and transmission (by the programmable terminal) is controlled by a CAN database (.dbc, aka 'CANdb') which connects display variables to the outside world via CAN(-"signals"). The script can access those display variables directly. Thus, in many cases the script doesn't need to care about how those variables are connected to CAN signals. In rare cases (for example, "gateway"-like applications or rest bus simulations) the script can encode or decode CAN messages itself (based on the information imported from CAN databases) using the commands CAN.EncodeMessage and CAN.DecodeMessage.
If there is no suitable DBC file available, the script can alternatively access the datafield of the received or to-be-transmitted CAN message via the bitfield component, and convert the signal's value from the physical unit into (or from) the value on the CAN bus itself.
can_add_id( [bus=N,] <CAN-ID> [,handler] ) : Register a CAN message ID for reception
Adds the specified CAN message identifier to an internal list (in the CAN
driver), so it will be received from now on, and put in the script's CAN
receive FIFO.
The script program only receives such messages with the can_receive function.
CAN-Messages which are *not* registered for reception this way may be processed
somewhere else (for example in the "CAN-signal-decoder" or in the CANopen
stack, but not in the script).
The maximum number of CAN messages identifiers which can be registered for
reception by the script is 32. If that's not enough, register whole ranges
of CAN message identifiers via CAN.add_filter().
The most significant bits (31..29) of 'CAN-ID' specify the bus number and the 11/29-bit-flag ("Extended ID").
For better readability, bitwise-or the constants cCanIdBit_Bus2, cCanIdBit_Bus3,
cCanIdBit_Extd as required to the message-ID (in bits 10..0 or 28..0 of the parameter).
Examples:
   can_add_id(  0x123 );                                  // start receiving 11-bit ID 0x123 on CAN1
   can_add_id( cCanIdBit_Bus2 | cCanIdBit_Extd | 0x123 ); // start receiving 29-bit ID 0x123 on CAN2
can_add_id( bus=cCanBusAny, 0x123 ); // start receiving 11-bit ID 0x123 on any available CAN bus
can_add_id( 0x123, CAN_Handler_ID123 ); // Call 'CAN_Handler_ID123' on reception of this message ID
See also: Details about CAN Receive Handlers.
CAN.add_filter( <filter>, <mask>, <receive_handler> )
Similar to can_add_id, but this command registers an entire
range of CAN message identifiers for reception.
- The CAN-receive-filter operates as follows:
- The CAN identifier of a received message is bitwise ANDed with the 'mask' parameter.
The result is then compared with the 'filter' parameter.
If all bits (which are not zero in 'mask') match, the received message will be passed on to the script (either to the optional receive-handler, or placed in the script's CAN-receive-Fifo).
In other words: All cleared bits in 'mask' are considered 'don't care' (i.e. ignored by the filter);
all bits set in 'mask' must match (between received ID and the 'filter' value).
- Examples:
- CAN.add_filter( 0x2ABCD00, 0x2FFFFF00 ); // receive extended IDs 0x0ABCD00 to 0x0ABCDFF
CAN.add_filter( 0x000, 0x000, addr(MyCanRxHandler) ); // receive standard IDs with a handler
// Note: As in other CAN functions of the script language,
// the 'extended' flag which indicates a 29-bit-ID is encoded in bit 29,
// and the bus number (0..3) is encoded as a two-bit value in bits 31..30 of the ID.
This function had to be implemented because J1939 encodes a lot of information (for example the sender's 'Source Address', SA) inside the 29-bit CAN message ID.
This renders the CAN acceptance filtering, which is implemented 'in silicon' (hardware) in most microcontrollers, almost useless because any non-trivial J1939 node is doomed(!) to receive 'almost everything' this way.
The result from registering 'all CAN message identifiers' for reception may cause an enormous CPU load, so try to keep the number of registered CAN identifiers as low as possible.
Handlers registered by CAN.add_filter() will only be invoked if none of the handlers registered 'individually' (via can_add_id) had returned TRUE. Details about the handler calling sequence are here.
can_receive (function to poll for CAN reception)
Tries to read the next received CAN message from a FIFO.
When successful, the message is copied into
can_rx_msg, and the result is 1 (one) .
Otherwise (empty FIFO), can_rx_msg remains unchanged, and the result is 0
(zero) .
Note: If received CAN messages are not 'polled' but processed in a user-defined
CAN-receive-handler, it's not neccessary (and, in fact, illegal)
to call 'can_receive' from the handler !
The received CAN message will be passed via pointer (as argument) to the handler,
and -if the handler returns with exit code 1 or 'TRUE'- the message was intercepted
by the CAN message handler, and will not be copied into the CAN-Rx-FIFO at all !
Using a CAN-receive handler is the preferred method (if extra processing of received messages
is necessary in the script at all) because it wastes less CPU time than "polling".
can_rx_fifo_usage (function)
Returns the number of CAN messages still waiting in the receive FIFO (without
reading a message).
A return value of zero means "the FIFO is completely empty at the moment".
A return value of 2047 (!) means "the FIFO is completely full" (and, if another
message was received by the CAN controller, it would be lost for the
script).
can_transmit (procedure)
Command to send a CAN message (directly, layer 2). This command comes in
three different variants (without and with a parameters in the argument list):
Variant 1: can_transmit without an argument list:
Tries to send the contents of can_tx_msg (CAN message structure defined
below). The global variable 'can_tx_msg' is filled
with contents by the script, and transmitted my calling can_transmit:
   can_tx_msg.id  := 0x334;  // set CAN message ID (and bus number in the upper bits)
   can_tx_msg.len := 2;      // set the data length code (number of data bytes)
   can_tx_msg.b[0] := 0x11;  // set the first data byte
   can_tx_msg.b[1] := 0x22;  // set the second data byte
   can_transmit;  // send the contents of can_tx_msg to the CAN bus
Variant 2: can_transmit called with a parameter (argument):
Instead of using the global variable 'can_tx_msg', a variable (preferrably a local variable) of type 'tCANmsg' is filled by the script, and the address of that variable is passed as an argument to the procedure 'can_transmit( <address of the message to be sent> ) .
The following example calls can_transmit (with parameter) from a CAN-receive handler, after assembling the transmitted message in a local variable ("responseMsg"):
 //--------------------------------------------------------------------
 func CAN_Handler_A( tCANmsg ptr pRcvdCANmsg )
   // A CAN-Receive-Handler for a certain CAN message identifier.
   // Must be registered via 'can_add_id', along with the CAN message ID.
   // Interrupts the normal script processing, and must RETURN to the caller
   //  a.s.a.p. ! Uses a LOCAL variable for transmission (not can_tx_msg).
   // Thus can_tx_msg can safely be used in the script's main loop,
   // even if the main loop may be interrupted at any time by this handler.
   local tCANmsg responseMsg;    // a local variable with type 'CAN message'
   responseMsg := pRcvdCANmsg[0];      // copy the received CAN message into the response
   responseMsg.id := pRcvdCANmsg.id+1; // response CAN ID := received CAN ID + 1
          // Note: The upper two bits in tCANmsg.id contain the zero-based BUS NUMBER !
   can_transmit( responseMsg );  // send a response via CAN immediately
   return TRUE;
   // returning TRUE means: "the received message was processed HERE,
   //              do NOT place it in the script's CAN-receive-FIFO".
 endfunc; // end CAN_Handler_A

      ... somewhere in the initialisation : ...

   // Register a received CAN ID, and install a CAN-receive-handler for it:
   can_add_id( C_CANID_RX_A, addr(CAN_Handler_A) );
Variant 3: can_transmit with two parameters: Besides the address of the to-be-transmitted message (from variant 2), a 'CAN transmit option' can be specified:
       can_transmit( responseMsg, cCanTx_Normal );  // if necessary, wait before transmission
       can_transmit( responseMsg, cCanTx_NoWait );  // don't wait here if TX-buffer is full
- cCanTx_Normal : If necessary, wait for a few milliseconds until the CAN bus can transmit another message.
Due to the CAN driver's transmit buffer (FIFO), this feature allows the script to produce a CAN bus load of almost 100 %, with the main loop slowed down by the 'blocking' call of can_transmit() so that all messages get through without a transmit FIFO overflow.
- cCanTx_NoWait : Don't wait if the CAN transmit buffer is completely full,
but simply discard it.
This may happen if the script tries to send more messages than the bus can accept, or if there is no-one out there (yet) who can acknowledge the CAN transmission.
The option CAN_TX_NOWAIT should be used if can_transmit is called from an event handler, for example a script timer event.
An example for the periodic transmission of CAN messages is in the application 'TimerEvents.cvt' (look for "OnCANtxTimer").
Please note that this procedure usually returns 'immediately', before the transmission actually took place, because all transmitted CAN messages (not just those sent from the script) are first placed in an interrupt-driven CAN transmit buffer. This is why
can_transmit cannot
return a "status" (like 'transmission complete', etc).To check for CAN errors during transmission, poll CAN.status, bitmask cCANStatusTxError.
To send RTR frames (Remote Transmit Request), bitwise-OR the constant cCanRTR in the length field of the message.
Only use this function if you know exactly what you are doing !
Sending a 'wrong' CAN message into an unknown network may have potentially dangerous consequences !
can_rx_msg, can_tx_msg
(global variables of type tCANmsg)From the script's point of view, the 'can_rx_msg' structure holds the last received CAN message for processing. It was filled by the previous call of the can_receive function. If the script doesn't call can_receive, and as long as can_receive doesn't return TRUE (=success), the contents of can_rx_msg will not change. The following components of can_rx_msg (and similar, can_tx_msg for transmission) can be accessed like variables by the script program:
-
.id -
holds the CAN-bus-identifier in the least significant 11 (or 29) bits of
this 32-bit integer variable, plus an optional 11/29-bit flag ("extended
CAN identifier flag") in bit 29, and the zero-based CAN BUS NUMBER (!) in the most
significant bits (bits 31..30). Please note that bit numbers are always start
at zero, thus a 32-bit integer value (such as can_rx_msg.id) contains bit
0 (least significant bit) to 31 (most significant bit). There is no "bit
32" in a 32-bit integer !
For LIN, the 6-bit 'frame ID' ranges from 0 to 63 = 0x3F; in addition it should be bitwise OR-ed with the constant cCanIdBit_LIN to inform the CAN API that this is a LIN frame, not a CAN message.
-
.len -
Length of the DATA FIELD in bytes. CAN frames can have 0 (zero) to 8 byte
data fields, LIN allows 1 to 8 data bytes per frames.
The upper bits of this field may contain special FLAGS like cCanRTR (Remote Transmission Request, see example ScriptTest3.cvt, SendRTR() ). -
.tim -
Timestamp of the received CAN message, using the CAN driver's hardware specific
timestamp frequency. This 32-bit integer value will roll over from 0xFFFFFFFF
to 0x00000000 after about 29 hours, because the CAN driver's timestamp clock
frequency is 40 kHz (at least for the ARM-7 CPUs with an internal CPU clock
of 72 MHz). If you *really* need to convert a timestamp difference (as
32-bit integer value) into seconds or similar, divide the difference
by the constant 'cTimestampFrequency'
to get a timestamp difference in seconds. Note that other script timer functions
use the same 'timestamp'. See also:
system.timestamp ("current time", using the
same unit) .
-
.b[N] -
Accesses the N-th byte in the CAN data field as an 8-bit unsigned integer
(value range 0 to 255).
-
.dw[N] -
Accesses the N-th Doubleword (N : 0..1) in the CAN data field.
A doubleword ('DWORD') contains 32 bits, the value range is 0x00000000 to 0xFFFFFFFF (hex).
Note that (in contrast to the components listed further below) the array-index is a 'doubleword'-index, not a byte-index. Thus the only allowed indices are 0 (=first doubleword) and 1 (=second doubleword).
Example to copy the entire 8-byte CAN data field (taken from 'ScriptTest3.CVT') :
Unlike the components of 'can_rx_msg' and 'can_tx_msg' listed further below, the DWORD-wise access explained above is also possible for 'normal' varibles declared as type tCANmsg (also via pointer).// The 8 databytes are copied as two 32-bit integers, // because that's faster on an ARM-CPU than a byte-copying-loop: response.dw[0] := can_rx_msg.dw[0]; // copy first doubleword (4 bytes) response.dw[1] := can_rx_msg.dw[1]; // copy second doubleword (4 bytes) -
.i16[N] -
Accesses the N-th and N+1-th byte in the CAN data field as a 16-bit
signed integer, using 'Intel' byte order (aka Little-Endian,
or 'least significant byte first).
The sign is expanded from bit 15 into the upper bits of the 32-bit integer result, so the range is -32768 to +32767. -
.u16[N] - Accesses the N-th and N+1-th byte in the CAN data field as a 16-bit unsigned integer, using 'Intel' byte order (aka Little-Endian, or 'least significant byte first). Unlike 'i16', the sign bit is not expanded, so the result ranges from 0 to 65536.
-
.i32[N] -
Accesses the N-th to N+3-th byte in the CAN data field as a 32-bit signed
integer, using 'Intel' byte order (aka Little-Endian, or 'least significant
byte first).
Note that the above three methods to access a CAN data field are very fast, but they cannot cross 'arbitrary' bit boundaries (thus, their syntax mimicks a BYTE-ARRAY, not a BIT-ARRAY). The "bitfield" method explained further below is slower, but more versatile. -
.m16[N] - Similar to '.i16', but uses big endian byte order aka 'Motorola' format.
-
.m32[N] - Similar to '.i32', but uses big endian byte order aka 'Motorola' format.
-
.bitfield[<index of the signal's least significant bit in the CAN-message>,<number of bits>] -
Accesses a part of the data field in a CAN messages as a 'bitfield', containing
an unsigned integer value in 'Intel' byte order (least significant
byte first).
Note that regardless of the signal type, bits in a CAN message are always numbered according to the following table. As usual for binary numbers, the most significant databit is on the left side in this graphic representation; the numbers for 8 bits within a byte always runs from 0 (=LSB, right) to 7 (=MSB, left).
The green cells in the following table show an example defined ascan_rx_msg.bitfield[ 18, 15 ]
("Intel" byte order, LSBit at bit 18 in the CAN frame, and 15 bits for this bitfield ).
Support for signals with 'Motorola' byte order (most significant byte first) was not projected by the time of this writing.
-
Numbering of bits in a CAN- or LIN- data field
(green: 15-bit signal example; .bitfield[ 18, 15 ] ) -
bit 7 bit 6 bit 5 bit 4 bit 3 bit 2 bit 1 bit 0 byte[0] 7 6 5 4 3 2 1 0 byte[1] 15 14 13 12 13 10 9 8 byte[2] 23 22 21 20 19 18 17 16 byte[3] 31 30 29 28 27 26 25 24 byte[4] 39 38 37 36 35 34 33 32 byte[5] 47 46 45 44 43 42 41 40 byte[6] 55 54 53 52 51 50 49 48 byte[7] 63 62 61 60 59 58 57 56 -
The global variable 'can_tx_msg' has exactly the same structure as 'can_rx_msg' . The only difference is that can_rx_msg is used for reception, while can_tx_msg is used for transmission (from the script's, i.e. the device's, point of view). Typically, both are used in the implementation of a simple 'CAN protocol handler'.
The script test application 'ScriptTest3.cvt' contains a few examples for the reception and transmission of CAN messages through the script interpreter.
- Notes and hints:
-
To test the script's CAN functions in the programming tool, connect your
PC to the CAN bus using one of the supported CAN interfaces. The script
language's CAN RX FIFO also works in the simulator, using live data
received from the CAN bus.
If that is not possible (no CAN bus available in the lab, or no suitable CAN interface on the PC), use the programming tool's CAN playback utility. It allows you to play back recorded CAN messages (stored in a simple text file) into the simulator/emulator, as if they were received from a 'real' CAN interface.
A valuable tool for the development of CAN protocols in the script language is the Trace History, which most devices support (also those without an integrated CAN logger / snooper). The history can be read out remotely via web browser, for example using the URL http://upt/trace.htm . In contrast to external CAN diagnostic tools, the trace history display distinguishes between sent and received CAN messages (from the device's point of view), which an normal external CAN bus monitor can't (from his point of view, all CAN messages are received).
CAN.DecodeMessage( tCANmsg ptr msg )
This function is intended to be called from CAN receive handlers, after reception of a CAN message, if the signals need to be processed immediately after reception (inside the CAN receive handler). It updates all display variables which are possibly mapped to signals in the specified CAN message, described in a Database for CAN (*.dbc aka 'CANdb').This may be necessary for 'very demanding' applications, because the CAN receive handler is invoked by the system before decoding the display-variables which are possibly contained in the message.
For message(-identifiers) which are not described in a database, CAN.DecodeMessage does 'nothing' besides wasting time searching for the CAN message identifier. Thus, if you know that the received CAN message is not contained in the database (imported DBC), don't call CAN.DecodeMessage() on it.
If the message was found (with a matching CAN-ID and, if multiplexed, a matching multiplexer), CAN.DecodeMessage() returns TRUE.
If the message was not found (no matching CAN-ID or, if multiplexed, no matching multiplexer), CAN.DecodeMessage() returns FALSE.
- Input:
- Address of the to-be-decoded CAN message (aka CAN frame with up to 8 data bytes).
- Output:
- All display variable (display.XYZ) which are connected to CAN signals,
depending on the imported CAN database (.dbc file).
- Note:
- CAN.DecodeMessage() is typically used in CAN receive handlers.
- Test / Example:
- See CAN.EncodeMessage() .
CAN.EncodeMessage( int msgID, tCANmsg ptr msg )
This function is -more or less- the counterpart to CAN.DecodeMessage.For a given CAN message identifier (first argument), it assembles the data field of a CAN message, and places the result in the specified message buffer (second argument).
The signal values for the CAN data field are collected from all display variables which are connected to the specified message, depending on the loaded Database for CAN (*.dbc aka 'CANdb').
If the message-ID was found in the database, CAN.EncodeMessage() returns TRUE.
If the message-ID was not found in the database, CAN.EncodeMessage() returns FALSE.
Notes:
- CAN.EncodeMessage() doesn't transmit send a CAN message. It only encodes it in memory !
- For transmission, you can pass the address of the message to the CAN Transmit command.
- If you need to know which variables are actually contained in the message, call CAN.MessageIDToVarName with the same ID used to encode the message.
Here a simplified excerpt from it, to demonstrate the principle. The signals 'ThreeSines1', 'ThreeSines2', 'ThreeSines3' have been imported (into display-variables) from a CAN database ('MktStandardSignals1.dbc'). The following script fragment first sets them to different values (1,2,3), then maps them into a CAN message (three 16-bit fields in this case), and finally checks the inverse function (CAN.DecodeMessage should restore the original values of ThreeSines1..3):
  // Test CAN.EncodeMessage( int msgID, tCANmsg ptr msg ) :
display.ThreeSines1 := 1; // set display variable (input for CAN.EncodeMessage)
display.ThreeSines2 := 2;
display.ThreeSines3 := 3;
pVarDef := display.GetVarDefinition( "ThreeSines1" ); // get database entry for this display variable
CAN.EncodeMessage( pVarDef.CAN_Msg_ID, MyTxMessage ); // encode CAN message (but don't transmit it yet)
  // Check the encoded CAN message (which contains 3 signals here):
if( (MyTxMessage.w[0] != 1) or (MyTxMessage.w[1] != 2) or (MyTxMessage.w[2] != 3) ) then
  print("\nSomething wrong in the database, or CAN.EncodeMessage() ?");
endif;
  // At this point, the values from 'ThreeSines1' to 'ThreeSines3'
  // have been mapped into the CAN message (MyTxMessage) by CAN.EncodeMessage().
  // On this occasion, also check the inverse function, CAN.DecodeMessage():
display.ThreeSines1 := 0; // clear to see if CAN.DecodeMessage() really sets these...
display.ThreeSines2 := 0;
display.ThreeSines3 := 0;
CAN.DecodeMessage( MyTxMessage ); // TEST, should overwrite display.ThreeSines1...3
if( (display.ThreeSines1 != 1) or (display.ThreeSines2 != 2) or (display.ThreeSines3 != 3) ) then
  print("\nBug in CAN.DecodeMessage() ?");
endif;
CAN.VarNameToMessageID( string sVarName )
Queries the CAN database (imported from a DBC file) for the CAN message identifier
used to received or send a certain (display-) variable.
When successful, CAN.VarNameToMessageID returns the numeric CAN message identifier, otherwise cCanInvalidID (= 0xFFFFFFFF, which is not a valid CAN message ID).
Notes:
- In many cases, a CAN message doesn't transport only ONE, but MULTIPLE signals.
- To retrieve a list of ALL variables which are transported in the same CAN message, repeatedly call CAN.MessageIDToVarName(), beginning with n=0 for the first variable (signal) contained in the message.
- Bits 31 and 30 of the return value (message ID) contain the zero-based CAN-bus-number !
- To retrieve other parameters of the CAN-signal related with the display variable (e.g. CAN message layout and scaling), use display.GetVarDefinition() .
CAN.MessageIDToVarName( int iMessageID, int n )
Queries the CAN database (imported from a DBC file) for the name of the n-th display variable
contained in a certain CAN message.
When successful, CAN.MessageIDToVarName returns the name of the n-th display variable in the message,
otherwise an empty string.
Notes:
- In many cases, a CAN message doesn't transport only ONE, but MULTIPLE signals. Argument n=0 retrieves the FIRST name, n=1 the SECOND, etc.
- To find out the CAN message ID for a given display variable name (like "EngineRPM"), use CAN.VarNameToMessageID().
- Bits 31 and 30 of the CAN message ID (iMessageID) contain the zero-based CAN-bus-number !
Special CAN-bus diagnostic functions
Most of the following 'special' CAN functions only work on certain targets,
but not in the programming tool / simulator . The first function argument
is usually the CAN port number. Use one of the following integer constants
for the port number:
cPortCAN1 (1st CAN bus),
cPortCAN2 (2nd CAN bus) .
The application script_demos/ErrFrame.CVT uses some of these functions to test a CAN bus with error frames.
-
CAN.status( <port> ) -
Returns the current status of the CAN bus controller on the specified CAN port (cPortCAN1 oder cPortCAN2).
The return value is a bitwise combination of the following flags (constants):
cCANStatusOK (0) 'no problem' (at least not with this CAN port) cCANStatusHWFault (1) unspecific problem with the CAN hardware or this port cCANStatusRxOverflow (2) CAN receive buffer overflow cCANStatusTxOverflow (4) CAN transmit buffer overflow cCANStatusIRQFailed (8) Only occurred on old systems ("too many interrupts per second"). cCANStatusTxError (16) Error while trying to send a CAN frame
(no Acknowledge, nothing connected, missing terminator ?)cCANStatusBusError (32) One of the 'more serious' CAN bus errors (possibly now 'error passive',
i.e. no active transmission until error counters decremented)cCANStatusWarning (64) Warning (the precise definition of a 'CAN warning' depends on the controller) cCANStatusBusOff (128) 'BUS-Off'. This is the most serious CAN error status bit.
The controller doesn't try to communicate with the bus anymore,
neither active (transmit) nor passive (receive).
A brute-force method to recover from the Bus-Off state
is the command system.reboot .
In contrast to the CAN functions listed further below, CAN.status is also available in firmware variants with CANopen protokoll.
-
CAN.rx_counter( <port> ) -
Retrieves the number of CAN messages received through the specified port, since power-on.
In the programming tool, the result includes the number of messages 'simulated' with the CAN Logfile Player.
-
CAN.tx_counter( <port> ) -
Retrieves the number of CAN messages sent through the specified port, since
power-on.
-
CAN.tx_enable -
Accesses the 'transmit enable'-flag for all periodically transmitted CAN-signals
(from the device's point of view), which have been imported from a CAN-database for transmission.
This is the same flag as 'signals.tx_enable' in the display interpreter. Details in the document about 'CANdb'.
Note: Even with CAN.tx_enable = FALSE, the script command can_transmit can transmit !
CAN.tx_enable only affects the 'scheduler' for periodic or event-driven transmission of CAN signals.
CAN.tx_enable is usually set during the script initialization, shortly before calling init_done:
CAN.tx_enable := TRUE; // allow transmission of CAN-signals assembled from imported databases init_done; // let the system know "we're open for business" (enable event handlers) -
CAN.rx_timeout -
Accesses the global 'CAN message/signal receive timeout' parameter, here: scaled into milliseconds.
For details, see the description of CAN Signal Timeout Monitoring in the document about CAN database support.
Example:
if( CAN.rx_timeout == 0 ) then // Timeout monitoring for rcvd messages/signals not enabled -> enable it: CAN.rx_timeout := 2000; // CAN message/signal timeout in ms endif; -
CAN.err_counter( <port> ) -
Retrieves the number of any errors and warnings, counted by the CAN-driver's
interrupt service handler since power-on.
The counter includes 'comparably harmless' errors, for example bit-stuffing errors, which sporadically occur even in a 'good' CAN network. This function is only intended for diagnostic purposes; the expectable error rate depends largely on the bus load and on the environment (EMC) !
-
CAN.err_register( <port> ) -
Retrieves the last content of the CAN controller's 'error register', captured
by the CAN-driver's interrupt service handler when the last CAN error interrupt occurred.
Because the format of the CAN controller's error register is extremely hardware dependent, specifying the meaning of the bits in that register would be far beyond the scope of this documentation.
- For MKT-View II (with CPU = LPC2468), see NXP's "UM10237" (LPC24XX User Manual), Chapter 18.8.4,
"Interrupt and Capture Register";
- For MKT-View III (with CPU = LPC1788), see NXP's "UM10470" (LPC178x/7x User Manual), Chapter 20.7.4,
"Interrupt and Capture Register", pages 514 to 517 in UM10470 Rev. 1.5;
- For devices with other controllers, and in the programming tool (simulator), the value returned by CAN.err_register() is meaningless !
- For MKT-View II (with CPU = LPC2468), see NXP's "UM10237" (LPC24XX User Manual), Chapter 18.8.4,
"Interrupt and Capture Register";
-
CAN.err_frame_counter( <port> ) -
Retrieves the number of "error frames" received on the specified port, since
power-on.
Strictly defined, it's the number of "bit stuffing errors" signalized by the CAN bus controller.
A bit-stuffing error means six or more dominant bits on the physical layer.
Ideally, there should be no error frames on a CAN at all. The error-frame-counter allows to check this.
CAN.ParseString( string source, tCANmsg destination )-
Inverse to the string()-constructor with source data type tCANmsg.
Can be used to convert ("parse") a string into a binary CAN message (destination type tCANmsg).
Similar as when converting a tCANmsg into a string, the format is specified
using the built-in global variable CAN.string_format
(e.g. sfVectorASC).
An example is in the CAN-ASCII-Logger demo.
-
CAN.PulseOut( <port> , <duration in microseconds> ) -
Generates a pulse (dominant state) on the specified CAN port, with the specified
length (duration) in microseconds.
Rarely used; for example to send CAN error frames (= six dominant bits, which is impossible with a 'normal' CAN controller.
The function only works on a suitable target (LPC / ARM-7), not on a PC, and not on any Linux-based system. A sample script which uses this procedure is in the 'ErrFrame' application in the script_demos folder. It was designed to send CAN error frames, to check if certain CAN testers were able to detect such CAN bus errors. For example, see the ErrFrame.CVT application.
Do not use this function in a critial environment (vehicle, etc),
unless you are absolutely sure about the possible consequences !
-
CAN.timestamp_offset -
This variable can be used to 'move' the timestamps when converting CAN messages (type tCANmsg)
into text. The internal timestamp generator starts at zero when booting the system.
But when recording received messages in a file (via script), the timestamps shall often be 'relative' to the trigger point (which is also determined via script). This can be achieved as follows:
Note: The timestamps delivered by the CAN driver are not affected by CAN.timestamp_offset .CAN.timestamp_offset := system.timestamp; // offset for converting to Vector ASC format
CAN.timestamp_offset only affects the conversion of type tCANmsg into a string ("Vector ASC") with the string() function.
The unit of CAN.timestamp_offset is the same as for system.timestamp (timer ticks, frequency=cTimestampFrequency).
-
CAN.string_format -
Specifies the format for converting CAN messages (script data type tCANmsg) into strings, using the
string()-function (if 'value' is a tCANmsg, or a pointer to a tCANmsg). Example:
CAN.string_format also controls the conversion of strings into CAN messages via CAN.ParseString().CAN.string_format := sfVectorASC; // when converting tCANmsg to string, use "Vector ASC" format
-
CAN.test_id := <CAN-Message-ID> - Special command for hard- and software tests. Only available in devices with a special firmware (available on request for the MKT-View IV). Details only available in the german document.
-
CAN.test_action := <N> -
Defines 'what to do' on reception of a CAN-message with identifier = CAN.test_id.
This action is already performed in the CAN interrupt, thus the latency is extremely small.
Details only available in the german document.
Controlling the programmable display pages from the script
Any procedure or function beginning with the keyword "display" controls the
programmable display pages in some way.
-
display.<var-name> -
Accesses a display variable
via script. Here, <var-name> must match exactly one of the names defined
in the programming tool's 'Variables' tab.
In most cases, such variables are used to communicate with a network,
thus a display variable contains network-specific information that
don't exist in normal script variables.
-
display.app_info -
Returns the 'application info' aka 'file description', specified here.
This is a string of characters (single line), defined by the application's developer, contained in the *.cvt- or *.upt file copied into the devices internal Flash memory. -
display.goto_page(<page>) -
Switches to the specified display page.
The new page can be specified either as a page number (integer, deprecated), or as a page's name (string, favourized). -
display.page_scan -
Replaces the old interpreter command "pscan"
to control periodic display page switching.
Examples:
display.page_scan := 5; // switches to the next page in the scan sequence, every 5 seconds
display.page_scan := 0; // stops timer-controlled, periodic page-switching
See also: Page Definition Header (checkmark 'include page in the page-scan sequence'). -
display.page_name -
Retrieves the name of the current display page (read-only).
-
display.page_index -
Retrieves the zero-based index of the current display page (read-only).
Remember, the "first" page of every display application has index "zero", not "one" !
To switch to a different display page (from the script), use display.goto_page .
-
display.num_pages -
Retrieves the number of pages which exist in the display application
(read-only).
This function can be used to let the script run through a 'loop with all display-pages', as used in the 'page menu' example.
-
display.num_lines -
Retrieves the number of lines on the current display page (read-only).
This function can be used to let the script iterate through 'all elements on the current display page'.
-
display.page[n].name -
Retrieves the name of the n-th display page (read-only).
Note that the page index 'n' runs from zero to display.num_pages minus one !
-
display.exec( < command string > ) -
Lets the display-interpreter execute any
display command.
This command must be used with caution ! It should
be avoided if not absolutely necessary, because it may severely slow down
the script. This may happen because the display commands are
interpreted, not compiled . Example:
display.exec( "bl(0)" );// turn the display's backlight off via display interpreter
To avoid calling the display interpreter from the script, use 'flag variables', which can be polled in global or local events by the display. This way, the script will not be slowed down (or even blocked for dozens of milliseconds) by the execution of the display command. A safe example for the display.exec command can be found in the 'traffic light' demo.
-
display.pixels_x -
Retrieves the width of the LC display, measured in pixels (read-only).
Used in the QuadBlocks demo to switch to
a display page designed for 'landscape' or 'portrait' mode of the screen.
-
display.pixels_y -
Retrieves the height of the LC display, measured in pixels
(read-only).
-
display.fg_color -
Returns the default foreground- aka text-colour of the current display page.
In the programming tool, this colour value is defined in the im 'Display Page Header' (Default Text Colour).
-
display.bg_color -
Returns the default background colour of the current display page.
In the programming tool, this colour value is defined in the im 'Display Page Header' (Default Background Colour).
-
display.night -
Read- and write access to the boolean
day/night colour switching flag. Example:
display.night := TRUE; // use colour scheme 'Night' display.night := FALSE; // use colour scheme 'Day' -
display.menu_mode,display.menu_index -
This is the script language's equivalent to the display interpreter's
"mm", and
"mi" function.
(Entspricht der Funktion "mm" bzw "mi" des Display-Interpreters.)
Examples in the application 'DisplayTest.cvt' .
Possible menu modes are defined as built-in constants in the script language:
mmOff: neither 'navigating' nor 'editing'
mmNavigate: navigating between different fields on the page
mmEdit: editing the (usually numeric) value in an input-field
-
display.EditValueMin, display.EditValueMax -
Specifies the limiting range when editing a numeric value via 'up/down' (increment/decrement the value using cursor keys or rotary encoder)
in an edit field on any programmed display page.
This function was added in 2016-06, because (unlike 'display variables') a simple script variable does not contain
any information about the permitted value range. Use the 'Begin Edit' event
in your script's OnControlEvent-handler, to set those limiting values whenever the operator
begins to edit such a field.
Both display.EditValueMin and display.EditValueMax can be read or written by the script at any time, but their values may be overwritten by the system when beginning to edit a normal display variable, using the min- and max values as defined in the 'Variables' definition table in the UPT programming tool. This happens shortly before OnControlEvent is called with event=evBeginEdit. So even when editing display variables, your script can still override the edit field's limiting range.
-
display.elem[<Element-Name>].visible -
The script can show or hide a display element by setting or clearing the 'visible'-flag. Example:
display.elem["Arrow"].visible := TRUE; // show the element named "Arrow"Note: When a display page is loaded from ROM (due to a 'page switch'), all elements are visible by default.
display.elem["Popup"].visible := FALSE; // hide the element named "Popup"
Making an element invisible which was previously visible causes an automatic update of the entire display page.
-
display.elem[<Element-Name>].xyzor
display.elem[<Element-Index>].xyz -
This is the script language's equivalent to the display
interpreter's function
"disp.<Element>.xyz"
(follow the link for a list of accessable components, here simply called 'xyz').
Examples (more in the 'display test' application):
// Show the NAME of the currently selected element :

     print("\r\n Name:",
     display.elem[
     display.menu_index
     ].na );


     display.elem[i].bc := rgb(255,127,127); // set background to lightred
The element can be addressed by its index as in the above example, or by its name. Example:
 display.elem["BtnNext"].bc := rgb(0,i,255-i); // modify 1st background colour

     display.elem["BtnNext"].b2 := rgb(0,255-i,i); // modify 2nd background colour
In the last example, "BtnNext" is the name of a UPT display element, specified in the page definition table. The script runtime determines which of the two addressing modes is used by the data type of the argument between the squared brackets: [Integer] = by index, [String] = by name. In conjunction with events like evClick, evBeginEdit, evEndEdit, an array element may also be addressed by its index (within the current display page). To simplify this, the element-index is passed as function argument 'param1' to the script's control event handler (OnControlEvent).
- Note (also applies to display.elem_by_id[ ] ):
- If there is no display element with the specified name, index, or identifier on the current display page,
the read- or write access to the non-existing element will not cause a runtime-error, and the script won't stop.
A write-access will simply 'do nothing' (the assigned value is discarded).
A read-access will return zeroes or empty strings, depending on the component type.
-
display.elem_by_id[<Control-ID>].xyz -
Similar as above (display.elem), but accesses
a display element by its control-ID (which needs
to be defined in the
page definition
table).
Accessing a display element this way simplifies modifying it in an event handler (in the script language), because the control-ID is passed in the handler's function argument list. Details about this "advanced" topic are here .
-
display.dia.XYZ -
Invokes one of the commands to control the Y(t)- or X/Y-diagram on the current display page.
Details are in a separate document about the display interpreter's 'diagram' commands.
'XYZ' is the token listed in that document, for example clear, run, ready, ch[N].min, ch[N].max, sc.xmin, sc.xmax, unix_time, etc.
At the time of this writing (2018-12-13), controlling diagrams via script was 'under construction' again, and up-to-date info was only available in german language.
-
display.arr[row][column][component],
display.arr.dim(n_rows, n_columns, n_components),
display.arr.n_rows, .n_columns, .n_components -
Allows direct access to the old display interpreter's 'global' array,
which (in the interest of downward compatibility) can still be used to draw polygons
into diagrams (see above, display.dia.XYZ).
Details about the display interpreter's 'global' array (arr[][][]) are here.
-
display.pause := TRUE; -
Stops updating the screen (with the current "programmed display page"). This
can be used for a crude way of synchronizing the display to the script
application: Pause the display before calculating a new set of 'display values'
in the script, and resume when finished with that.
This command is typically used to pause the display output temporarily, for example to ensure the consistency (auf Deutsch: Widerspruchsfreiheit) of the screen while the script prepares some values which "always belong together". Without such precautions, due to semi-multitasking of the script and the display, some of those values shown on the display may be "old", and others may be "new".
-
display.pause := FALSE; -
Resumes updating the screen, i.e. switches back to normal periodic screen
update (screen updated 'in the background', while the script
runs).
The test/demo application "LoopTest.cvt" uses the display.pause flag to avoid flicker, while filling the text-screen with new data.
-
display.redraw := TRUE; -
Sets a flag to let the UPT display interpreter update the current
display page as soon as possible. On completion, the flag display.redraw
will be cleared automatically.
It is usually not necessary to force a display update this way, because the display interpreter periodically compares the values of all (numeric) variables associated with the elements on the current display page; and -if a value has changed since the last update- automatically redraws the element.
-
display.UpdateDiagram -
This command may be issued after calculating new values (in an array),
to let a diagram update the curve display (showing the array data).
If a diagram channel uses an array as "data source" as
described here,
then the 'UpdateDiagram'-command will also copy the data from the array
into the diagram's own channel memory ("double buffering" to keep the display consistent).
-
display.GetVarDefinition(<variable>) - Special function to query the definition of a display variable.
Allows retrieving almost any parameters specified on the tabsheet "Variables" (in the programming tool) via script during normal runtime. For simple display-applications, this function is not required.
Input argument : <variable> = name of the variable (as string) or definition table index (as integer value).
If successfull, the returned value is a pointer to (= "the address of") a structure of type tDisplayVarDef .
Otherwise (no display-variable found for the specified name or index), GetVarDefinition returns a NULL pointer.
Some of the components of structure tDisplayVarDef are direct equivalents of similar-named columns on the tabsheet 'Variables' in the programming tool:
- .Name
- Name of the Display-Variable (without prefix "display.")
- .AccessRights
- Access rights; in certain cases this also defines the 'direction' of a transfer ("write"=transmit or "read"=receive from the terminal's point of view).
- .BusNr
- Bus number. For CAN signals, this parameter is defined when importing a DBC file.
- .CAN_Msg_ID
- CAN message identifier (if this variable is connected to a "CAN signal", which turns it into a 'Network Variable').
In contrast to tCANmsg.id, this component does not contain bus numbers encoded in the upper bits !
- .CommChannel
- Kommunication channel. Contains the channel number from column "Channel" on the programming tool's 'Variables' definition table.
- .CopIndex
- CANopen Object Index (1..65535). Matches the first part of column 'OD-Index' in the 'Variables' table.
If the value is nonzero, the display variable becomes part of the CANopen device's Object Dictionary, and can be accessed externally via SDO.
- .CopSubindex
- CANopen Sub-Index (0..255). Used in combination with the OD-Index. Details in the description of the Object Dictionary.
- .CycleTime_ms
- For CAN signals ("CANdb"), this parameter is used as periodic transmit cycle, or for receive timeout monitoring.
- .MinValue
- Minimum value of the scaled variable. Sometimes used as 'limit' for the display or in numeric edit fields.
- .MaxValue
- Maximum value of the scaled variable. Sometimes used as 'limit' for the display or in numeric edit fields.
In most cases, both 'MinValue' and 'MaxValue' are zero, which means 'no limits'.
- .MuxValue
- Numeric (integer) value of an optional MULTIPLEXER / "Multiplexor" from the CAN database ("CANdb", importied from *.DBC).
- .MuxLSBit
- Zero-based Index of the multiplexer's least significant bit in the CAN data field (0..63). For details, see 'CANdb'.
- .MuxNumBits
- Number of data bits of the multiplexer in the CAN data field (1..16).
- .MuxByteOrder
- Byte order of the multiplexer in the CAN data field, if this contains more than 8 bits (extremely rare!) .
Encoded as a single character: M=Motorola (big endian), I=Intel (little endian).
- .RawSigType
- Type of the 'raw' signal transferred via CAN ("CANdb") : (U)nsigned, (S)igned, (F)loat, or (I)nvalid.
- .RawSigByteOrder
- Byte order of the 'raw' (CAN-) signal: (M)otorola, (I)ntel.
- .RawSigLSBit
- Zero-based index of the raw signal's least significant bit (0..63). For details, see 'CANdb'.
- .RawSigNumBits
- Number of data bits of the 'raw' signal (on the CAN bus, or similar) .
- .ScaleFactor
- Scaling factor. The 'raw' CAN Signal is multiplied with this floating point value, to convert it into the 'display' unit.
- .ScaleOffset
- Skaling offset. After the multiplication (see above), this floating point value is added to the result.
- .SDO_Data_Type
- Data type 'a la CANopen'. Required to transfer values via SDO (Service Data Object), and for proper PDO mapping (Process Data Object).
- .Unit
- A string of up to 8 characters with the physical display unit. Usually originates from the imported database (DBC file).
- .UpdateTime_ms
- Update time in milliseconds (for the display).
- .ValueTable
- A string of value/text pairs for the display, using the format specified here.
If you need to modify the definition of display-variables via script at the normal runtime (for 'extremely special applications'), please get in contact with the software development engineer at MKT Systemtechnik.
An example using display.GetVarDefinition() is in the application ScriptTest3.cvt:
var string sVarName; // name of a display-variable tDisplayVarDef ptr pVarDef; // definition of a display-variable endvar; ... sVarName := "FourSines1"; // name of a display-variable // Show CAN message layout of this *DISPLAY*-variable: pVarDef := display.GetVarDefinition( sVarName ); print("\n ", sVarName, " : bits ", pVarDef.RawSigLSBit, "..", pVarDef.RawSigLSBit + pVarDef.RawSigNumBits - 1 ); -
See also ... about interaction between script and display application :
- Accessing display variables from the script
- Accessing script variables from the display interpreter
- Invoking script procedures from the display interpreter
- Invoking script functions from display pages (to retrieve a text strings for the display, used for internationalisation)
- Asynchronous event handling (and how to intercept certain events in the script language)
'System' functions, etc
Built-in procedures or function begin with the keyword
"system". They access some low-level system parameters.
For normal applications, the following 'system' functions are available:
system.analog_in .amb_light .audio_ptt .audio_vol .beep
.click_vol .dwInputs .dwOutputs .dwFirmware .dwVersion
system.encoder_pos .encoder_freq
.exec .feed_watchdog .led .keybd_light .nv[0..31] .reboot .resources .serial_nr .shutdown .temp .timestamp .ti_ms
system.unix_time .unix_time_boot system.vsup system.vcap
system.show_help .
Functions intended for 'special uses' and software tests (e.g. system.test) are deliberately not specified here.
system.analog_in[0] .. system.analog_in[3]-
These functions read the current value for the specified onboard analog input.
The MKT-View III has two analog inputs (indices 0 and 1), the MKT-View IV four 'onboard' analog inputs (indices 0 to 3).
Details about how to connect the analog inputs can only be found in the device specific datasheet.
In the MKT-View III, the analog inputs are connected to pins 12 and 13 of the 14-pin Lemo connector;
the "analog ground" is on pin 14. In the MKT-View IV, the two additional analog inputs on connector 'X3'
can be polled by the script via 'system.analog_in[2]' and 'system.analog_in[3]'.
In contrast to the old display interpreter functions "ain1" and "ain2", the script funktion system.analog_in[] returns a floating point number, ranging from 0.0 to 1.0, regardless of the voltage divider (populated on the board), and regardless of the A/D converter's resolution ("number of bits"). Even future devices with high-resolution A/D converters, or with digital signal processing and oversampling, will stick to this scale range.
By default, the voltage dividers in MKT-View III / IV are designed for a maximum input voltage (scale end) of 15 Volts.
Only converters that support negative input voltages (which didn't exist in any MKT-View at the time of this writing) will deliver values ranging from -1.0 to +1.0. The same applies to analog inputs sampled with the DAQ Unit (fast-sampling Data Acquisition).
In the programming tool / simulator, the analog input values can be set as explained here.
A simple example using the analog inputs can be loaded from programs/script_demos/AnalogIn.cvt. It uses digital lowpass filters to 'smooth' the samples read from the analog inputs, and plots the results along with the non-filtered 'raw' samples as an Y(t) diagram on the screen:
Screenshot from sample application 'AnalogIn.cvt' on an MKT-View III.
Red: Ch. 1,raw; orange: Ch. 1,filtered; blue: Ch. 2,raw; purple: Ch. 2,filtered
An example for the analog inputs (measuring temperatures in °C with simple 22 kOhm NTCs as external sensors) is in the demo application programs/script_demos/Thermo.cvt .
Depending on the hardware, the script language may support additional commands to poll other 'internal' A/D converter channels, e.g.:
- system.vsup : DC input supply voltage (in Volts, as a floating point value)
- system.vcap : Voltage measured at the internal UPS (Ultracap power bank, result in Volts)
- system.amb_light : Last 'Ambient Light Sensor' reading as a floating point value (0 .. 1.0)
- system.temp : Internal temperature in degrees Celsius (floating point value)
system.amb_light-
This script function returns the last 'Ambient Light Sensor' reading as a floating point value,
ranging from 0.0 ("complete darkness") to 1.0 ("bright sunlight").
In newer devices like the MKT-View V, the sensor is 'logarithmizing', and located inside the membrane keyboard.
Since different generations of MKT-Views have used different sensors, some of them mounted deep inside the enclosure, a direct conversion of the A/D conversion result into a physical unit like 'Lux' is difficult, and unnecessary for the sensor's main purpose: Controlling the display brightness depending on the ambient light. But such a conversion can be done via script (if necessary), e.g. using a lookup table or an individually crafted polynomial interpolation.
An example to display the measured value (numeric and as curve / "trend") is contained in the 'Analog Input' test applikation, programs/script_demos/AnalogIn.cvt, on the display page titled Internal Analog Sensors.
system.keybd_light- In devices with backlit keys, this read/writeable parameter allows
controlling the keyboard backlight intensity via script.
Usually, the keyboard backlight ist configured statically in the
System Setup / Display / Keybd-Backlt.
If that entry is missing, the keyboard doesn't have a backlight, or the
backlight intensity cannot be controlled via pulse-width modulator.
system.audio_vol-
Reads or writes the audio output volume aka "Speaker Volume". The same parameter
can be modified (and permanently saved) in the terminal's system menu. The
function is only implemented in certain terminals with an analog audio output
- see feature matrix . A similar command also
exists in the display interpreter. Unfortunately, the value range and scaling
depends on the hardware. For example, the CVT-MIL 320 used a digital
potentiometer with 128 linear steps (not logarithmic!), value range 0 to
127. See also: Audio settings and signal paths in the MKT-View III / IV.
system.audio_ptt-
Controls a switching relay for the audio output's 'Push-To-Talk'-feature.
Only exists in a few 'special' devices.
system.beep( frequency [,time [,volume [,freq_mod [,ampl_mod] ] ] ] )-
Generates a simple sound using the system's built-in 'beeper' (buzzer, piezo
speaker, or similar). Similar as the 'beep'
command in the older display interpreter.
frequency : Tone frequency in Hertz. A value of zero turns the tone off.
time: length of the tone, measused in 100-millisecond-steps. If this and all following parameters are missing (or zero), the tone will be "endless" until you turn it off with the command system.beep(0).
volume: Relative volume (loudness) in percent, ranging from 0 to 100. The beeper is controlled with a pulse width modulator which can be used to produce different output levels, but the harmonic spectrum of the generated tone is also affected by the PWM duty cycle. A volume of 100 produces the loudest possible tone with a 1:1 duty cycle. freq_mod: Frequency modulation. Can be used to produce siren-like sounds, or "chirps" and "whistles". Unit is "Hertz per 100 milliseconds". If the value is positive, the frequency increases as long as the sound is audible; if the value is negative the frequency decreases.
ampl_mod: Amplitude modulation. Can be used to produce sounds which start with a low volume and then get louder. Not very effective because of the pulse-with modulation, where a volume of 10% can hardly be distinguished from a volume of 50% .
Example: system.beep(150,20,50,100)
produces a 2-second, "chirped" tone which rises from 150 Hz to 2150 Hz (=150 Hz + 2 seconds * 100 Hz/0.1sec)
system.play_notes(string )-
Similar as (but a bit more versatile than) system.beep. Uses the same 'beeper'
(buzzer, piezo speaker, etc) to play a short string of notes.
The format (syntax of the 'note string') is the same as for the old
interpreter command "play"
(follow the link for examples with short 'melody' strings).
The command already returns before playing has finished, i.e. it doesn't consume significant time, and can safely be used in event handlers.
system.click_vol-
Only for devices with touchscreen. Reads or writes the 'touchscreen click'
volume. The same parameter can be modified (and permanently saved) in the
terminal's system menu.
system.backlight-
Only for devices with backlit display. Sets (or reads) the
normal backlight intensity / day,
same as in the system setup under "Display Setup" / "Brightness".
Value range (same as for other 'LED pulse width modulators'): 8 Bit, 0 (off) ... 255 (max).
system.backlight_low-
Only for devices with backlit display. Sets (or reads) the
dimmed backlight intensity / night time or after backlight-timeout ("power saving mode"),
same as in the system setup under "Display Setup" / "Low Brightness".
system.bl_timeout-
Only for devices with backlit display. Sets (or reads) the
timeout-setting in seconds after which the backlight switches from "on / bright" to "off or dimmed",
same as in the system setup under "Display Setup" / "LCD-Off-Time".
system.dwInputs-
Access the system's onboard digital inputs as a 32-bit 'doubleword'. Depending
on the target hardware, up to (!) 32 digital inputs can be read in a single
access (MKT-View III / IV have two onboard digital inputs).
Bit zero reflects the state of the first input, etc. Use a formal assignment
to read the current state of the digital inputs, for example:
iDigitalInputs := system.dwInputs; // poll all onboard digital inputs

     if( iDigitalInputs & 0x00000001 ) then // check bit zero = first input

       print("DigIn1 = high");

     else

       print("DigIn1 = low");

     endif;
An example for measuring (low) input frequencies on a digital input can be found in the application programs/script_demos/DigitalInputFrequency.cvt .
See also: Frequency- and event counter for the digital inputs .
system.dwOutputs-
Access the system's onboard digital outputs as a 32-bit 'doubleword'. Depending
on the target hardware, up to (!) 32 digital inputs can be set in a single
access (of course, not all devices have onboard digital I/O lines at all,
and for most devices, it's impossible to set all digital outputs exactly
at the same time, due to hardware restrictions / internal 'I/O-bus'). Bit
zero drives the first output, etc. Use a formal assignment
to read, modify, and write the current state of the digital outputs, for
example:
system.dwOutputs := system.dwOutputs |
     0x0001;    // set the first
     onboard-output
system.dwOutputs := system.dwOutputs &
     (~0x0001); // clear the first
     onboard-output
system.dwOutputs := system.dwOutputs ^ 0x0001;
       // toggle the first onboard-output
A sample script which uses digital onboard I/O is the 'TrafficLight' application .
system.dwFirmware-
Retrieves the hardware-specific firmware 'article number' as a 32-bit integer value.
Example:
print("FW-Art-Nr.=",system.dwFirmware);
Output (when the above example is executed on different target systems):FW-Art-Nr.=11314 (on an MKT-View II with 'CANdb' firmware) FW-Art-Nr.=11315 (on an MKT-View II with 'CANopen' firmware) FW-Art-Nr.=11392 (on an MKT-View III with 'CANdb' firmware) FW-Art-Nr.=11393 (on an MKT-View III with 'CANopen' firmware) FW-Art-Nr.=11222 (when running on a PC in the 'simulator')
system.dwKeyMatrix-
Returns the current state of the keyboard matrix as bit combination (up to 32 bits in a 'DWORD').
Each key is represented by a single bit, thus this function can be used to poll 'exotic' key combinations, for which which getkey doesn't have an equivalent code (for example, Shift-Enter, etc).
The bit combination returned by system.dwKeyMatrix is similar to the display interpreter funktion km and (for devices with CANopen V4) Object 0x5001:- Bit 0..7 : Function keys F1 (bit 0) to F8 (bit 7) .
- Bit 8..15 : Cursor left (bit 8), right(9), up(10), down(11);
ENTER (bit 12), ESCAPE (bit 13), first shift key (bit 14), second shift key (bit 15) . - Bit 16..23: Numeric keys '0' (bit 16) .. '7' (bit 23) .
- Bit 24..31: Numeric keys '8' (bit 24) .. '9' (bit 25),
"Dot" (bit 26), "Plus" or "Plus/Minus" (bit 27),
Tab key or 'two horizontal arrows'-key (bit 28),
Questionmark, Help, or similar 'help' key (Bit 29),
"A to Z", "Alpha", or similar special key for 'alphanumeric input' : Bit 30,
"Backspace" or "special arrow pointing left" : Bit 31 .
  kmF1 .. kmF8 : Function keys F1 to F8
  kmLeft    :  Cursor keys..
  kmRight
  kmUp
  kmDown
  kmEnter   : ENTER key
  kmEscape  : ESCAPE key
  kmShift1  : 1st Shift key
  kmShift2  : 2nd Shift key
  kmDigit0 .. kmDigit9 : decimal keys (exist in a few devices only)
  kmDot     : decimal separator (dot, sometimes comma)
  kmPlus    : "PLUS" (sometimes labelled "+/-" or "* +")
  kmTab     : TAB key, or "two horizontal arrows"
  kmMode    : Questionmark, HELP, HELP/MODE, or similar labelled key
  kmAtoZ    : key labelled "ABC"/"A"/"Alph" (for TEXT INPUT)
  kmBackspace: Backspace,"special arrow pointing left", or similar labelled key
To react quickly on any change of the keyboard matrix (without wasteful polling system.dwKeyMatrix), implement the OnKeyMatrixChange handler in your application.
An example is in the application script_demos/KeyMatrix.cvt .
system.dwVersion-
Retrieves the firmware version number (in the target device) as a 32-bit integer
value.
Format:
  bits 31 .. 24 = major version number
     (Hauptversionsnummer)

       bits 23 .. 16 = minor version number (Nebenversionsnummer)

       bits 15 ..  8 = revision number

       bits  7 ..  0 = build nummer
Example:
print("FW-Version=0x"+hex(system.dwVersion,8));
-> output:FW-Version=0x01020304(if the firmware version was "V1.2.3 - build 4")
system.encoder_pos- Returns the absolute position of the rotary encoder on the front panel.
Clockwise rotation increments, counter-clockwise rotation decrements this.
For an efficient user interface, instead of polling this parameter,
use the OnEncoderDelta(int delta, int freq) event handler.
The first argument ('delta') is the number of steps (detents) counted since the last call.
system.encoder_freq- Returns the momentary rotation speed of the rotary encoder,
measured in 'detents per second' (thus the result is a frequency in Hertz).
The value may be negative when rotating the knob counter-clockwise.
For an efficient user interface, instead of polling this parameter,
use the OnEncoderDelta(int delta, int freq) event handler.
The second argument ('freq') is the frequency measured when the event occurred.
system.exec( filename )- Loads the speficied file (*.cvt or *.upt, aka 'App')
from the memory card, or the specified pseudo-filesystem-path into RAM (not FLASH!),
recompiles the script (which is contained in the new application),
and finally launches the new application.
The application in the device's internal FLASH (for example, the 'App Selector')
remains intact, so by calling
system.reboot
the 'reloaded' application can switch back into the 'App Selector'.
In simulator mode ("running the app in the programming tool"), system.exec() is only enabled if the running program was saved (on disk) since the last modification.
Screenshot of the 'Application-Selector'. Click on the image for details.
Note: This function only exists in devices with a "large" RAM, like MKT-View III / IV. It is not available in older devices like MKT-View I / II !
See also (helpful for 'reloaded' scripts): Variable declarations with the 'noinit' attribute.
system.show_help( filename, options )-
Loads the specified file (typically *.htm or *.txt) into the
'Help Browser' integrated in devices with sufficiently large screens
and sufficiently large on-board Flash. This browser is normally used to show
built-in help pages only,
but you can use it in your own application to show application-specific
help. Such custom help pages can be created with a plain text editor,
and uploaded into the device's onboard Flash memory via
File-Transfer-Utility.
Details about the file format are here.
The 'options' parameter (2nd, optional function argument) is reserved for future use (like showing the help window in maximized, or minimized state; etc). Use options=0 for the default size and appearance of the help window.
When called with an empty argument list ("system.show_help()"), the browser shows the device's built-in "Help Index" page.
system.counter_mode-
Operation mode of the optional (*) frequency- or event counter.
At the time of this writing (2017-10-11), the following modes were implemented:
- 0 : Counter off (passive). This is the default state after power-on.
- 1 : Simple counter for positive edges on digital input #1
- 2 : Simple counter for positive edges on digital input #2
- 3 : Two independent frequency- or pulse counters on the digital inputs
- 4 : Complex counter with quadrature input, suitable for most incremental encoders.
The phase between input 1 and 2 indicates the direction (increment or decrement).
The counter value increments or decrements on any edge (rising or falling) on any of the two inputs.
The same applies to the measured frequency, which may become negative when the encoder is turned counter-clockwise.
- 5 : Up/down-counter with pulse input (trigger on rising edge) on digital input #1, and direction control on input #2 (LOW=increment, HIGH=decrement).
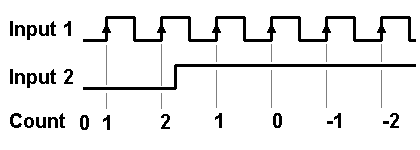
- 5 : Up/down-counter with pulse input (trigger on rising edge) on digital input #1, and direction control on input #2 (LOW=increment, HIGH=decrement).
system.counter_gate_time-
Gate time for frequency measurements with the 'digital counter' described above.
Unit: Milliseconds. Default: 1000 [ms].
system.counter_frequency[0]-
Returns the measured frequency in Hertz (first input, thus array index zero).
Thanks to the measuring principle, even with gate times below 1000 milliseconds the frequency resolution
may be better than one Hertz. Thus the result is always a floating point number (float) !
-
system.counter_frequency[1] -
Frequency measured on the second digital input.
Only available in mode 3 ('two independent frequency- or pulse counters').
system.counter_value[0]-
Number of pulses or events counted on the first input (thus array index zero). In contrast to the frequency,
this value is always read- and writeable (even without stopping the counter), and doesn't depend on the gate time.
In some counter modes (e.g. up/down counter), the result may be negative.
system.counter_value[1]-
Number of pulses or events (edges) counted on the second digital input.
Only available in mode 3 ('two independent frequency- or pulse counters').
(*) The frequency- and event-counter was initially implemented in an MKT-View III / IV.
In older devices (like MKT-View II) it is not available.
Input voltage and maximum frequency are specified in the device's datasheet.
Typical values are: Vin_low <= 3.0 V, Vin_high >= 6.5 V, f_max = 20 kHz (with modified input lowpass).
On request, the digital inputs (voltage dividers with lowpass filters) can be modified
for 'TTL'-levels (threshold approx. 3 V) and higher frequencies (MKT-View IV: up to 200 kHz without lowpass).
Please note: The counter is one of the 'extended', unlockable script features.
An example for measuring frequencies on the digital (onboard) inputs is in the application programs/script_demos/DigitalInputFrequency.cvt .
system.feed_watchdog( < number of milliseconds > )-
This command should only be used if really necessary, for example if an
event handler, or a function invoked via
backslash sequence in a
display element's format string, is expected to require more than 400 milliseconds for execution.
Fortunately, in most applications this is hardly ever necessary, because any 'long-lasting' operations
can easily be moved into the script's main loop (main task), and in the event handler, you will only set
a flag (variable) which can be polled in the main loop. Setting a variable takes much less than
a millisecond, so you don't need to feed the watchdog in a well-designed event handler.
In the following paragraph, the term 'event handler' also applies to a function invoked via backslash sequence in the format string of a display element (as in the 'GetText' example).
Technical details follow...
Endless loops, and long calulations must be avoided in event handlers, because they will render the device inoperable (or, from an operator's point of view 'it crashes'). To avoid this (in case of an erroneous script), the run time system will terminate the function call, if the function (event handler) doesn't return to the caller fast enough (i.e. in less than 200 milliseconds). In the normal script context, there is no such limit because the pseudo-multitasking guarantees that the device stays 'responsive' even if the script gets stuck in an endless loop without calling any 'waiting' function.
If the maximum event handler execution time is not sufficient, the forced termination can be avoided with a command like this:
system.feed_watchdog(500); // Feed the script's watchdog for another 500 milliseconds
As already mentioned, this consequence of doing this may be a sluggish user response, but also protocol timeouts (because as long as the event handler is busy, the device will not do much else). So whereever possible, avoid this command, and re-write your event handlers so they return to the caller as fast as possible. Then you won't need to feed the watchdog at all.
system.led( index, pattern, red, green, blue )-
Shown above is the syntax for devices with multi-colour LEDs. This command sets the blink-pattern and RGB colour mixture
for the specified LED. As usual, array-like indices begin at zero, not one.
Parameters:index : 0=first LED (topmost, or 'top right') ... e.g. 2=third LED pattern: 8-bit blink pattern. Each bit controls a 100-millisecond interval. After a cycle of 8 * 100 ms the whole cycle starts again. The 8-bit blink patterns of all LEDs are synchronized. red, green, blue: specifies the 3 * 8-bit colour mixture (see examples).If a certain LED parameter (pattern, red, green, blue) shall not be modified, pass -1 (negative) instead.
Examples:system.led( 0, 0xFF, 0xFF, 0x00, 0x00 ); // 1st LED permanently on, RED system.led( 1, 0x0F, 0x00, 0xFF, 0x00 ); // 2nd LED slowly blinking GREEN system.led( 2, 0x55, 0x3F, 0x3F, 0xFF ); // 3rd LED rapidly flashing BLUE system.led( 2, 0x00, -1, -1, -1 ); // 3rd LED off without changing the colour system.led( 2, 0xFF, -1, -1, -1 ); // 3rd LED on without changing the colourSome older devices had a GREEN and a RED LED (sometimes combined as a CANopen-Status-Indikator as in HBG-18 und HBG-22). For such devices, these LEDs are assigned as follows:- The 'first LED' (index 0) shall emit GREEN light.
- The 'second LED' (index 1) shall emit RED light.
- Since these LEDs can be driven independently, a complementary bit pattern like 0x55 and 0xAA lets a bicolour LED flash green/red.
system.nv[ 0..31 ]-
Accesses one of the 32 'non-volatile values', like the nv-function in the
UPT display interpreter. The same restrictions concerning EEPROM cell endurance
apply. Details here. Setting a new value
as in the following example doesn't immediately 'write' the value into the
system's configuration EEPROM, but into a latch:
  system.nv[0] := 12345; // write 32-bit integer into the
     non-volatile memory latch
To store the contents of the 32 'latches' (integer values) permanently in the EEPROM, and you are really sure that no othernv[]-values need to be set in future, carefully invoke the following command to write the contents of he latches into the sluggish EEPROM (which may take a considerable amount of time, depending on temperature and 'fitness' of the EEPROM chip):
system.nv_save; // write all modified nv locations into the EEPROM.
See also: Defining the initial values for the nv[]-array in the programming tool,
how to prevent overwriting values in the nv[]-array when loading a new application.
system.reboot-
Reboots the system (including a complete hardware reset). Can be used to recover from errors
which cannot be 'cured' by other means, for example after the CAN-controller entered the
'bus-off' state.
This command is also used to switch back from any application launched by the 'App-Selektor' into the 'App-Selektor'.
Note: Your script should close any file that it had opened before calling system.reboot.
Otherwise, you may get an error message like
"System has not been shut down properly - this may damage the memory card".
system.resources-
This function is just an aid for debugging. It returns a combined indicator
of 'remaining system resources', measured in percent.
The value is the minimum of the following script-related system parameters:- Remaining stack space (used for local script variables, etc)
- Remaining dynamic memory ("heap") available for the script
If the system resources drop below 10 percent, the script may contain a bug (for example, illegal recursion, allocate too many strings or arrays, etc).
The reason can be examined in the debugger/simulator (memory usage display), integrated in the programming tool.
The function system.resources works the same way in the 'real' target as well as in the programming tool.
system.serial_nr-
Retrieves the device's serial number as an integer value.
If a device doesn't support unique serial numbers (stored in an EEPROM), the result is zero.
Example:
print("Serial Number="+itoa(system.serial_nr,5));
system.shutdown-
Forces the system to shut itself down ("programmatically").
This is the script's equivalent for the display interpreter command sys.poff ("power off").
Depending on the hardware and the system configuration, the device can be powered on again (after this) via keyboard, CAN-activity, or via supply voltage cycle. Details are in document Nr. 85115 (PDF), chapter "Power on/off" .
In the bus sleep mode demo, this command is used to turn an MKT-View (II/III/IV) off after 60 seconds without any activity on the CAN bus.
The script may be informed about any kind of system-shutdown, if it contains the OnSystemShutdown handler. The handler will receive the reason for being shut down as an integer parameter (iReason):
A simple example for an OnSystemShutdown-handler can be found in programs/script_demos/SystemTest.cvt .1 = "manual" shutdown (by the operator, via key or shutdown screen) 2 = automatic shutdown because the supply voltage got too low 3 = automatic shutdown due to temperature (usually "too hot") 0 = shutdown for some other reason
system.temp-
Returns the current temperature inside the device,
measured in the vincinity of the TFT display (which is the least 'heat-tolerant' unit).
It can be displayed on the screen for testing purposes, or copied into a variable for logging, etc.
In contrast to the older display interpreter function 'sys.temp', the script function 'system.temp' returns a floating point value, scaled into °C (degrees Celsius).
Note: The same temperature is also used for the 'automatic shutdown on excess temperature', as explained in a chapter with that title in MKT's document number 85115 .
system.timestamp-
Retrieves the system's local timestamp generator value. The same generator
also produces the timestamps for the CAN driver, thus by comparing
system.timestamp with the timestamp in a received CAN message, you can tell,
down to the fraction of a millisecond, how much time has elapsed since the
reception of that message. Together with the wait_ms() command,
you can also use this function to synchronize the activity of the script.
Example: Send a precisely timed 'answer' for a CAN message :
display.pause := TRUE;  // don't let the display-interpreter interfere
     for a short time
Tdiff := can_rx_msg.tim -
     system.timestamp; // timestamp difference between 'now'


     // and a certain CAN message reception

     Tdiff := (1000*Tdiff)/cTimestampFrequency;
     // convert to milliseconds

     wait_ms(100-Tdiff);    // wait until 100 ms
     have passed since CAN msg reception

     can_transmit;

     display.pause := FALSE; // resume normal display operation
Note: This example isn't 100 percent bullet-proof. It only works if this code is executed within 100 milliseconds after the time of a CAN message reception. To mininize the risk of wasting too much time for the display-update, the display should be paused immediately after reception of the CAN message which shall be 'answered'. Remember that the display terminal isn't a programmable logic controller with 'guaranteed' maximum latencies, even if there is a fast pre-emptive multitasking kernel running "under the hood".
The 32-bit timestamp is generated by a hardware timer, which starts at zero during power-on, and then increments at a hardware-depending frequency specified as constantcTimestampFrequency. The timer frequency is typically in the range of 40 kHz, so a signed 32-bit number will overflow from 0x7FFFFFFF (large positive value) to 0x80000000 (very negative value) after about 2^31 / 40000 Hz = 53687 seconds, or 14 hours. Despite that, the 32-bit integer arithmetic (as in the example shown above) will still give a valid DIFFERENCE between two timestamps, even if a timestamp wrapped from 0x7FFFFFFF to 0x80000000 or from 0xFFFFFFFF to 0x00000000 . This is the reason why you must not convert a timestamp into seconds (or any other unit) before calculating a timestamp-difference. First calculate the difference (as in the example above, "Tdiff := can_rx_msg.time - system.timestamp"), then convert the timestamp difference into any unit you like (as in the example, "Tdiff := (1000*Tdiff) / cTimestampFrequency").
See also: programmable timers, timer events, CAN.timestamp_offset, StartStopwatch(), ReadStopwatch_ms() .
system.timestamp_sec-
Retrieves the system's local timestamp generator value (system.timestamp), converted into seconds.
In contrast to system.unix_time, the local timestamp generator alway starts at zero when turning on the device. Thus, when stored in a 32-bit float value with a 24-bit mantissa, it delivers a better resolution than the Unix time: After running for 24 hours, the mantissa must store a value of 24*60*60 seconds. Divided by 2^24, the resulting resolution is approximately 5 milliseconds. If a better resolution is required, the timestamp must be stored in a double (64 bit).
The same unit for 'time' ("number of seconds since power-on") is also used when accessing the DAQ unit, and to synchronize the display of Y(t)-diagrams (also for event handlers in the script).
system.ti_ms-
Returns the system's timestamp generator value, scaled into milliseconds.
Uses the same internal source as system.timestamp. With a timer clock frequency of 40 kHz (as used in MKT-View II,III,IV), the 32-bit timer rolls over to zero after approximately 2^32/( 40kHz * 60 * 60 ) = 29.8 hours, causing a 'step' in the value returned by 'ti_ms'. After such an overflow, or after power-on, the timer starts counting at zero. It is not affected by the battery-backed-up real time clock.
In the display interpreter, ti_ms is an equivalent function.
system.unix_time-
If the system is equipped with a battery-buffered real time clock (RTC),
this function returns the system's current date and time in 'Unix Time'
format.
The 'Unix Time' aka 'Unix Second' is defined as
the number of seconds since midnight January 1st, 1970 (1970-01-01 00:00:00) .
Beware of the "Unix Millenium Bug" (Year 2038 Bug) which will affect any system which (as many of today's Unix / Linux systems) use a signed 32-bit integer to store the Unix Time ! Since November 2018 system.unix_time doesn't return an int anymore, but a double with fractional part and a resolution in the range of a few microseconds.
For details, see the TimeTest.cvt example .
The 'system' (terminal) doesn't care about timezones, so we suggest you let the built-in real-time clock run in UTC (universal time). Only in that case, system.unix_time (and system.unix_time_boot, see below) can really return date and time in UTC, as it should.
See also: time.unix_to_str, Date and time conversions, Modified Julian Date (MJD),
timestamps in array headers, timestamps for Y(t)-diagrams.
system.unix_time_boot-
Returns the system's date and time in 'Unix Time' format, at the time the
system (programmable display) was booted, and when the timestamp generator
(system.timestamp) was zero.
system.vsup-
Returns the device's current supply voltage, measured in Volts.
The voltage is tapped "after the reverse-protection diode" and thus isn't very accurate. The function can be used for diagnostic purposes, for example if the device is powered from a vehicle's onboard DC mains.
In contrast to the older display interpreter function 'sys.vsup', the script function 'system.vsup' returns a floating point number (V).
system.vcap-
Similar as system.vsup, but this function returns the voltage at the device's integrated
UPS (Uninterruptable Power Supply) when equipped with such.
The unit is Volts. The maximum (for MKT-View II, III, IV) is slightly below 5 Volts when the Ultracaps are fully charged.
In devices without an integrated UPS, this function returns zero.
getkey-
Reads the next key from the UPT's keyboard buffer. The same buffer is also
used by the display interpreter's kc function (!), so reading a key through
getkey also removes it for the 'kc'-function, and vice versa !
If the keyboard buffer was not empty, getkey will return a non-zero value. Usually, this value is one of the key-constants which you can use in a select-case list to implement "handlers" for the individual keys. Note that not all keyboards support all possible keys ... some of MKT's keyboards only have function keys (keyF1 to keyF3), others have only cursor keys (keyUp, keyLeft, keyRight and keyDown) and / or keyEnter and keyEscape (Enter alias "Return", sometimes this key is generated by pressing the rotary button).
For numeric keyboards, use key0 to key9 .
Don't make any assumption about the actual key values, they may be hardware-specific ! Only use the key-constants ! The only value returned by getkey which will definitely never change in future is 0 (zero), which means "no key has been pressed since the last call" .
An example for the getkey function, used in a select-case list, can be found in the test application TScreenTest.cvt , and in the 'QuadBlocks' demo (to control the game via keyboard).
For more advanced control (for example, to detect when a key has been pressed and released), use the low-level event handlers OnKeyDown and OnKeyUp instead.
See also : display (functions),
keywords, contents .
Date and Time conversions
The following built-in functions and procedures can be used for basic date- and time conversions aka "calendar" functions :
-
time.unix_to_str(string format, int unix_date_and_time) -
This function converts a date (precisely, date and time in Unix seconds)
into a string. The format is specified by means of a format string (first argument), like:
"YYYY-MM-DD hh:mm:ss" : produces an ISO 8601-compliant representation with date and time.
(without a 'T' between date and time because the 'T' is ugly ... see next example)
"YYYY-MM-DDThh:mm:ss" : would be fully ISO 8601-compliant, but looks ugly
"DD.MM.YYYY" : produces an 'unlogic' date format which is unfortunately common in Germany.
"MM-DD-YYYY" : another 'unlogic' but unfortunately common date format.
"MMM-DD-YYYY" : similar but less ambiguous: Three letters (not digits) for the month.
(MMM, all in upper case, expands to JAN, FEB, MAR, APR, MAY, JUN, JUL, AUG, SEP, OCT, NOV, DEC)
"Mmm DD, YYYY" : similar as the traditional american date format, but only three letters for the month.
(Mmm, mixed upper/lower case, expands to Jan, Feb, Mar, Apr, May, Jun, Jul, Aug, Sep, Oct, Nov, Dec)
We suggest to use ISO-compatible date- and time formats only; especially if you are a German company with customers on the other side of the pond.
What do you, and what would your customer make of 3/12/2001 ? The 12th day of March, or the 3rd day of December ?
Example:
print("It is now ", time.unix_to_str("YYYY-MM-DD hh:mm:ss",system.unix_time) );
-
time.date_to_mjd(in int year, in int month, in int day) -
This function converts (combines) a date consisting of year
(1858..2113), month (1..12), and day-of-month (1..31) into the Modified Julian
Date (MJD, defined futher below). The function result ("return value") is
the MJD.
-
time.mjd_to_date(in int mjd, out int year, out int month, out int day) -
This procedure converts (splits) a Modified Julian Date number
(MJD) into a normal Gregorian date, consisting of year
(1858..2113), month (1..12), and day-of-month (1..31) .
All outputs are specified as 'outputs' in the argument list, there is no 'function result' aka 'return value'.
The Modified Julian Date (MJD) is commonly defined
as
the number of days since midnight November 17, anno 1858
(1858-11-17 00:00:00 in ISO 8601 format) .
It is widely used to calculate differences between dates, becauses the
difference between two MJDs is the number of days (!) between their calendar
dates.
The MJD can easily be converted
into a 'Unix' time, because the UNIX BIRTHDATE (1970-01-01) as MJD (day)
is 40587 . In contrast to MJD, the 'Unix
time' counts the number of seconds since that birthdate, so the conversion
from MJD to 'Unix seconds' is straightforward ... see example
programs/script_demos/TimeTest.cvt .
See also (related to measuring time via script):
Programmable timers, timer events,
CAN.timestamp_offset, StartStopwatch(), ReadStopwatch_ms(), GPS .
Commands for the GPS receiver
The script language has similar commands to control the external GPS receiver as the display interpreter. Both are explained in detail in this extra document (gpsdec_01.htm). In any case, the module prefix 'gps.' is used for commands to control the receiver, and to retrieve position data.- Note
- The script language has an extra data type 'double' for 64-bit double precision floating point numbers.
The standard 'float' with 32-bit single precision doesn't have enough resolution for storing the latitude and longitude in degrees from a decent GPS receiver (and especially not for DGPS receivers). The same applies to the combined gps-date and -time in Unix format (seconds since 1970-01-01 00:00:00.0 UTC). Thus, for calculations or storage of gps.lat_d, gps.lon_d, and gps.unix_time, use double, not float.
Commands to control the Trace History
The following procedures and functions can be used to control the Trace History from the script. Their main intention is for debugging, development, and to track CAN bus problems.
-
trace.print( <Parameter> ) -
Prints the specified parameters (strings and numeric values) as a single line of text
into the device's Trace History.
This is possible in the simulator (programming tool) as well as on a 'real' target, but the target must have a 32-bit-CPU (ARM), and the firmware must be from July 2012 or later.
Example (prints the current date and time into the Trace History):
trace.print( "Date,Time: ", time.unix_to_str( "YYYY-MM-DD hh:mm:ss", system.unix_time ) );
-
trace.enable -
With this formal variable ("flags"), the script can stop or resume the trace history,
for example to prevent CAN messages being appended after the script (application)
found out that 'something went wrong' already, and all further CAN traffic is not
relevant to track down the cause.
The trace-enable-flags (trace.enable) is actually a bitwise-OR combination of the following constants:
- traceCAN1 : add CAN messages, 1st bus, to the trace history
- traceCAN2 : add CAN messages, 2nd bus, to the trace history
- traceCAN_UDP: add CAN-via-UDP messages to the trace history
traceFlexRay: add Flexray-via-UDP messages to the trace history- traceUDP : add generic UDP/IP frames to the trace history
- traceTCP : add generic TCP/IP frames to the trace history
Example (script code):
       trace.enable := traceCAN1 + traceCAN2; // trace messages from CAN1 and CAN2

       if( can_rx_fifo_usage > 500 ) then

         trace.print( "CAN FIFO usage: ", can_rx_fifo_usage );

         trace.enable := 0; // don't add more CAN messages to the trace history

       endif;
By default (after power-on) the trace history is enabled for CAN1 and CAN2, which means all CAN messages registered for reception, and all CAN messages transmitted by the device are appended to the history.
Setting trace.enable=0 does not affect the trace.print command; the script can always 'print' into the Trace History via command.
-
trace.stop_when_full -
If this flag is set (by the script), the trace history will be automatically stopped
as soon as the trace buffer is (almost) full.
This feature can be used to catch the initial part of a CAN conversation. An example is in the application 'TraceTest.cvt':// Select the items which shall be displayed in the trace history: trace.enable := traceCAN1 + traceCAN2; // trace messages from CAN1 and CAN2 // Let the TRACE HISTORY stop when the trace-buffer is full // (instead of overwriting the oldest entries) : trace.stop_when_full := TRUE;
To resume acquisition, set trace.enable as shown in the example above.
By default (after power-on), trace.stop_when_full is FALSE.
-
trace.num_entries -
Returns the current number of entries in the trace history.
As long as the trace history is enabled, this value may increase up to (almost!) trace.max_entries.
-
trace.max_entries -
Returns the maximum number of entries in the trace history.
This value is constant (for a certain device), but it may depend on the device firmware due to memory constraints.
The example in 'TraceTest.cvt' (details below) uses this value as argument for a modulo-operation, to limit the circular buffer indices:
iTailIndex := (iTailIndex+1) % trace.max_entries;
-
trace.oldest_index -
Returns the trace buffer index where the OLDEST entry has been stored.
Due to the 'circular' nature of the buffer, the oldest entry isn't necessarily at index zero !
-
trace.head_index -
Returns the trace buffer index where the NEXT (newest) entry will (future!) be stored.
It also marks the endstop when listing the trace buffer in the script itself.
Example (from the application 'TraceTest.cvt'):iTailIndex := trace.oldest_index; // start listing trace-entries HERE while( iTailIndex != trace.head_index ) print( trace.entry[iTailIndex], "\r\n" ); // dump next entry to screen iTailIndex := (iTailIndex+1) % trace.max_entries; // increment "tail" index // (iTailIndex wraps from 'max_entries minus one' to zero, // because the trace buffer is organized like a CIRULAR ARRAY ) endwhile;
-
trace.entry[n] -
Retrieves the n-th entry in the trace history buffer as a string.
The oldest entry is at index n=trace.oldest_index .
A 'headline', compatible with the display format, can be retrieved by trace.entry[-1].
A 'separator line', consisting of a string of dashes, can be retrieved by trace.entry[-2].
print( trace.entry[-1], "\r\n" ); // print a 'headline' for the trace display
print( trace.entry[-2], "\r\n" ); // print a 'separator' for the trace display
-
trace.can_blacklist[i] -
Retrieves the n-th entry in the blacklist of CAN-IDs,
which can exclude up to 10 individual CAN message identifiers from the trace history (display).
At the time of this writing (2013-11-27), the index (i) may be 0 to 9, because the blacklist is limited to a maximum of ten entries.
An example which exclude certain CAN message identifiers from the trace history via script is in the test/demo application TraceTest.CVT.
-
trace.file_index -
Gets or sets the file-sequence-number for saving the trace history as a text file.
To save the trace history as text file, you can use the command trace.save_as_file mentioned below.
-
trace.save_as_file -
This command saves the contents of the trace history buffer as a text file on the memory card.
The same can be achived 'manually' (by the operator) as explained here.
With each new file saved, the file-sequence-number (exposed as trace.file_index) is incremented by one.
Only certain devices support this feature !
-
trace.clear -
Clears (erases) the trace history buffer.
Functions to control the virtual keyboard via script
Since 03/2020 (*), the script language contains a few functions (methods)
to control the virtual keyboard:
(*) These functions require a firmware and programming tool compiled 2020-03-16 or later .vkey.show(N) : opens the virtual keyboard, i.e. makes it visible.
0 = don't "show" but hide the virtual keyboard
1 = show the small virtual keyboard (with cursor keys for "navigation"; see
screenshots above)
2 = show the medium-sized numeric virtual keyboard
3 = show the large alphanumeric virtual keyboard
4 = show the large virtual keyboard with the "special character" page (function
keys, German Umlauts, etc)
The following bit-flag may be combined with the above values for parameter 'N' (bitwise ORed):
8 = maximize window (occupying the entire screen, only makes sense for 'large' keyboard layouts with an internal edit field).
vkey.move(X,Y) : moves the virtual keyboard window.
vkey.enable : enables opening the virtual keyboard via double-click.
vkey.disable : disables opening the virtual keyboard via double-click.
vkey.connect(var,caption,options[,row,col]) : Connects the virtual keyboard to a script variable.
var : variable to connect with the keyboard's edit field; type must be string or tTable
caption : text (string) to be displayed in the virtual keyboard's title row
options : reserved for future applications, 0="no special options"
row,col : row and column, if var is an object of type tTable
Note: vkey.connect() also makes the virtual keyboard visible.
Except for script-controlled switching of the keyboard layout, it's unnecessary to call vkey.show(N)
besides vkey.connect().
vkey.text : Current text in the virtual keyboard's edit field.
This pseudo-variable always has data type string, regardless of what is currently
'connected' to the virtual keyboard's edit field.
It is typically used in the OnVirtualKeyboardEvent handler.
vkey.editing : Flag 'virtual keyboard currently used for editing under script control.
This pseudo-variable has the data type bool, i.e. TRUE (1) or FALSE (0).
It is typically used in the OnVirtualKeyboardEvent handler.
In devices with older firmware, similar functions are only available in the display interpreter.
Interaction between Script and Internet Protocol Stack
Most devices with an Ethernet port also have an integrated Internet protocol stack (with TCP/IP).
The functions and event handlers presented in this chapter can be used for a 'direct' interaction
between the script (application) and the IP stack.
For the normal use (TCP/IP used for the embedded web server)
it's not necessary to have special commands in the script for controlling the TCP/IP stack.
For example, files uploaded into the RAMDISK via web server (HTTP-POST) can be processed by the script
using the standard file I/O-functions; and files which were written
into the RAMDISK by the user's script can be read via web server (HTTP-GET) from the device.
Because Internet Socket programming is anything but trivial, and -especially during development-
things can 'go wrong' due to myriads of possible reasons (network-related trouble, trouble with
firewalls, routers, cables, protocols, ...), several network-related debugging tools are integrated
in the development system and / or in the device firmware(!). Those methods are listed in chapter
'Internet / Ethernet-related testing'.
Overview of Internet Application Interface (socket-like API)
In addition to the web server (which doesn't depend on the script language at all), a script application
can implement its own 'IP based' functionality. For this purpose, the script language contains a small subset
of the Berkeley Socket API.
The following list is just an overwiev of the most important
socket-based functions. For details about Berkeley Sockets, consult other literature, or study
the examples further below.
The internet application interface is 'socket based', in resemblance to
sockets used in historic telephone exchanges like the one shown above.
But in 1890, operators didn't need to 'create' sockets before using them.
- iSock := inet.socket(int address_family,int type,int protocol);
- Creates a new socket of a certain socket type,
identified by an integer number, and allocates system resources to it.
The returned value (socket) is an integer value which identifies the communication endpoint. It must be stored in an integer variable until the socket is closed (i.e. "unplugged") again.
Most functions listed below expect the socket number as their first input argument. - inet.close( int socket )
- Causes the system to release resources allocated to a socket.
In case of TCP, the connection is terminated.
Unlike the other socket API functions, inet.close does not return a value.
If certain network operations are still outstanding, a closed socket may not be available immediately for other tasks, i.e. given back to the pool of 'free' sockets. For example, a socket which was successfully CONNECTED to a remote peer will first enter the CLOSING state, before being 'really' CLOSED.
- result := inet.bind(int socket, int port_number)
- Used on the server side (on the client side, use inet.connect instead).
Associates a socket with the specified local port number. In contrast to the Berkeley socket API, inet.bind() doesn't care for IP addresses because the server's IP address is always the same as the device's IP address. - result := inet.listen(int socket, int nConnections)
- Used on the server side. Causes a bound TCP socket to enter listening state.
- iAcceptedSocket := inet.accept(int iListeningSocket)
- Used on the server side. Accepts an 'incoming call' from a remote client,
and creates a new socket associated with the socket address pair of this connection.
The returned value is a new socket, which should later be closed/freed (inet.close) to prevent running out of system resources. - his_name := inet.getpeername(int iAcceptedSocket)
- Typically used on the server side, after successfully accepting a connection.
This function shall retrieve the peer name ("IP address) of the specified socket as a string.
Notes: The Berkeley API uses a fancy structure to store the result for this function; but here the result is a simple string.
In this context, a peer is 'the guy at the other end of the line', i.e. the remote client. - iSockState := inet.getsockstate(int socket)
- Retrieves the current state of the specified socket.
The result may be one of the following symbolic script constants 'SCKS_...' - see socket states.
- result := inet.connect( int socket, int timeout_ms, string destination )
- Used on the client side, and assigns a free local port number
to a socket. In case of a TCP socket, it causes an attempt
to establish a new TCP connection.
This function usually requires several hundred milliseconds, depending on the network and the protocol, because often the TCP/IP protocol stack must resolve the remote server's IP address, or name (using ARP and/or DNS). The second parameter (timeout_ms) specifies the maximum number of milliseconds after which inet.connect must return (with or without success).
The return value indicates success (0=SOCK_SUCCESS), or a negative error code defined here.
- result := inet.send(int socket, int timeout_ms, input_arguments )
- Sends data to a remote socket. If the network transmit buffer is full, the command may block the caller up to <timeout_ms> milliseconds. If the connection bandwidth it large enough, inet.send will not block at all because the actual transmission of data takes place in the background (in a different task).
- result := inet.recv(int socket, int timeout_ms, output_arguments )
- Receives data from a remote socket. Returns the number of bytes received (if any); or a negative error code (one of the SOCK_ERROR constants). If the network receive buffer is empty, the command may block the caller for up to <timeout_ms> milliseconds to wait for the reception of data. The output arguments must be passed by reference, using the address-taking operator.
Examples for the socket style API can be found in the following subchapters, and in the application
script_demos/InetDemo.cvt,
which contains a small, socket-based TCP client and server, written entirely in the script language.
Details on some of the 'inet' functions follow in the next chapters.
- inet.my_addr[0..3] : Reads the local, numeric ("four-byte") IP address.
- If the device doesn't have an IP address yet (because it's configured for DHCP and hasn't received an IP yet),
all four bytes are zero. Without DHCP (aka 'fixed IP address' in the device's network setup),
inet.my_addr[] may report a non-zero IP address even if there is no Ethernet cable plugged in !
Some of the demo applications use this feature to show the device's own numeric IP address on the display,
which is especially helpful if the device has leased an IP address via DHCP but for some reason
the remote client cannot access the device via its hostname (due to DNS trouble, which sometimes happens).
Example (copied from programs/script_demos/InetDemo.cvt) ://-------------------------------------------------------------------- proc UpdateLocalAddress // Updates the 'local address' (string) for the display. // If DHCP is in use, our local (IP-)address may not be valid yet when // the script starts to run. Note: 'LocalAddress' is a display variable ! display.LocalAddress := string(inet.my_addr[0])+"."+string(inet.my_addr[1]) + "." + string(inet.my_addr[2])+"."+string(inet.my_addr[3]) ; endproc; // UpdateLocalAddress
- inet.gethostname : Returns the device's own hostname as a string of characters.
- The hostname can be configured in the device's network setup,
and -in contrast to the numeric IP address- it will never change by means of an Internet protocol.
Internet socket state diagram
The following diagram shows the basic states of a socket, and their transistions.
Not shown here for clarity: Transitions into the (unrecoverable) error state.
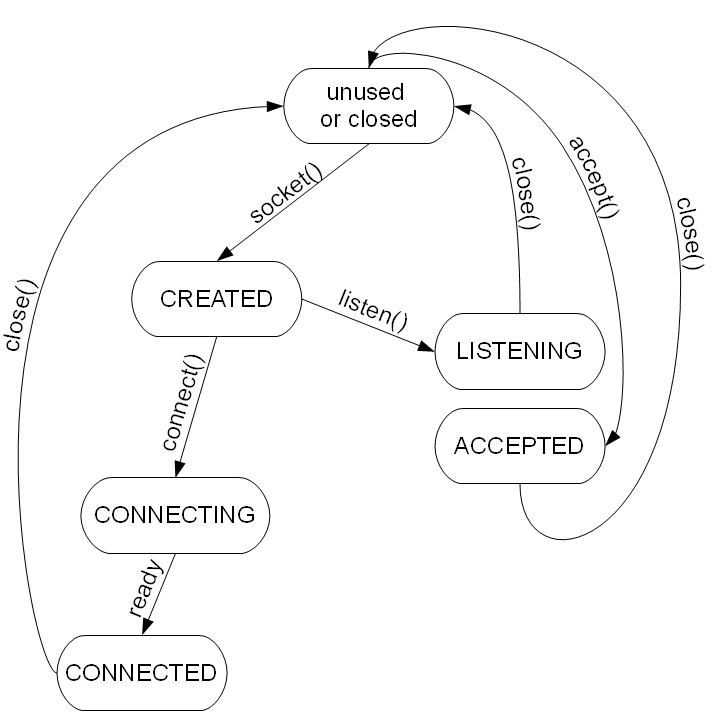
The result (an integer value) is one of the following symbolic constants in the script language:
- SCKS_NOT_IN_USE
- this socket is currently not in use.
- SCKS_CREATED
- socket has been created but neither listening (server side ) nor connecting (client side) yet
- SCKS_LISTENING
- server side: called 'inet.listen' but not 'inet.accept' yet
- SCKS_ACCEPTED
- server side: called 'inet.accept', with success (!).
Note that accept() allocates a new socket from a pool,
thus the 'accepted' socket is not the same as the 'listening' socket, and there is no transition from LISTENING to ACCEPTED for the listening socket !
- SCKS_CONNECTING
- client side: trying to connect to a remote server
- SCKS_CONNECTED
- client side: successfully connected to a remote server
- SCKS_CLOSING
- either side: closing the socket, but some network operations may be still pending
- SCKS_CLOSED
- either side: the connection is definitely closed by someone
- SCKS_ERROR
- either side: an (unexpected) error occurred, connection broke down, etc.
The application should close the socket, and if necessary try to reconnect.
Error codes for the Internet Socket Services
The following internet-socket related err codes are available as symbolic constants in the script language.
Their values are not compatible with error codes specified in the Berkeley socket services,
so don't make any assumption about the actual values (except that SOCK_SUCCESS is ZERO,
and all other error codes have negative values), and use only these symbolic constants in your code:
- SOCK_SUCCESS
- Success, or operation completed. Since this 'error code' is not an error at all, its value is zero.
- SOCK_ERROR
- General Error
- SOCK_EINVALID
- Invalid socket descriptor
- SOCK_EINVALIDPARA
- Invalid parameter
- SOCK_EWOULDBLOCK
- Caller would have been blocked (if it was a 'blocking' socket, i.e. completion is pending)
- SOCK_EMEMNOTAVAIL
- Not enough memory in memory pool, or too many handles or 'sockets' in use
- SOCK_ECLOSED
- Connection is closed or aborted
- SOCK_ELOCKED
- Socket is locked in RTX environment
- SOCK_ETIMEOUT
- Timeout (on a socket, during address resolution, name lookup, connection set-up, or whatever)
- SOCK_EINPROGRESS
- Host Name resolving in progress
- SOCK_ENONAME
- Host Name not existing
- SOCK_ECONNREFUSED
- No connection could be made because the target machine actively refused it
- SOCK_EUNREACH
- Destination unreachable. Example: An ARP request to query the MAC-address for a certain IP has been sent,
but no response was received. Possible reason: No device with the destination-IP-address exists in the network.
- SOCK_ENOTSUPPORTED
- a particular function, or a combination of options, is not supported ( / yet ? )
- SOCK_ETHREADING
- Problem with multithreading. Please report to the developer.
- SOCK_ENCONNRESET
- equivalent to Winsock's "WSAECONNRESET" ("Connection reset by peer")
Beware, this message may be misleading; it also means 'destination port not open' for UDP !
See comments in the sourcecode of the 'internet' demo script / UDP test.
- SOCK_ENOBUFFERS
- equivalent to Winsock's "WSAENOBUFS" ("No buffer space available")
- SOCK_EISCONNECTED
- equivalent to Winsock's "WSAEISCONN" ("Socket is already connected")
- SOCK_ENOTCONNECTED
- equivalent to Winsock's "WSAENOTCONN" ("Socket is not connected")
Note: A function to convert these error codes into human-readable text
is contained in the 'Internet Demo' application (script_demos/InetDemo.cvt) .
The following chapters contain details about some of the internet related functions in the script language.
inet.socket(int address_family, int socket_type, int protocol)
This function creates a new socket of a certain socket type,
identified by an integer number, and allocates system resources to it.
The returned value, traditionally called a 'socket' in resemblance to a telephone socket,
is an integer value which identifies the communication endpoint.
It must be stored in an integer variable until the socket is closed (i.e. "unplugged") again.
Negative return values indicate an error (see error codes listed here).
Parameters:
- address_family : One of the AF_ constants, similar to the Berkeley socket API.
- AF_INET = Internet Protocol (V4). This is currently the only supported address family.
- socket_type : One of the SOCK_ constants, similar to the Berkeley socket API.
- SOCK_STREAM = Stream socket (Connection oriented, for example TCP)
SOCK_DGRAM = Datagram Socket (Connectionless, for example UDP)
- protocol : One of the IPPROTO_ constants, similar to the Berkeley socket API.
- IPPROTO_TCP = TCP/IP (used together with socket_type SOCK_STREAM)
IPPROTO_UDP = UDP/IP (used together with socket_type SOCK_DGRAM)
Note: Any other combination of 'address family', 'socket type', and 'protocol' beside those listed above is expected NOT to work properly !
Example for TCP (code snippet from the 'internet demo') :
          iListeningSocket := inet.socket( AF_INET, SOCK_STREAM, IPPROTO_TCP );

          if ( iListeningSocket < 0 ) then    // negative result means ERROR !

             print("Could not create a socket !");

          endif;
Example for UDP (also from the 'internet demo') :
          iUDPSocket := inet.socket( AF_INET, SOCK_STREAM, IPPROTO_TCP );

          if ( iUDPSocket < 0 ) then    // negative result means ERROR !

             print("Could not create a socket !");


          endif;
inet.bind(int socket, int port_number)
Used on the TCP- or UDP- server side (on the TCP client side, use inet.connect instead).
As in the Berkeley socket API,
'bind' associates a socket with the specified local port number.
But in contrast to the Berkeley socket API, inet.bind() doesn't care for IP addresses
because the server's IP address is always the same as the device's IP address (in which the script runs).
For UDP sockets, inet.bind must be called before inet.recv
due to restrictions in the Windows Sockets API (which is used in the simulator): recv / recvfrom only works
on a 'bound' socket (which means, in geek speak, a socket tied to a certain local port number.
See also: Analogy between ("Berkeley"-) sockets and a conventional telephone in the description of inet.accept .
inet.listen(int socket, int nConnections)
Used on the server side. Causes a bound TCP socket to enter listening state.
For details, see the explanation of the Internet Socket State Diagram shown in an earlier chapter.
An example using inet.socket / bind / listen is in the 'Server' part of the Internet demo application.
inet.accept(int iListeningSocket)
Used on the server side. In analogy to a telephone, "picks up the phone off the hook" when the phone rings (incoming call).
Prior to receiving a call, the phone must be plugged into the socket (inet.socket),
the phone company must have assigned a number (here: inet.bind, with a certain port number),
and the phone must have been prepared to listen for incoming calls on the line (inet.listen).
When successfull, accept() allocates a new socket from a pool, thus the 'accepted' socket is not the same as
the 'listening' socket, and there is no transition from LISTENING to ACCEPTED for the listening socket (this is where the 'phone analogy' ends..) !
If there was no incoming call (since the previous call of accept(), which is not an error),
inet.accept() returns SOCK_EWOULDBLOCK (which is a negative number to distinguish it from a new, 'accepted', socket).
If anything in the sequence (socket → bind → listen → accept) went wrong, you may get another
error code (as the return value), sometimes accompanied with a (more or less)
descriptive error text in the error history (especially when trying this on a PC, in the simulator, shown in the 'Errors and Messages' tab) :
For details, see the explanation of the Internet Socket State Diagram shown in an earlier chapter.
An example using inet.socket / bind / listen is in the 'Server' part of the Internet demo application.
inet.connect( int socket, int timeout_ms, string destination )
Used on the client side. Assigns a free local port number to a socket.
In case of a TCP socket, it causes an attempt to establish a new TCP connection.
When used with a UDP socket, this function does not generate any network traffic (because UDP is a connection-less protocol),
but only sets the remote address (the peer's IP-address), and -optionally- a fixed port number.
If you prefer (like the author) to not use a 'connect' function on a connection-less protocol,
use inet.SetRemoteAddress for UDP instead because that name better hits the spot.
Unlike Winsock / Berkeley Socket API (which uses hundreds of obfuscated structures to store all kinds of 'addresses'),
the 'destination' address is just a simple string, for example "192.168.0.24:49155" (without the double quotes, of course).
This function usually requires several hundred milliseconds, depending on the network and the protocol,
because often the TCP/IP protocol stack must resolve the remote server's IP address, or name (using ARP and/or DNS).
Thus the second parameter (timeout_ms) specifies the maximum number of milliseconds after which inet.connect
must return (with or without success).
The return value indicates success (0=SOCK_SUCCESS),
or a negative error code defined here.
inet.SetRemoteAddress( int socket, string destination )
Used for UDP (which is a connection-less protocol so using "connect" for UDP sockets didn't seem appropriate).
This function sets the 'remote' address and port number for any subsequent call of inet.send, but -again-
only for UDP, not for TCP (for which 'connect' is used instead).
Similar as for inet.connect (which should only be used for TCP but not UDP),
the 'destination' address is just a simple string, for example "192.168.0.24:49155" .
inet.send(int socket, int timeout_ms, input_arguments )
Used both on the client- and server- side, and for UDP and TCP sockets.
Sends data to a remote socket ('peer').
If the network transmit buffer is full, the command may block the caller up to <timeout_ms> milliseconds.
Regardless of being successful or not, inet.send() will always return after that interval (or earlier).
If the connection bandwidth it large enough, inet.send will not block at all
because the actual transmission of data takes place in the background (in a different task).
The return value indicates success (0=SOCK_SUCCESS),
or a negative error code defined here.
In the most simple case, the transmitted data (parameter 'input_arguments') is a simple string.
In more demanding applications (for example if the transmitted fragment or datagram contains 'something binary'),
'input_arguments' may actually be a comma-separated list of variables, which will be assembled one-by-one in the
internal transmit buffer.
inet.recv(int socket, int timeout_ms, output_arguments )
Usable on both the client- and server- side.
Receives data from a remote socket.
Return value: The number of bytes received (if any); or a negative error code (one of the SOCK_ERROR constants).
If the network receive buffer is empty, the command may block the caller for up to <timeout_ms> milliseconds
to wait for the reception of data.
The output arguments must be passed by reference (not, as usual, passed by value).
To achieve this, use the address-taking operator (&)
as prefix before the names of the destination variable(s). Example (from 'InetDemo.cvt') :
    proc RunTcpClient   // minimalistic 'TCP client' .
       local int iResult;
       local string s;
        (...)
       iResult := inet.recv( iClientSocket, 20/*ms*/, &s );
       if( iResult > 0) then // received something -> process it
           print( s );
       endif;
    endproc;
In most higher internet protocol layers (HTTP, FTP, ..), lines of text are exchanged between client and server. Thus the output arguments will almost exclusively be text strings. Each line of text must end with <CR><LF> (Carriage Return followed by 'Linefeed' aka New Line, hexadecimal 0x0D 0x0A).
Thus, the default 'separator' when receiving strings from a socket using inet.recv is this end-of-line marker. Unfortunately, some applications stubbornly ignore this. To simplify the treatment of different END-OF-LINE markers, inet.recv() uses the following end-of-string markers:
- A zero-byte is always an end-of-string marker, as in the "C" programming language.
- <CR> (carriage return) immediately followed <LF> also marks the end of a string (on reception), and both of these characters are appended to the end of the string.
- <CR> not followed by <LF> also marks the end of a string (on reception), and is appended (as a single character) to the end of the string.
- <LF> ('linefeed', 0x0A) without a preceding <CR> is treated like
a normal ASCII character, and does not mark the end of a string;
unless you explicitly define this character as separator after creating the socket.
JSON (Javascript Object Notation)
Even though the script language is in no way compatible with Javascript, it will support JSON (planned for 2015).This will, for example, allow a seamless implementation of an interface to openABK ('offenes Anzeige- und Bedien-Konzept'), initiated by BMW.
Abandoned plan : With sufficient demand from other users, there will be commands in the script language to communicate via openABK 'directly'.
Internet / Ethernet-related troubleshooting
Internet Socket programming is anything but trivial, and -especially during development- things can 'go wrong' due to various reasons (network-related problems, trouble with firewalls, routers, cables, protocols, ...).To help developing network-based applications, several test methods are integrated in the development system and / or in the device firmware(!). Those methods are:
- The status and calling sequence of Internet-related script commands can be examined in the Trace History
(click on the wrench button on the script tab, select 'Options for the trace history', and set the checkmark before trace 'inet' function calls) - Examine received and sent Ethernet frames with the Wireshark-compatible Packet Capture option
(on devices like MKT-View IV, the Ethernet traffic can also be 'listed' without Wireshark, locally on the devices LCD screen) - If 'something goes wrong' (when calling any of the internet-related functions), for example because the network protocol stack
refuses to do what the scripts wants it to, an error message (or warning) will be appended to the list of
Errors and Messages. Example (with a desciption of the possible error reason on a PC with Windows 7):
inet.bind(port=49152) failed : "Only one usage of each socket address (...) is normally permitted"
We will get back to this particular error, and why it often occurrs in the simulator, further below. - You should write your script according to the motto 'hope for the best but expect the worst' (defensive programming).
Most internet-related script functions return a non-negative return value when successful, and a negative error code when 'something went wrong'.
The symbolic error codes are listed in another chapter of this document. If nothing else helps, you could inform the operator of the device, with a human-readable error message.
The 'Internet Demo' application contains a user-defined function (InetErrorCodeToString) to convert any of the 'Socket'-related error codes into plain text.
When running the script in the simulator (on a PC), you will often face the problem that the bind-function refuses to 'bind' a successfully created socket to a certain port number (for purpose of "listening" for incoming calls on that port, which is necessary for many 'server'-like applications).
The reason is usually that the specified port is already in use by another program (or "service") running on the same PC. The simulator tries to gather more information about the reason why a Socket API function call failed, and show the result on the programming tool's 'Errors and Messages' tab. Example:
  Sourcecode (script) :
     // Bind the 'listening' socket to the server's port number:
     iResult := inet.bind( iListeningSocket, display.RemotePort );

  Error message (when running the script in the Simulator) :
      inet.bind(port=49152) failed : "Only one usage of each socket address (...) is normally permitted"
                     |___|            |________________________________________________________________|
                       |                                       |
                       |__ Is this port already "occupied" ?   Error text from Windows (socket services)
To find out who has occupied a certain port (on the PC), use the 'netstat' command in a console window ("cmd.exe").
Example (on a windows 7 machine):
C:\>netstat -abnop TCP

Aktive Verbindungen

  Proto  Lokale Adresse         Remoteadresse          Status           PID
  TCP    0.0.0.0:80             0.0.0.0:0              ABHÖREN         1296  ('simulated' HTTP server)
 [ctptwin1.exe]
  TCP    0.0.0.0:135            0.0.0.0:0              ABHÖREN         400
   .....
 [svchost.exe]
  TCP    0.0.0.0:5357           0.0.0.0:0              ABHÖREN         4
 Es konnten keine Besitzerinformationen abgerufen werden.
  TCP    0.0.0.0:49152          0.0.0.0:0              ABHÖREN         772
 [wininit.exe]
   ......
  TCP    127.0.0.1:49797        127.0.0.1:49796        HERGESTELLT     620
 [firefox.exe]
   ......
See also (external link): Wireshark-compatible Packet Capture option to track down network-related problems.
Interaction between Script and the CANopen Protocol Stack
Note: The functions described below are only available since August 2013 in devices with built-in CANopen protocol stack,
and in the 'UPT Programming Tool II' (as simulator) !
Because most devices (like "MKT-View" II / III / IV) are delivered with a firmware supporting
'CANdb' (automotive) rather than CANopen (automation), your script may
check the availability of CANopen at run-time via cop.supported,
before calling any of the CANopen functions listed further below.
That way, portable> applications can be written that either use CANopen or 'CANdb',
depending on what is currently available. The Feature Matrix contains a list of
firmware article numbers with CANopen- or 'CANdb' support.
The following commands and functions with the prefix 'cop.' (short for 'CANopen') are implemented in the script language:
- cop.supported
- Returns 1 (one, TRUE) if the currently installed firmware supports the CANopen-features listed further below.
Otherwise cop.supported returns 0 (zero, FALSE). In that case, don't use CANopen but the 'raw' CAN-receive and -transmit functions shown in chapter 4.10.6 .
- cop.obd(Index,Subindex[,Data_type])
- Accesses an object in the CANopen device's own (local) object dictionary (OD).
Since no network operations are involved, this function returns to the caller immediately.
Because in a CANopen device almost anything can be controlled via the OD, the script can use this command (as a formal assignment, i.e. write-access) to modify its own behaviour regarding its CANopen communication. Just a few examples:
- Reconfigure the process data communucation via PDO-Communication-Parameter
(Object indices 0x1400=RPDO1 CommPar, 0x1401=RPDO2, .. , 0x1800=TPDO1, 0x1801=TPDO2, .. ) - Reprogram the contents of the process data telegrams by virtue of the
PDO-Mapping-Parameter
(Object indices 0x1600=RPDO1 Mapping, 0x1601=RPDO2, .. , 0x1A00=TPDO1, 0x1A01=TPDO2, .. ) - Reconfigure the SDO-Clients (used to communicate via cop.sdo)
(Object indices 0x1280=first SDO-Client, 0x1281=second SDO-Client, etc.. ) - Reconfigure the SDO-Server (which allow other devices to access the terminal's OD)
(Object indices 0x1200=first SDO-Server, 0x1201=second SDO-Server, etc.. )
- Reconfigure the process data communucation via PDO-Communication-Parameter
- cop.sdo(Index,Subindex[,Data_type][,Timeout_in_milliseconds] ) ,
cop.sdo2(SDO-Channel,Index,Subindex[,Data_type][,Timeout_in_milliseconds] ) - Accesses an object in a remote CANopen device's object dictionary via SDO ('Service Data Object').
The simple variant (cop.sdo) always uses the first SDO client, cop.sdo2 can use any of the SDO clients (as far as supported in the firmware) identified by the zero-based SDO-channel number.
Because network operations are involved, these functions will take some time to complete. During this time, the caller (script) will be blocked for several milliseconds, and the script will be switched into the 'waiting' state. The waiting time may be interrupted by event handlers. For this reason, cop.sdo must not be used in event handlers itself.
Use cop.sdo only in the script's main task (main loop) !
Because cop.sdo() can return different data types (e.g. int,float,string,...), it is recommended to use a variable declared as anytype to store the result (see example under 'anytype'). If an error occurs during the SDO transfer, the result will have the type 'Error' (i.e. typeof(result) == dtError). In that case, the result's value is one of the error codes which CANopen (CiA 301) calls an 'Abort Code'. An excerpt from a long list of possible error codes can be found in the description of the function cop.error_code.
The SDO-clients (and thus 'cop.sdo' in your scripts) support read- and write-access.
For read-access, use cop.sdo on the right side of an assignment-operator ("LVALUE"),
for write-access, use it on the left side ("RVALUE") as in the following examples:
A complete example using cop.sdo is in CANopen1.upt .// Object 0x1018, subindex 0x01 = "Vendor ID", part of the "Identity Object", see CiA 301 : my_vendor_id := cop.obd( 0x1018, 0x01, dtDWord ); // read vendor ID from this device's own OD his_vendor_id := cop.sdo( 0x1018, 0x01, dtDWord ); // read vendor ID from a REMOTE device's OD cop.error_code := 0; // Clear old 'first' error code ('abort code') before the next SDO access cop.sdo(od_index, subindex ) := iWriteValue; // try to write into remote object via SDO if( cop.error_code <> 0 ) then // if the previous SDO accesses were ok, cop.error_code is zero print("\r\nSDO access error, abort code = 0x",hex(cop.error_code,8) ); // show abort code endif; iReadBackValue := cop.sdo(od_index, subindex, dtInteger ); // try to read remote object via SDO if ( iWriteValue <> iReadBackValue ) then print("\r\nSDO error: Read value (",iReadBackValue,") <> written value (",iWriteValue,") !"); endif; print("\r\n My name is ", cop.obd( 0x1008,0, dtString ) ); // "Michael Caine" ? No, but.. print("\r\n His name is ",cop.sdo( 0x1008,0, dtString ) ); // ..the 'Manufacturer Device Name'
SDO clients are usually configured in the programming tool as explained here.
The various CANopen SDO Protocols are specified in CANopen CiA 301.
- cop.error_code
- This variable will be set when an SDO protocol error ('abort code') is indicated (locally or via CAN from a remote server).
The error code is usually displayed as an 8-digit hexadecimal value (see excerpt from CiA 301 below), or can be translated
into a human-readable string with a select-case list as in the demo CANopen1.upt ("ErrorCodeToString").
If an SDO transfer is completed without an error, the value stored in cop.error_code does not change. As long as cop.error_code is nonzero, the value will also not change (even if a subsequent error occurrs).
Together with cop.error_code, the variables cop.error_index (= CANopen OD index of the object which caused the error) and cop.error_subindex (= subindex of the object which caused the error) will be updated.
To clear (or acknowledge) the error in the script, set cop.error_code to zero as in the following example:
The CANopen-SDO-Abort-Codes are specified in CANopen CiA 301. Here's a small excerpt :cop.error_code := 0; // Clear old CANopen error code (usually an abort code; 0 = "no error")
CANopen Abort Code Description 0x05030000 Toggle bit not alternated 0x05040000 SDO protocol timed out 0x06010000 Unsupported access to an object 0x06010001 Attempted to read a write-only object 0x06010002 Attempted to write a read-only object 0x06020000 Object does not exist in the object dictionary 0x08000000 General error
In addition to the CANopen SDO Abort Codes listed above, the function cop.sdo may return one one of the following 'Pseudo'-abort codes, if a read access failed or is impossible for any of the reasons listed below. The type of the value returned by cop.sdo will be dtError in that case.
Note that these 'Pseudo' abort codes are not part of the CANopen standard, and to tell them from the CANopen SDO abort code, the Pseudo abort codes have bit 28 set (hex. mask 0x10000000).
Pseudo Abort Code Description 0x10000001 Cannot call cop.sdo() now due to CAN bus trouble (check CAN status !) 0x10000002 Cannot call cop.sdo() now due to NMT state ("bootup" or "stopped") 0x10000003 Cannot call cop.sdo() now because CANopen is not initialized yet 0x10000004 Cannot call cop.sdo() now because the SDO client is currently busy from another transfer 0x10000005 Cannot call cop.sdo() because the SDO client is not available (wrong channel, not implemented ?) 0x10000006 Cannot call cop.sdo() due to data type incompatibility ("can't convert") 0x10000007 Cannot call cop.sdo() because the simulator is not running 0x10000008 Cannot call cop.sdo() because the SDO client is occupied by the 'node scanner' 0x10000009 Cannot call cop.sdo() because the CAN port is in 'Gateway' mode 0x10000000 Other 'internal' reason why the script must not call cop.sdo() at the moment
See also: Table with more CANopen-SDO-Abort-Codes in the old display interpreter.
- cop.nmt_state
- Retrieves the current NMT state of the CANopen node (built inside the programmable device).
The return value may be one of the following constants:- cNmtStateBootup (0) :
The CANopen device is initialising itself; it cannot communicate, and the object dictionary doesn't exist yet. - cNmtStatePreOperational (127) :
In the NMT state Pre-operational, communication via SDOs is possible. PDOs do not exist, so PDO communication is not allowed. (...)
The CANopen device may be switched into the NMT state Operational directly by sending the NMT service start remote node or by means of local control. - cNmtStateOperational (5) :
All "communication objects" (CANopen-slang) are active. Transitioning to the NMT state Operational creates all PDOs; the "constructor" uses the parameters as described in the object dictionary. - cNmtStateStopped (4) :
The CANopen device is forced to stop the communication altogether (except node guarding and heartbeat, if active)
Details about the 'NMT state machine' of a CANopen device could be found in CiA 301 (formerly known as 'DS 301'..), Version 4.2.0 (Februrary 2011), chapter 7.3.2, pages 83 to 85. The restrictive terms of use (in CiA 301) don't allow us to duplicate that information here; so please obtain a copy of that document from CiA yourself.
- cNmtStateBootup (0) :
- cop.node_id
- Retrieves the CANopen node-ID (1..127) of the device on which the script is running.
The value is read-only. To modify a device's node-ID, use the system setup.
- cop.SendNMTCommand( int node_id, int wanted_nmt_state)
- Sends an NMT message to the CANopen network to switch the desired node(s) into the wanted NMT state.
Valid CANopen nodes IDs are 1 to 127. In addition, for the NMT (Network Management) protocol, node-ID zero can be used to address 'all nodes' in the network.
If the node-ID matches the local node ID, the local node also transits to the new state.
The NMT state can be one of the following constants (which are also used for cop.nmt_state):- cNmtStateBootup : force re-booting (Bootup), actually sends the 'Reset Node' command to one or all slaves.
- cNmtStatePreOperational : switch one or all slaves into the 'Pre-Operational' state.
- cNmtStateOperational : switch one or all slaves into the 'Operational' state.
- cNmtStateStopped : switch one or all slaves into the 'Stopped' state.
TRUE = ok
FALSE= error (function not available, illegal node ID, illegal NMT command, ...)
See also: cop.nmt_state : Retrieves the device's own momentary NMT state.
- cop.SetPDOEvent( int pdo_comm_par_index)
- Sets an 'event-'flag for a certain PDO which may cause immediate transmission.
The PDO is identified by the CANopen OD-index of its 'PDO communication parameter', for example:
0x1800 = first transmit-PDO, 0x1801 = second transmit-PDO, etc.
If setting a PDO's 'event' really causes an immediate transmission depends on the PDO's transmission type. The transmission type is usually defined in the programming tool's PDO-communication-parameter dialog. It may be also affected by a TPDO's optional inhibit time (which limits the maximum frequency at which a PDO can be transmitted).
Return value (if cop.SetPDOEvent was called as a function) :
TRUE = ok (PDO-event-flag was successfully SET)
FALSE= error (function not available, illegal CANopen-OD-Index, etc...)
See also:
- The display terminal's own (local) CANopen object dictionary (OD)
- Object 0x5001 in the CANopen OD : PDO-mappable 'Keyboard Matrix Bits'
- Features of programmable terminals with "CANopen V4"
- PDO-Mapping (Defining the contents of 'Process Data Objects')
- SDO Abort Codes (Error codes used when communicating via CANopen SDO)
- CANopen specifications from CiA (CAN in Automation), most important: CiA 301
Extensions to the script language for J1939
So far, the support for SAE J1939 in the script language is only described in german language,
details here .
Extensions to the script language for ISO 15765-2 (aka "ISO-TP")
The support for ISO 15765-2 (aka "ISO-TP") in the script language isn't finished yet. Until then, some preliminary information
about how to implement parts of the "ISO Transport Protocol" can only be found in the documentation in German language .
A crude (and yet untested) sample script is provided along with the programming tool.
Due to the lack of a suitable test environment (ECU with proper documentation), the ISO-TP functions
could not be tested so far.
Preprocessor Directives
#pragma
Similar as in "C", the #pragma directive is used to pass optional info to the compiler.
'Unknown' pragmas shall be ignored, but not throw an error.
So far, the following pragmas are implemented in the script language:
- #pragma strict : Only allow declared variables.
- #pragma debug : Collect info for the optional, built-in debugger when starting,
and allow the built-in debugger to show the sourcecode
(with 'been-here' markers, breakpoints, etc). - #pragma debug : Collect info for the optional, built-in debugger when starting,
#include
This directive inserts the contents of an 'include file' into the sourcecode.
Syntax:
#include "<Filename without path>"
Because the target system (e.g. MKT-View) cannot access the include files on the development PC,
the programming tool loads the sourcecode from all included files (when compiling the script
on the PC), and copies the included text into the loaded application. When saving
the application in a CVT- or UPT file, or transferring the application into the target (via CAN, etc),
the included text is still present (inserted in the script as explained below), so the embedded
script compiler can translate everything, even without a memory card or access to the PC's file system.
Whenever an application is loaded into, or compiled in the programming tool, the contents
of all included files will also be loaded (updated), overwriting the old included fragments (when already
present from an older include-file).
For technical reasons, the text loaded from an include file is visible in the script editor / debugger.
Editing the text loaded from the include file is useless ! It will be replaced with the text from the
include file on the next compilation. To modify the include file, edit the include file itself, but not the script
which #includes it. Unfortunately, the 'Rich Text' edit control (used in the programming tool) cannot protect
individual paragraphs from being edited. At least, the text loaded from the include file by the compiler
will be marked with a special background colour in the editor/debugger. The background colour also indicates
if the text could be loaded successfully in the last compilation:
- Yellow
- The include file could not be loaded; the yellow paragraph originates from a
possibly outdated file (located on a different PC, or outside the currently configured
'include file path' in the programming tool).
- Lightgray
- The include file was successfully loaded when the script was last compiled.
(Note: The programming tool immediately compiles the script after loading a *.upt or *.cvt file.)
When "loading" an include-file as mentioned above, the script compiler inserts two additional lines in the script (directly after the #include directive), to mark the begin and the end of the included text. Like the included text itself, these lines must not be edited:
##begin_include "Test.inc" date=2016-08-04_16:24:10 // DO NOT EDIT THIS PART !- This line is inserted before the first line read from the include file.
For testing, it also contains the name and the last modification date of the included file.
##end_include "Test.inc"- This line is inserted directly after the last line read from the include file.
It marks the end of the included text, which is important for the compiler to remove this fragment before 're-loading' the include file in the next compilation.
For testing, the name of the included file is also repeated in this line.
Keyword List
Even though the script compiler is not case-sensitive, 'basic' keywords which
should be written in lower case (more or less a matter of taste). Crossed out
(xyz) means 'the keyword may exist in future versions, but was
not implemented at the time of this writing'.
See also: Quick Reference, Operators, Constants .
| Keyword | Argument list or syntax |
Return value |
Remarks |
| abs | -> Math.abs, returns the absolute (non-negative) value, or (with two arguments) the length of a vector . |
||
| and | A and B | integer | boolean AND operator, same as the "C"-compatible
operator && . The result is 1 (one, TRUE) if both operands are non-zero; otherwise 0 (FALSE). |
| anytype | Data type to declare varibles which can accept 'int','float','string', and others. To check momentary type such a variable, use the typeof() operator. |
||
| addr | (variable) | pointer | Returns the address of the specified variable. |
| append | (dest,source[,index]) | - | Appends a string (source) to another string or binary block (dest). Result in 'dest'. |
| ->Math.atan2(y,x) arctangent | |||
| atof | (string) | float | "ascii to float". Converts a decimal string into a floating point number |
| atoi | (string) | integer | "ascii to integer". Converts a decimal string into an integer number |
| BIT_AND | A BIT_AND B | integer | Performs a bit-wise AND operator. Same as "&" in the "C" programming language. For example, 5 (101 binary) BIT_AND 3 (011 binary) gives 1 (001 binary). |
| BIT_OR | A BIT_OR B | integer | Performs a bit-wise OR combination of two operands. Same as "|" in the "C" programming language. For example, 5 (101 binary) BIT_OR 3 (011 binary) gives 7 (111 binary). |
| BIT_NOT | (unary operator) | integer | Performs a bit-wise NOT on the operand on the right side of this unary operator. Example: BIT_NOT 0xFFFF0000 gives 0x0000FFFF. For compatibility with "C", BIT_NOT is the same as the tilde (~). This operator is often used to invert bitmasks, as in this example | .
| BytesToFloat | (exp, m2, m1, m0) | float | Combines four bytes into a
IEEE 754 32-bit
floating point number ('single'). The first 8-bit argument (exp) contains the exponent's sign and 7 data bits. The last 8-bit argument (m0) contains the least significant bits of the mantissa. |
| BinaryToFloat | ( 32-bit 'DWORD' ) | float | Almost like 'BytesToFloat', but the four bytes are passed as a single 32-bit value in little endian byte order, aka 'Intel format'. |
| FloatToBinary | ( 32-bit 'float' ) | 32-bit int (binär) |
Inverse to 'BinaryToFloat'. Returns the "binäry bit pattern" of a 32-bit floating point value as a 32-bit Integer. The bit pattern itself is not modified - all this function does is modifying the data type code from 'float' to 'int'. This function can be used to store a float value in the array system.nv[] (system.nv[] is an array of integer values, thus without FloatToBinary, the automatic type conversion would round down to the neareast integer value). |
| BytesToDouble | (exp1,exp0,m5..m0) | double | Combines eight bytes into a
IEEE
754 64-bit floating point number ('double'). The first 8-bit argument (exp1) contains the exponent's sign and 7 data bits. The last 8-bit argument (m0) contains the mantissa's least significant bits. |
| can_receive | integer | Tries to read the next received CAN message from a FIFO. When successful, the message is copied to can_rx_msg, and the result is 1 (one). Otherwise (empty FIFO), can_rx_msg remains unchanged, the result is 0 (zero) . |
|
| CAN. (..) | Prefix (and namespace) for other CAN-related commands and functions. Not for devices with CANopen. |
||
| case | integer CONSTANT | part of a select .. case .. else .. endselect block . | |
| chr | (integer code) | Converts an integer character code (0..255, sufficient for "DOS" characters) into a single-character string . |
|
| cls | clears the text-mode screen (here: a buffer for multi-line text displays). | ||
| ->Math.cos cosine function | |||
| cop. (..) | Prefix (and namespace) for CANopen-related commands and functions. Only for evices with CANopen. |
||
| (reserved for an optimized 'decrement' operator) | |||
| display.xyz | Commands and functions controlling the programmable display | ||
| dtInteger, etc | Data type codes, used in combination with the typeof() operator. | ||
| endif | end of an if .. then .. [elif ...] else .. endif construct | ||
| endwhile | end of a while - loop | ||
| endselect | end of a select .. case construct | ||
| endproc | marks the end of a user-defined procedure | ||
| endfunc | marks the end of a user-defined function | ||
| elif | part of an if .. then .. elif .. [elif ..] else .. endif construct ("else if", eliminates the need for additional endifs). |
||
| else | part of an if .. then .. else .. endif,
or select .. case .. else .. endselect block |
||
| EXOR | A EXOR B (binary operator) |
integer | Operator for a bitwise EXCLUSIVE-OR combination of the two operands. Often used to toggle (invert) one or more bits in a bitmask. For example, 5 (0101 binary) EXOR 3 (0011 binary) gives 6 (0110 binary). Notes:
|
| file. | prefix for all file I/O functions | ||
| float | data type for floating point values | ||
| for | begins a for .. to .. step .. next loop | ||
| ftoa | (value, nDigitsBeforeDot, nDigitsAfterDot) |
'floating point to ASCII' | |
| stoneage jump instruction, try to avoid whereever possible | |||
| old subroutine calls, try to avoid ... | |||
| gotoxy | (x,y) | sets the text cursor to the specified column (x, 0..79) and row (y, 0..24) | |
| hex alias HexString |
(value, nDigits) | Converts an integer value into a fixed-length hex (hexadecimal) string, with the specified number of digits. |
|
| BinaryString | (value, nDigits) | Converts an integer value into a fixed-length binary string, with the specified number of digits. |
|
| if | (condition) | statement begins an IF .. THEN .. ELSE .. ENDIF construct | |
| in | defines the following argument (in a formal argument list) as "input" | ||
| (reserved for an optimized 'increment' operator) | |||
| inet. | prefix for socket-based internet functions | ||
| int | integer (data type; 32 bit signed integer) | ||
| isin | (argument:0...1023) | Fast integer sine. Input range 0 (~0°) to 1023 (~360°), output -32767 to +32767. | |
| itoa | (value, nDigits) | 'integer to ASCII'. Converts an integer value into a fixed-length decimal string with the specified number of digits. |
|
| limit | (variable,min,max) | - | Limits the value stored in <variable> to the specified range. |
| local | defines local variables (exist on the stack until the end of a user-defined function) | ||
| ->Math.log natural logarithm | |||
| Math.xyz | Math.pow(), Math.sin(),.. | Math functions | |
| MOD | |||
| next | ends any for .. to .. step .. next loop | ||
| NOT | boolean 'NOT' operator (negation). Same as the "!" operator in "C" ("unary not"). The result is 1 (TRUE) if the input is 0 (zero, FALSE); otherwise (if the input is non-zero), the result is zero. |
||
| OR | boolean OR operator, same as the "C"-compatible
operator || . The result is 1 (TRUE) if any of the operands is non-zero; otherwise 0 (FALSE). |
||
| out | defines the following argument (in a formal argument list) as "output" for a procedure or function . |
||
| Prints values into a multi-line "text panel" on the current display page . | |||
| cPI | constant value "PI" (3.14159....) . | ||
| proc | Marks the begin of a user-defined procedure | ||
| ptr | Keyword for a typeless or fixed-type pointer | ||
| ramdom | (N) | Returns a pseudo-random number between zero and N minus one . | |
| return | Returns from a user-defined function | ||
| repeat | begins a REPEAT..UNTIL loop. This kind of loop is executed at least once . | ||
| REM | begins a remark in BASIC. Better use the double slash // - same effect | ||
| rgb | (red, green, blue) | Composes a colour from red, green, and blue components | |
| select | (integer expression) | begins a select .. case .. else .. endselect block . | |
| setcolor | Sets the foreground- and background colour for output on the text screen . | ||
| SHL | (binary operator) | Bitwise shift left. Example N := N SHL 8; // multiplies N by 256 | |
| SHR | (binary operator) | Bitwise shift right. Example N := N SHR 2; // divides N by four
. Note: SHR is considered an 'arithmetic' shift right. Negative numbers remain negative, and positive numbers remain positive. Thus, SHR expands the sign from bit 31, and 0x80000000 SHR 31 gives the result 0xFFFFFFFF (not 0x00000001) . |
|
| step | defines the counter's stepwidth in a for .. to .. step .. next loop | ||
| stop | Stops execution of the script. Useful for debugging. | ||
| string | data type for a 'string' of characters | ||
| system | .component-name | 'system' variables (current timestamp, etc), and functions system.beep | |
| tCANmsg | Data type name for a 'CAN message'. Also used for the global variable can_rx_msg . |
||
| time | Date and Time conversions | ||
| tMessage | data type name for a system message (used for message handling in the script). | ||
| to | defines the counter's end value in a for .. to .. step .. next loop | ||
| trace | .print, .enable, .. | Trace History control | |
| tscreen | .component-name | text-screen buffer object | |
| tScreenCell | data type name for a 'text screen cell' | ||
| typedef | defines a new data type (usually a structure composed of basic data types) | ||
| typeof | Retrieves the momentary data type of the specified variable (declared as anytype). The result is usually a data type constant, for example dtInteger. |
||
| until | (end criterion) | ends a REPEAT..UNTIL loop | |
| wait_ms | (milliseconds) | waits for the specified number of milliseconds before executing the next script instruction. |
|
| while | |||
See also:
- list of built-in constants
- list of built-in data type names (which are reserved keywords, too)
- list of built-in operators (some of them are also reserved names / keywords, no 'special characters' !)
Error messages
Incomplete list - error messages that 'speak for themselves' may be omitted here.
If an error (or warning) occurrs during script compilation, it will be displayed
on the programming tool's Errors & Messages tab.
-
syntax error
An error has occured, usually during compilation, which cannot be further diagnosed by the compiler. -
missing argument
The argument list of a function or procedure call contains less arguments than expected. - missing left parenthesis
- missing right parenthesis
- missing LEFT square bracket ( [ )
- missing RIGHT square bracket ( ] )
- missing operand
- type conflict
- division by zero
- illegal value
- function unknown
- function permanently unavailable
- function temporarily unavailable
- illegal array index or similar
- missing component
- unknown component
- function failed
- bad array subscript
- illegal pointer or reference
- comma or closing parenthesis expected
- expecting a semicolon
- expecting a comma
- name expected
- var-name expected
- expecting an assignment
- expecting a data type
- expecting an integer value
- undefined variable
- out of memory
- structure or block too large
- illegal channel number
- label not found
- return without gosub
- call stack overflow
- call stack underflow
-
call stack corrupted
Occurrs, for example, when a user-defined function tries to return to the caller but finds no valid return address on the stack (value exceeds program memory size, or negative address). In fact, the "call stack" is the same stack used for RPN calculations, so if a calculation illegally overwrites a return address, such errors may occur. -
name or symbol too long
Names of variables, functions, data types, constants, etc are all limited to 20 characters. -
subscript or indirection too long
Applies to arrays and/or nested structures.
If, for example, A is a one-dimensional array, A[1][2] is illegal ("too many array indices" in this case). -
bad input
An input-function, or string parser, couldn't handle the input (for example, could not convert the input characters into a number). - 'for' without 'next'
-
'next' without 'for'
Often occurrs as a subsequent error when there was a problem in the matching 'for' (error disappears after fixing the problem in the 'for' statement). - 'else' without 'if'
- 'endif' without 'if'
- 'case' without 'select'
- 'endselect' without 'select'
- 'endwhile' without 'while'
- 'until' without 'repeat'
- no loop to exit from
- only callable from SCRIPT
- simple variables only
- variable or element is READ-ONLY
- unknown script command
- function not implemented yet
- RPN eval stack overflow
- RPN eval stack underflow
- illegal code pointer
- illegal sub-token after opcode
- cannot use as LVALUE (in assignment)
-
not an allowed ARRAY type
The element left of an array subscript cannot be accessed like an array. - ARRAY type mismatch (dimensions, etc)
-
name already defined
The name you tried to use in a variable declaration, type definition, or similar is already in use. - missing 'struct' or 'endstruct'
-
internal error - SORRY !
If you ever encounter this error, please report this error to the developer (Wolfgang Büscher), along with the sourcecode of the script which was causing it. -
unknown error code ( < number > )
An error code has occurred for which there is no entry in the error message table yet.
Please report this error to the developer, along with the error number.
Event Handling ( handling system messages and similar events in the script )
As a replacement for the 'event definitions' in the display interpreter, the script language can be used to react when the user 'does something' on a display page, press a key, operate the touchscreen, or the rotary encoder. The script may even intercept(!) certain events, i.e. disable the default message handler for that event.
In the script language, system messages / events can be handled by simply adding your own message handler. The return value of a message handler (function) tells the system if the message shall be discarded (because your script has processed it, and doesn't want the message be passed to the 'default' message handler). More on this later. Let's begin with the "lowest level" of message processing: Keyboard events, rotary encoder events, and (depending on the device capabilities) touchscreen events.
|
Similar restrictions also apply to calling the script from the display interpreter.
If the time specified above is not sufficient for your event handler, and staying in the handler for so long is unavoidable,
the maximum time spent in the handler can be prolonged by feeding a watchdog in the handler...
but this could have the side effects already mentioned before (sluggish response to user input, protocol timeouts, etc).
All event handlers listed in the following chapters are activated after the script finished its own
initialisation (e.g. preset global variables, load strings from translation files, etc).
At the end of the initialisation sequence (in the script sourcecode), the script should invoke
the command init_done to let the system know when the script is "open for business".
Amongst others, this enables the event handlers.
Example (from script_demos/ButtonEventDemo.cvt):
var
  int i,imax;
  int CanSignals[10]; // declare an array with 10 integers
endvar;

// Initialize the script's own variables:
imax := CanSignals.size(0)-1;
for i:=0 to imax
   CanSignals[i] := 11*i; // fill array with defaults
next i;

init_done; // let the system know "we're open for business" (enable event handlers)

  ...

func OnControlEvent(
         int event,     // [in] type of the event, like evClick, etc
         int controlID, // [in] control identifier (from page-def-table)
         int param1,    // [in] 1st message parameter, depends on event
         int param2 )   // [in] 2nd message parameter, depends on event
  // Called when 'something happens' with a certain control element
  // (button, menu item, edit field, etc) on the current display page .
 ...
Low-level system event handlers
To react on, or even intercept, low-level system messages, define one or more of the following handlers in your script.
      func OnKeyDown( int keyCode )    // a 'normal' key has just been pressed
      func OnKeyUp( int keyCode )      // a 'normal' key has just been released
      func OnKeyMatrixChange( int oldMatrix, int newMatrix ) // keyboard matrix changed
      func OnEncoderButton(int button) // rotary encoder button pressed or released
      func OnEncoderDelta( int delta ) // encoder button was rotated by 'delta' steps since the last call
      func OnEncoderDelta( int delta, int freq ) // similar, with additional step frequency measurement
      func OnPenDown( int x, int y)    // pen has just been pressed on touchscreen
      func OnPenUp( int x, int y)      // pen has just been released from touchscreen
      func OnPenMove( int x, int y)    // pen coordinate (on touchscreen) changed, WHILE pen down
      func OnGesture( int gestureCode, int gestureSize ) // touchscreen gesture finished, pen up again
      proc OnPageLoaded( int iNewPage, int iOldPage )   // a new display page was loaded (from FLASH)
      proc OnPageEnter( int page_nr, string page_name) // the specified display page is just being "entered"
      proc OnPageQuit( int page_nr, string page_name) // the specified display page is just being left
      proc OnPageUpdate( int page_nr, string page_name, int element [,..] ) // rendering page in framebuffer
      proc OnLocationChanged()           // GPS receiver has reported a new position and/or time (gps.xyz)
      proc OnSystemShutdown(int iReason) // System is about to be SHUT DOWN (turned off)
For some other kinds of events, arbitrary handler names can be used, for example CAN-Receive- and Timer- events. But even in those cases, we suggest to use consistent names beginning with "On", to tell event handlers from 'normal' functions in the script language.
A few examples:
func OnCAN_ID123( tCANmsg ptr pRcvdCANmsg) // CAN-Empfangs-Handler (activated by can_add_id)
func OnTimer1( tTimer ptr pTimer)          // Timer-Event-Handler (started by setTimer)
The handler may return an integer value
of 0 (zero = FALSE) to let the default message
handler process this event as usual; or 1 (one) which means "I have handled
this event in my script, and don't want to let the system handle it". This
way, the normal keyboard processing can be (almost) completely disabled by
returning 1 (one = TRUE = "message has been handled").
- Note:
- If a user-defined event handler doesn't use the 'return <value>' statement, the function returns with an integer value of zero. This means, if an event handler in the script language doesn't return with an explicit value, the event will be handled by the system as usual (which means the event-message will not be suppressed).
A few simple examples for event handlers can be found in the
'EventTest' application.
OnEncoderDelta( int delta, int freq )
If this handler exists in the script, it will be called a few milliseconds after turning the rotary encoder on the front panel.The first argument (delta) contains the number of steps counted since the last call of this handler. A negative 'delta' means rotate counter-clockwise, a positive value means clockwise rotation.
The second, optional argument (freq) is the step frequency (or pulse frequency) of the last few pulses before the call. As in the polling function system.encoder_freq, the frequency may be negative (if the encoder is rotated counter-clockwise). This value can be used to realize a speed-depending scaling between 'encoder counts' (delta) and 'increments / decrements' of a variable. A simple example with event handlers for the rotary encoder is contained in the script_demos/EventTest.cvt application. An advanced example (which uses both arguments, delta and freq) is in script_demos/RadioTuningKnob.cvt.
OnPageLoaded( int iNewPage, int iOldPage )
If implemented in the script, this event handler will be called immediately after loading a new display page from FLASH, before entering and updating the page (i.e. before it gets visible in the framebuffer).This handler was used for internationalisation, by translating all strings from the 'designed' language into the user's configured language at runtime. An example can be found in the 'internationalisation demo' (programs/script_demos/i18nDemo.cvt).
OnPageEnter( int page_nr, string page_name)
This optional event handler will be called whenever the specified display page is being 'entered', i.e. shortly before it gets rendered into the framebuffer (-> OnPageUpdate) and shortly after the page was loaded from FLASH (-> OnePageLoaded).OnPageQuit( int page_nr, string page_name)
This optional event handler will be invoked immediately before leaving the current display page, i.e. shortly before calling OnPageEnter() for the new display page.In OnPageQuite, the function arguments page_nr and page_name apply to the old display page.
OnPageUpdate( int page_nr, string page_name, int iElement )
or OnPageUpdate( int page_nr, string page_name, int iElement, tCanvas *pCanvas )
This optional event handler will be called multiple times whenever rendering ("updating") a display page.
The handler is intended for advanced graphic output 'directly into the framebuffer', whenever the specified page
is being updated by the display interpreter. As most other OnPage-handlers, the first two function arguments
indicate the number and the name of the page being updated.The third argument (element, an integer array index into the current display page's elememts (display.elem[ iElement ] ), informs the script about which element is about to be rendered into the framebuffer (thus multiple calls during a single page update):
- iElement = 0 : Call to paint "in the background of any other display element".
- OnPageUpdate() called between clearing the page's background
(in most cases, filling the entire framebuffer with the page's background colour)
and painting the first display element (with array-index zero, remember most array indices
in the script language are zero-based. display.elem[ iElement ] is one of them.
If the script paints anything into the framebuffer during this call, the painted whatever-it-is will appear in the background, behind all 'programmed' display elements of the current page.
- iElement = 1 :
- OnPageUpdate() called between rendering the first element (array index zero) and the second (array index one).
If the script paints anything into the framebuffer during this call, and display elements overlap on the screen, the painted whatever-it-is will appear between those elements.
- iElement = 2 .. <number of elements on the current display page - 1> :
- OnPageUpdate() called between rendering the N-th and N+1-th element, to control the Z-order
as explained above for iElement = 1.
- iElement = 255 : Call to paint "in front of any other display element".
- OnPageUpdate() called after rendering all display elements on the current page,
a few microseconds before flipping between the two framebuffers to make the new page visible on the screen.
If the script paints anything into the framebuffer during this call, the painted whatever-it-is appears in the foreground, in front of any 'normal' display element.
Instead, to control the Z order of anything you want to paint in the OnPageUpdate()-event, use a select-case block as in the "MacPan" demo.
The fourth (optional) parameter, pCanvas, can be used to paint "directly" into the framebuffer, using any of the Canvas drawing functions listed here.
Mid-level event handlers (events from visible controls on a UPT display page)
If a system message was not intercepted by a low-level event handler (see previous chapter), it may be propagated to the next level of event handling. This is, in most cases, related to the visible control elements (like buttons, menu items, edit fields, etc) on the current display page.
func OnControlEvent( int
event, int controlID,
int param1, int
param2 ) // event from a 'visible control
element'
This handler may be called for a number of different events. The first function argument indicates which event was detected :
-
event: can be one of the following symbolic contstants (in fact, integer numbers): -
evClick :"the control element has been clicked, or the enter key was pressed while it was focused"
evPenDown :"the touchpen has just been pressed, and the touchscreen coordinate was in the control's client area"
evPenMove :"the touchpen has been moved, while pressed within the control's client area"
evPenUp :"the touchpen has just been released, and the touchscreen coordinate was still in the control's client area"
evKey :"a key was sent to the control, while it had the input focus"
evBeginEdit:"An edit field has just been switched into the 'editing' state". Purpose: see display.EditValueMin / Max.
evEndEdit :"Editing has just been finished". Purpose and details here.
-
controlID: user-defined integer value (a constant) to identify the control which fired the event. -
The author strongly suggests to use
user-defined constants for these
identifiers.
The control-ID (also as symbolic constant, details below) must be entered in the field labelled
'Control ID' in the UPT programming tool's page definition table / display line properties.
If a control element doesn't have an ID (i.e. the 'Control ID' field is empty), it will not fire a control event.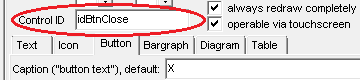
Assignment of a Control-ID in the programming tool
We strongly recommend to decorate the names of all control IDs with the prefix 'id', for example idBtnUp, idBtnDown, idBtnLeft (use 'talking names' whereever possible). When defining a control element on the 'Page #X' tab, the control ID can be picked from a list (after double-clicking the 'Control ID' field):
The control-ID can also be used to access the display element from within the event handler, using a statement like
Screenshot with a list of user-defined script contstants,
after double-clicking on 'Control ID' in the programming tool.
display.elem_by_id[controlID].xyz(xyz=component of the display element).
-
param1: first message parameter. The meaning depends on the event-type : -
For evPenDown and evPenUp, param1
is the touchscreen 'X' coordinate, param2 the 'Y' coordinate,
both are graphic client coordinates (x=0, y=0 is the control's upper left corner).
To convert a coordinate into text coordinates (of a text panel),
divide X (measured in pixels) by tscreen.cell_width,
and Y (also measured in pixels) by tscreen.cell_height.
For evKey, param1 contains the keyboard code of the key sent to the control.
For events evClick, evBeginEdit and evEndEdit, param1 contains the element index of the control element which 'fired' the event.
This allows to tell multiple controls (display elements) with the same Control-ID from each other.
To selectively access the sender (element which 'fired' the event), use display.elem[ param1 ].xyz (where xyz is the component of the element).
-
param2: second message parameter. The meaning depends on the event-type (eg. 'Y').
An example using 'OnControlEvent' can be found in the
'EventTest' application.
A more sophisticated example is the 'custom pop menu',
which uses a text panel and touchscreen event handlers to show a menu (or selection list).
See also:
Events fired by a 'table' (visible control element),
events fired by a 'diagram' (also a display element),
events fired by the virtual keyboard,
activating event handlers after the initialisation with the 'init_done' command.
Timer Events
As already mentioned in the chapter about 'Other functions and commands',
the command setTimer starts a periodic timer in the script language.
The optional (third) parameter in the argument list is the name of a timer event handler, for example:
      var
        tTimer timer1;  // Declaration of a timer instance as a global variable of type 'tTimer'
      endvar;
         ...
      setTimer( timer1, 100, addr(OnTimer1) ); // Start 'timer1'
         // with an interval of 100 milliseconds, to call 'OnTimer1' periodically
         ...
In the script language, timers will fire events periodically as long as they are not stopped. Whenever a timer's interval expires, the timer's "expired" flag (a component of struct tTimer) is set in the timer variable. If (as in the example shown above) the name of a timer-event-handler has been speficied, that handler will be called shortly after the 'expired' flag has been set.
The timer variable will be passed to the timer event handler as a pointer (address), so the event handler can easily access it (to start, or modify its own timer).
For that purpose, the timer event handler must be properly defined (as a function which expects the address of a tTimer object):
      func OnTimer1( tTimer ptr pMyTimer )  // periodically called Timer Event Handler
         local tCANmsg msg;  // declaration of a CAN-Message as a local variable
         msg.id := 0x334;    // set the CAN message ID (and optionally the bus number in the MSBits)
         msg.len:= 8;        // set the CAN data length code (max. 8 bytes = 2 DWORDs)
         msg.dw[0] := 0x11223344; // set the first four bytes in the message data as a DWORD (32 bit)
         msg.dw[1] := 0x55667788; // set the last four bytes in the message data as a DWORD
         can_transmit( msg ); // send the CAN bus message
         return TRUE; // TRUE = 'the event has been processed' (FALSE would not fire more events)
      endfunc; // end OnTimer1
If a timer event handler returns 'FALSE' (0), the 'expired'-flag will NOT be cleared, and the event handler won't be called again (i.e. "single shot" operation).
More examples for timer events (in the script) can be found in chapter 4.
See also: wait_ms(0) (to immediately handle all pending timer events).
CAN Receive Handlers
In addition to the polling-method explained in the chapter about CAN functions
(i.e. cyclically calling can_receive from the main loop),
event handlers can be implemented in the script which are automatically called on the
reception of certain CAN messages (precisely, handlers called on reception of certain CAN-message or LIN-frame IDs).
This way, the response time can be significantly reduced (in comparison with the polling method).
The following example shows a simple CAN message handler, which must be registered
by calling can_add_id( <CAN-ID>, <name of the handler> )
or (to receive multiple IDs) CAN.add_filter( <filter>, <mask>, <name of the handler> ).
      can_add_id( 0x0000123, addr(CAN_Handler_ID123) );  // register CAN-ID and a receive-handler
      can_add_id( 0x0000124, addr(CAN_Handler_ID123) );  // another CAN-ID for the same handler
      can_add_id( bus=cCanBusAny, 0x000, addr(OnNmtBroadcast) ); // ..for reception on ANY bus
       ...
  var
      tDisplayVarDef ptr pVarDef;  // pointer to the definition of a display-variable
  endvar;

       ...

  pVarDef := display.GetVarDefinition( "Oeldruck" );           // get database entry for "Oeldruck"
  can_add_id( pVarDef.CAN_Msg_ID, addr(CAN_Handler_Oeldruck)); // register RX-handler for "Oeldruck"

       ...
   func CAN_Handler_ID123( tCANmsg ptr pRcvdCANmsg )
     // CAN-Receive-Handler for certain 'important' CAN message identifiers.
     // Interrupts normal processing, and must return to the caller a.s.a.p. !
     select( pRcvdCANmsg.id )   // Take a look at the CAN message identifier...
       case 0x123:   // message ID 0x123 (hex)
           CAN.DecodeMessage( pRcvdCANmsg ); // update display variables IMMEDIATELY
           if( display.ValueFromMessageID123 > 123.0 ) then
              IllegalValueCounter := IllegalValueCounter + 1;
           endif;
           return TRUE; // 'handled' here; do NOT place this message in the script's CAN-RX-Fifo
       case 0x124:   // message ID 0x124 (hex)
       case 0x125:   // message ID 0x125 (hex)
           return TRUE; // 'handled' here; do NOT place this message in the script's CAN-RX-Fifo
     endselect;
     return FALSE; // did NOT handle this message here; let the system place it in the CAN-RX-Fifo
   endfunc; // end CAN_Handler_ID123
A CAN receive handler will be called shortly after the reception of a matching CAN message, which interrupts the normal script processing (and other functions of the programmable terminal). The handler is called even before the 'CAN signals' which may be contained in the message are decoded into 'display variables' (thus the need for CAN.DecodeMessage; see notes further below).
For technical reasons, this interruption may only require a few dozen milliseconds - see details in the yellow info box in the chapter about event handling in the script language.
While the handler is being executed, the device cannot perform other tasks !
If the event handler (function) doesn't 'voluntarily' return to the caller within 500 milliseconds, its execution will be suspended to keep the device operational. The system (firmware) will assume a return value of zero (0), which means the received CAN message will be passed to the system's default-handler for CAN reception.
Meaning of any CAN receive handler's return value :
- FALSE (0) : The handler did not process this message.
The system's default handler (implemented in the firmware) will copy the message into the CAN-receive-buffer,
from where it can be drained by periodically calling can_receive in the script's main loop.
- TRUE (1) : The handler has processed the CAN message.
The received message shall not be placed in the CAN-receive-buffer mentioned above.
A complete example with a CAN-receive-handler can be found in the application ScriptTest3.cvt .
Notes (concerning CAN receive handlers in the script):
- Because any CAN receive handler shall be invoked as fast as possible by the system ("interrupt-like"), the signals contained in the received CAN message have not yet been decoded for the display at that time !
- If the CAN receive handler returns TRUE, it indicates having processed the received message 'itself' (completely), which -as explained further above- causes the system not to place the received CAN message in the displays's receive FIFO. For this purpose, the CAN-receive-handler must be called before the display decodes the CAN message's data field.
- If, despite the above, your script needs to process the signals immediately in the CAN receive handler,
it can either decode the required signal(s) itself... for example:
EngineSpeed := pRcvdCANmsg.bitfield[0,16] * 0.3333; // decode received CAN signal
(where 'EngineSpeed' is a script variable, if possible declared as a local variable) - ... or (alternatively): The CAN receive handler can force immediate decoding
of all signals (in the received message) by the display, using the following command:
CAN.DecodeMessage( pRcvdCANmsg ); // decode all signals in the received CAN message
(after that, the signals from 'pRcvdCANmsg' are accessable in display variables, imported from a DBC file)
- If the received CAN messages are in fact 'simulated' by the CAN Logfile Player,
the player will automatically be paused when the script hits a breakpoint in the debugger.
This allows examining the CAN message (which caused the call of the receive-handler) in the programming tool's 'Errors and Messages' tab.
- If the received CAN messages originate from the programmable CAN-Simulator,
a breakpoint in the script (e.g. in the receive handler) can also
pause the CAN simulator.
This option was very helpful when implementing an own transfer protocol in the script (display).
- A single received CAN message may result in multiple calls
of registered CAN receive handlers.
Example: A received CAN message, ID 0x123, may cause calling an event handler registered via can_add_id(0x123,...)
and another handler registered via CAN.add_filter( 0x000, 0x000, ...), i.e. a handler for "everything".
It may even be possible that the same handler is called twice, because it's perfectly legal to register one handler multiple times (for different IDs, or ranges of IDs). Such a handler may be called multiple times, until one of them returns TRUE (which means "I have processed the message, and don't want it to be passed to anyone else" from the script's point of view).
The calling sequence is as follows: First, all handlers registered via can_add_id() are called (until one of them returns TRUE), then (if none of them returned TRUE) the received message will be passed to the handler registered via CAN.add_filter().
Event handler for the virtual keyboard
Similar as events fired by user-defined graphic controls (OnControlEvent), events from the virtual keyboard can also be processed or intercepted by an event handler in your script. For that purpose, define the following function in your script (case sensitive):
func OnVirtualKeyboardEvent( int
event,
int param1, int
param2 ) // event from the 'virtual keyboard'
In contrast to the OnControlEvent handler, there is no 'control ID' here, because
the virtual keyboard only exists in a single instance.
Parameters 'event', 'param1' und 'param2' have the same meaning as in the
OnControlEvent handler (details there).
As of 2020-07-07, the following events could be processed in OnVirtualKeyboardEvent
(first argument, parameter 'event'):
- evChar
- Operator pressed a (virtual?) key with the code (ASCII) in param1.
- evBeginEdit
- The virtual keyboard has just been switched into mode 'Editing' (with its own edit field now visible).
- evEndEdit
- Input into the virtual keyboard's own edit field has just been finished.
Especially important with command vkey.connect:
The edited text can now be read from vkey.text.
If OnVirtualKeyboardEvent() returns TRUE for this event, i.e. "the event has completely been processed by the script, then the text from the edit field will not be copied back into the variable specified in vkey.connect().
- evClick
- Operator clicked 'somewhere into the client area' of the virtual keyboard,
depending on the hardware also by pressing the rotary encoder knob or the 'Enter'-key while the virtual keyboard was focused.
Examples for using the virtual keyboard under script control can be found in the applications script_demos/VKeyTest.cvt and script_demos/TableTest.cvt .
See also:
Controlling the virtual keyboard via script
Advanced message handling functions
At the time of this writing, the following functions were not implemented yet but planned:
- message.register( <message_id>, <flags> ) : registers a certain message to be processed (handled) by the script .
- message.deregister( <message_id> ) : de-registers (un-registers) a certain message, i.e. informs the system that the script doesn't want to handle this type of message anymore.
- message.peek( out tMessage msg) : Checks if one of the registered messages is waiting in the message queue. If it is, the message is removed from the queue (and copied into 'msg'), and the function returns 1 (one, TRUE). Otherwise (if there is no message waiting in the queue), the function returns immediately with result 0 (zero, FALSE).
- message.get( out tMessage msg, int iTimeout_ms) : Checks if one of the registered messages is waiting in the message queue. If it is, the message is removed from the queue (and copied into 'msg'), and the function returns 1 (one, TRUE). Otherwise (if there is no message waiting in the queue), the function waits for the arrival of the next message. If, during the specified timeout value (in milliseconds) no message arrives, the function returns with result 0 (zero, FALSE). Besides the 'blocking' (waiting) behaviour, there is no difference between message.peek and message.get !
- message.post( <receiver>, <message_id>, <param1>, <param2>, <param3> ) : Places a message in the message queue for the specified 'Receiver', which may be something like a window (future plan !). Note that, unlike message.send, message.post returns immediately --- before the receiver has actually processed the message !
-
message.send( <receiver>, <message_id>, <param1>,
<param2>, <param3> ) : Sends a message to the specified 'Receiver'
(future plan) or (with iReceiver=0) to the system's default message handler.
Note that, unlike message.post, message.send does not return until the message
has actually been processed (in other words, it "blocks" the caller). This
is not possible with all message types, especially not with those messages
which can only be handled in different tasks, or even interrupt service handlers
!
The tMessage structure will be specified here in a future version of this document. Most likely, it will be similar to (but not compatible with) Borland's TMessage type .
The message IDs (not to be confused with "CAN" message IDs !) are defined
as constants in the script language. Their prefix depends on the message
class. For example, messages beginning with
wm... have a similar purpose
like 'windows messages' (even if there is no 'Windows' under the hood of
the programmable displays). Some of these messages can be used for interaction
between the script program, and the graphic user interface. Most notably:
- wmTouchPenDown, wmTouchPenMove, wmTouchPenUp, wmTouchDblClick": low-level touchscreen messages .
- wmEnterDblClick : double-click with the 'Enter' button, whatever the enter button is (it may be a real key, or the rotary encoder button) .
- wmEncoderBtnDown, wmEncoderBtnUp, wmEncoderDblClick, wmEncoderMovedDelta : low-level rotary button events .
Note: Depending on the 'flags' parameter, specified in the message.register command, you can completely 'intercept' certain message types by the script, so they will not be handled by the system anymore.
< To Be Completed ... >
Examples
The programming tool's installer contains a few 'tests' (used during development)
and 'examples' (planned).
Many of the following examples were generated as 'linked hypertext' with the script editor's integrated HTML Export Tool.
The HTML exporter uses similar syntax highlighting as the script editor. It also marks keywords by bold characters,
which work as hyperlinks into the documentation (when hovering over keywords and similar elements with the mouse).
Names of user-defined functions and variables are also printed with bold characters, but in the examples
the links to a function's implementation, or a variable's declaration don't work because the following code snippets
usually don't contain the variable declaraction part (etc).
After installing the programming tool (for example in folder c:\MKT\CANdbTerminalProgTool)
you will find the complete script examples in c:\MKT\CANdbTerminalProgTool\Programs\script_demos\*.cvt .
An overview of examples is in the Contents section of this document.
- script_demos\CANgate1.cvt
-
A simple example for a 'CAN gateway' : registers a few CAN message identifiers for reception,
receives messages on CAN1 (first CAN port) and transmits them on CAN2, etc.
Note: In the script language, the two upper bits of the 32-bit 'identifier' field in tCANmsg.id are used to encode the bus number as a two-bit number.
The procedure 'CANGatewayProcess' is periodically called from the demo's main loop.
proc CANGatewayProcess() // Process received CAN messages in "gateway mode"
  local tCANmsg can_msg; // use local variable wherever possible
  local int can_port;    // can port index, 0..3, from a 2-bit-field of rcvd message
  local int id_only;     // can message id, without bus-number-bits

  // As long as there are CAN messages waiting in the FIFO,
  // handle them (can_receive drains the CAN-RX-FIFO and
  // copies the next received message into the specified variable) :
  while( can_receive( &can_msg ) )

    // Get the two-bit, zero-based "CAN port index" from the upper two bits in the ID:
    can_port:= (can_msg.id & (cCanIdBit_Bus2 | cCanIdBit_Bus3) ) / cCanIdBit_Bus2;

    // Get the CAN-message-id without bus number (~ is bitwise "not") :
    id_only := can_msg.id & (~(cCanIdBit_Bus2| cCanIdBit_Bus3) ); // ID w/o bus-number

    // Count received CAN frames.. only for debugging purposes
    nFramesRcvd := nFramesRcvd + 1;

    // Show received message if wanted, on the text panel:
    if ( show_frames ) then
      print("CAN"+itoa(can_port+1)+" ",hex(id_only,4)," ", can_msg.len );
      for i:=0 to can_msg.len-1
         print(" ",hex(can_msg.b[i],2) );
      next i;
      print("\r\n");  // carriage return + new line
      if( tscreen.cy >= tscreen.vis_height ) then
         gotoxy(0,0); // screen 'full'; back to 'home' position
      endif;
      clreol;         // clear to end-of-line
    endif; // show_frames ?

    select( can_port ) // can_port is an zero-based INDEX..
      case 0: // message received from FIRST CAN port ("CAN1")
        // At this point, we know the message was RECEIVED from the first CAN port
        // because both 'bus number bits' in can_msg.id are CLEARED. For details,
        // right-click on cCanIdBit_Bus2, then search it in the manual.
        // Modify the received message's 'id' field so it will be
        // tranmitted on the SECOND bus.
        //     From the help system: The CAN BUS NUMBER (!)
        //     is encoded in the most significant bits (bits 31..30) :
        can_msg.id := id_only | cCanIdBit_Bus2;  // modify ID-field to transmit on CAN2
        // We could also modify the ID (bits 10..0) or the data of the
        //    "echoed" CAN message, but in this simple demo, we don't:
        // can_msg.b[0] := 0; // set the first byte in the CAN message to zero
        can_transmit( can_msg );  // send the response

      case 1: // Message received from the SECOND(!) CAN port ("CAN2")
        can_msg.id := id_only;  // modify ID-field(!) to transmit on CAN1
        // .. etc, add your own code here ..
        can_transmit( can_msg );  // send the response

      case 2: // Message received from the THIRD(!) CAN port ("CAN3")
        // (only available if "CAN-via-UDP" is enabled, MKT-View II/III/IV only have TWO ports)
        break;   // don't send messages from THIS port on any other port

      case 3: // Message received from the FOURTH(!) CAN port ("CAN4")
        // (only available if "CAN-via-UDP" is enabled, MKT-View II/III/IV only have TWO ports)
        break;   // don't send messages from THIS port on any other port

    endselect; // .. can_msg.id & (cCanIdBit_Bus2 | cCanIdBit_Bus3) ..
  endwhile; // end of CAN-message processing loop
endproc; // CANGatewayProcess()
- script_demos\CAN_ASC_Logger.cvt
-
Contains a tiny 'CAN Logger' implemented completely in the script language.
The script registers a few CAN message identifiers for reception.
In the script's CAN-receive-handler, messages with matching ID are logged as a text file similar to Vector's "ASCII" (i.e. text) format.
When converting CAN frames to 'ASCII' (text), a message with an 8-byte CAN data field requires at least 64 bytes in the text file. Thus, this format isn't suited to log a 'complete CAN bus' with all message identifiers, and a large bus load. When tested on an MKT-View IV with a 'fast' memory card, up to 1800 frames per second could be logged in Vector ASC format.
- script_demos\MovgAvrg.cvt : Moving Average Filter
-
A moderately advanced example. Calculates a moving average over a fixed timespan, using a timer event and a simple array.
Moving average filters can be used like a lowpass filter to reduce noise in a measured signal.
There used to be a nice description of the principle at en.wikipedia.org/wiki/Moving_average.
In the sample application, the non-filtered test signal (green) and the moving-average-filtered result (red) are plotted as a Y(t) diagram :
Script code fragment from the timer event handler, with moving average calculation: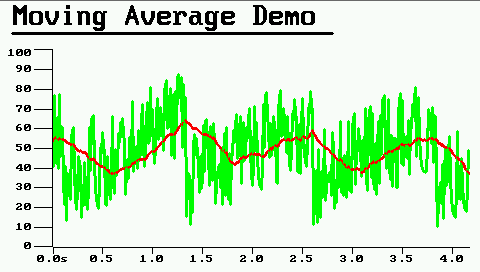
Screenshot 'Moving Average Demo' (programs/script_demos/MovgAvrg.cvt)// Implementation of the moving average filter i := display.FilterIn; // new filter input value if( Avrg1NumSummands<C_AVRG_BUF_SIZE ) then // Didn't reach the 'wanted' length (number of summands) yet : Avrg1NumSummands := Avrg1NumSummands+1; Avrg1Buffer[Avrg1BufIndex] := i; Avrg1Sum := Avrg1Sum + i; else // reached the "wanted" queue length : forget 'oldest' value Avrg1Sum := Avrg1Sum - Avrg1Buffer[Avrg1BufIndex]; // remove oldest summand Avrg1Buffer[Avrg1BufIndex] := i; // store NEWEST summand in the buffer Avrg1Sum := Avrg1Sum + i; // add newest summand to sum endif; Avrg1BufIndex := (Avrg1BufIndex+1) % C_AVRG_BUF_SIZE; // new circular buffer index display.FilterOut := Avrg1Sum / Avrg1NumSummands;
- script_demos\Integrator.cvt : Numeric Integration
-
This example example calculates an approximate integral of an input signal, using the Trapezoidal rule.
Similar as in the moving average example, it uses a timer to acquire the sample at reasonable intervals. An array to store the to-be-integrated values is not required.
var
   int   Integr1Reset;         // flag to reset (clear) the integrator
   int   Integr1PrevTimestamp; // high-res timestamp of the previous sample
   float Integr1PrevValue;     // current "integrated" value (sum of areas)
   float Integr1Value;         // current "integrated" value (sum of areas)
   tTimer Timer1; // "periodic" timer for data acquisition (or simulation)
   int    Timer1Counter;
endvar;

  (...)

//-----------------------------------------------------------------------
func OnTimer1( tTimer ptr pMyTimer )  // periodically called Timer Event Handler
   local int i, timestamp;
   local float f, delta_t;

   // To see this demo 'in action' without CAN signals,
   // provide a dummy signal for demonstration .
   // This signal is not only used as input for the integrator,
   // but also plotted on a display page .
   // Produces a test signal with slow positive + negative pulses .
   i := int(system.timestamp/(4*cTimestampFrequency)); // -> 4 seconds per step
   select( i % 4 )      //     ___
      case 0: i := 0;   //    | + |
      case 1: i := 20;  // ___|   |___     ... (cycle repeats endlessly)
      case 2: i := 0;   //            | - |
      case 3: i := -20; //            |___|
   endselect;
   display.IntegrIn := float(i);

   // - - - - - - - - - - - - - - - - - - - - - - - - - - - - - - - - - - -
   // Above: Generation of the staircase "test signal" .
   // Below: Implementation of the numeric integrator .
   // - - - - - - - - - - - - - - - - - - - - - - - - - - - - - - - - - - -

   timestamp := system.timestamp; // read current timestamp (see manual)
   f := display.IntegrIn;         // get the new input value (to be integrated)
   if( Integr1Reset ) then   // 'Reset' the integrator ?
      // (this must be done at least once after power-on) :
      Integr1Value := 0.0;  // no areas summed up (keine Flächen aufaddiert)
      Integr1Reset := FALSE; // 'done' (integrator has been reset)
   else  // normal operation: integrate !
      // delta_t = time difference between current and previous sample [sec],
      //           using the display's high-resolution timestamp generator :
      delta_t := (timestamp-Integr1PrevTimestamp) / cTimestampFrequency;
      // Numeric integrator, see en.wikipedia.org/wiki/Trapezoidal_rule :
      Integr1Value := Integr1Value + delta_t * 0.5 * ( Integr1PrevValue + f );
   endif;
   Integr1PrevValue  := f;             // save current input value for the NEXT time
   Integr1PrevTimestamp := timestamp;  // save timestamp for the NEXT time
   display.IntegrOut := Integr1Value;  // copy integrated result into a DISPLAY variable

   Timer1Counter := Timer1Counter + 1; // count number of timer events (test)
   return TRUE;  // TRUE = "keep on firing timer events" (FALSE would stop)
endfunc; // end OnTimer1
The script-generated test signal (green) and the output of the integrator (red) are plotted as a Y(t) diagramm :
By clicking the 'Reset' button, the integrator can be restarted any time. When clicked, the button sets a flag ('Integr1Reset') which causes the script to clear the sum ('Integr1Value'). A similar feature may also be required for 'real-world signals', for example if the to-be-integrated sensor value contains a small permanent DC-offset, which (after a sufficiently long time) would cause the integrator to 'overflow' (or reach the endstop, value off-scale). To avoid such problems, in practise a 'leaky integrator' is often used instead of an ideal integrator. The complete example (part of the installation archive) already has an option to make the integrator 'leaky', by letting the sum decay exponentially with a large time constant.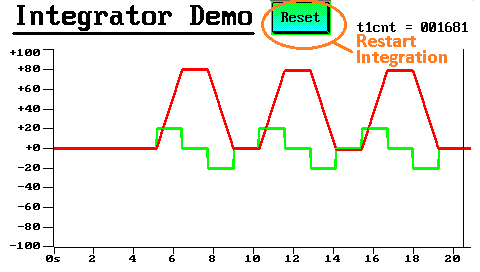
Screenshot 'Numeric Integrator' (programs/script_demos/Integrator.cvt)
Related topics (about signal processing) : numeric integrator, moving average filter.
- script_demos\ScriptTest1.cvt
-
A very basic example, used to test program flow controls (especially
select..case), operators, built-in keywords, etc.
- script_demos\ScriptTest2.cvt
-
A speed test for the script's runtime function. Calculates the value of PI
(approx. 3.14159) using an iteration loop.
The demo calculates PI using the slow-converging Leibnitz Series, which calls a user-defined procedure ('Iterate' shown below) for each iteration: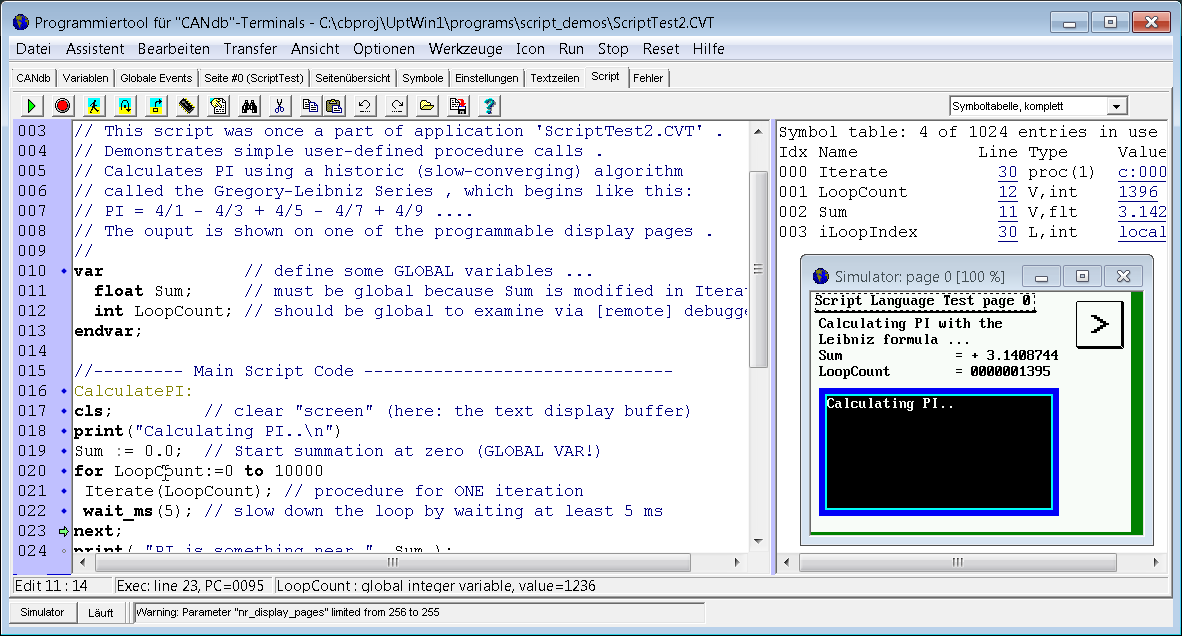
Screenshot of the programming tool while running the demo 'ScriptTest2.cvt'.
Click on the image to magnify.//--------- Procedures and Functions (subroutines) --------- proc Iterate(int iLoopIndex) // ONE iteration to calculate PI // Even loops: ADD, Odd loops: SUBTRACT from sum . // Note the BITWISE AND to check the least significant bit: if (iLoopIndex & 1) == 0 // The division must use floats, so use 4.0 not 4, // otherwise 4 / ( 2 * (iLoopIndex + 1) would be calculated // with integer values, giving an INTEGER quotient ! then Sum := Sum + 4.0 / (2 * iLoopIndex + 1); else Sum := Sum - 4.0 / (2 * iLoopIndex + 1); endif; endproc; // end Iterate()
- script_demos\ScriptTest3.cvt
-
A slightly more advanced test application. Used during development to test
arrays, type definitions, scrollable text,
and CAN-bus functions.
- script_demos\DisplayTest.cvt
-
Test application to control some display elements
via script, like display.menu_mode, display.menu_index. Also calls a very
simplistic user-defined procedure ("GoToNextField") from a graphic button:
//-----------------------------------------------------------

     proc GoToNextField // Called from the display (on button)

       display.menu_mode  := mmNavigate;
     // switch to "select" (navigate) mode

       display.menu_index :=
     (display.menu_index+1) % 8; // switch to next field

     endproc; // end GoToNextField
- script_demos\TimerEvents.cvt
-
Test and demo for Timer-Events.
This script uses an array of timers, programmed with different cycle times:
On each timer event, a counter for that timer is incremented, and the counter value is displayed as a horizontal colour bar on a Text-Panel :const // define a few constants... C_NUM_TIMERS = 10; // number of simultaneously running timers int ResistorColours[10] = // ten 'colour codes' [0..9]: { clBlack, clBrown, clRed, clOrange, clYellow, // [0..4] clGreen, clBlue, clMagenta, clDkGray, clLtGray // [5..9] }; endconst; ... typedef tMyTimerControl = struct int iEventCount; float fltMeasuredFrequency; endstruct; endtypedef; ... var // declare a few GLOBAL variables... tTimer MyTimer[C_NUM_TIMERS]; // an ARRAY of timers for the stress-test tMyTimerControl MyTimerCtrl[C_NUM_TIMERS]; // an array of self-defined 'timer controls' endvar; ... // Start the timers for the timer 'stress test' for i:=0 to #(C_NUM_TIMERS-1) MyTimer[i].user := i; // use the index as 'user defined ID' for this timer setTimer( addr(MyTimer[i]), 37+20*i/*ms*/, addr(OnMyTimer) ); next i; ... //-------------------------------------------------------------------- func OnMyTimer( tTimer ptr pMyTimer ) // another TIMER EVENT HANDLER... // Shared bytimers which run at different intervals. // The activity of each of these timers is visualized // as a horizontal coloured bar on a text panel . local int i,x,y; local tMyTimerControl ptr pCtrl; debugTimer := pMyTimer[0]; // copy the argument into a global variable (for debugging/"Watch") TimerEventCount := TimerEventCount + 1; // global counter for ALL timer events i := pMyTimer.user; // user defined index of this timer, here: i = 0..9 pCtrl := addr(MyTimerCtrl[i]); // address of a user-defined 'timer control' struct x := pCtrl.iEventCount % tscreen.vis_width; y := i; tscreen.cell[y][x].bg_color := ResistorColours[i]; tscreen.cell[y][x+1].bg_color := clWhite; tscreen.modified := TRUE; pCtrl.iEventCount := pCtrl.iEventCount + 1; // count the events fired by THIS timer // ... return TRUE; // TRUE = 'the event has been handled here' (FALSE would not fire more events) endfunc; // OnMyTimer()
The upper bar shows the 'fastest running' timer (index 0, colour code black), the lower bar shows the slowest timer (here: index 8, colour code gray).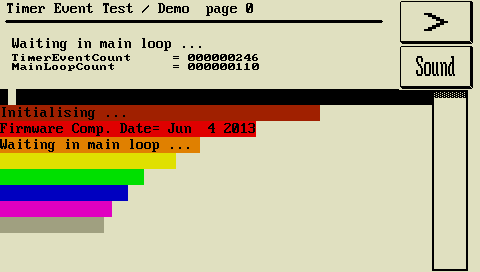
(Screenshot from the 'Timer Event' test application)
To measure the timing jitter, an additional timer event is used, which cyclically transmits a CAN message:
The timer for this event handler is started in the initialisation part of the script as follows://-------------------------------------------------------------------- func OnCANtxTimer( tTimer ptr pMyTimer ) // a TIMER EVENT HANDLER... local tCANmsg msg; // use LOCAL variables (not globals) in event handlers ! msg.id := 0x335; // set CAN message identifier for transmission msg.len:= 8; // set CAN data length code (max. 8 bytes = 2 doublewords) msg.dw[0] := 0x11223344; // set four bytes in a single doubleword-move (faster than 4 bytes) msg.dw[1] := 0x55667788; // set the last four bytes in the 8-byte CAN data field can_transmit( msg ); // send the CAN message to the bus return TRUE; // TRUE = 'the event has been handled here' (FALSE would not fire more events) endfunc;
When tested on an MKT-View III, a jitter of approximately +/- 5 milliseconds could be observed with a CAN bus tester. Most of this jitter is caused by the cooperative, not preemptive, multitasking within the script language. The jitter may be reduced in future versions of the device firmware (2013-06-05).// Start another timer for periodic CAN transmission . // Jitter can be checked with a CAN bus analyser. setTimer( CANtxTimer, 100/*ms*/, addr(OnCANtxTimer) ); // OnCANtxTimer called every 100 ms
- script_demos\FileTest.cvt
-
Test- and demo application for the file I/O functions. Different tests can be started
by the graphic buttons on the first display page:
'Test RAMDISK' writes and reads a file on the device's RAMDISK,
'Test Memory Card' uses the memory card for the same test.
The function 'Test File Access' (written in the script language) is used for both storage media. Here is a shortened version of it:
//---------------------------------------------------------------
func TestFileAccess( string pfs_path )
  // Part of the test program for file I/O functions . Taken from 'FileTest.cvt' .
  // [in]  pfs_path : path for the pseudo-file-system like "ramdisk" or "memory_card"
  local int fh;       // file handle
  local int i;
  local string fname;
  local string temp;

  // Build a complete filename, with a path:
  fname := pfs_path+"/test.txt";

  // First try to OPEN the file (but don't try to CREATE, i.e. OVERWRITE it):
  fh := file.open(fname,O_RDWR); // try to open existing file, read- AND write access
  if( fh>0 ) then
    file.seek(fh, 0, SEEK_END ); // Set file pointer to the END of the file
    // write a separator between the 'old' and the 'new' part of the file:
    file.write(fh,"\r\n---- data appended to file ----\r\n");
  else  // file.open failed, so try to CREATE a 'new' file:
    fh := file.create(pfs_path+"/test.txt",4096);  // create a file, with pre-allocation
  endif;
  if( fh>0 ) then    // successfully opened or created the file ?
    file.write(fh,"First line in the test file.\r\n");
    file.write(fh,"Second line in the test file.\r\n");
    file.write(fh,"Third line in the test file.\r\n");
    file.close(fh);
  else               // neither file.open nor file.create were successful:
    print( "\r\nCould not open or create a file !" );
    return FALSE;
  endif;

  // After writing and closing the file (above), open it again, and READ the contents:
  fh := file.open(pfs_path+"/test.txt", O_RDONLY | O_TEXT);  // try to open the file for READING
  if( fh>0 ) then    // successfully created the file ?
    print( "\r\nRead from file on '",pfs_path,"' :" );
    while( ! file.eof(fh) ) // repeat until the end of the file.......
      temp := file.read_line(fh); // read one line of text from the file
      print( "\r\n ", temp );     // dump that line to the text panel
      Progress := Progress+1;
    endwhile;
    print( "\r\nReached the END-OF-FILE marker." );
    file.close(fh);
  else
    print( "\r\nCould not open file for reading !" );
    return FALSE;
  endif;
  return TRUE;
endfunc; // TestFileAccess
With some additional output from the 'print' command, and pressing the 'Test RAMDISK' button, the program produced the following output on a text panel:
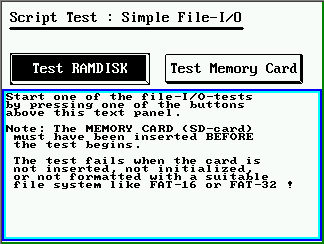
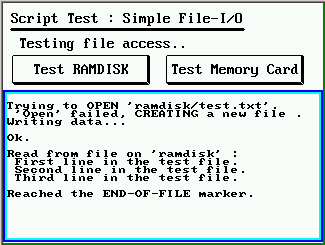
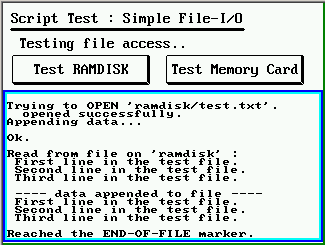
Other examples using the file I/O functions: VT100/VT52 emulator, reading (parsing) of INI files .
- script_demos\IniFiles.cvt
-
This demo for advanced users reads a 'configuration file' (similar to windows 'INI' files), line by line.
The values read from the file are stored in script variables, which can be displayed on a scrolling text panel:
The application uses the 'file.read' function as INI file parser. For details, see file.read.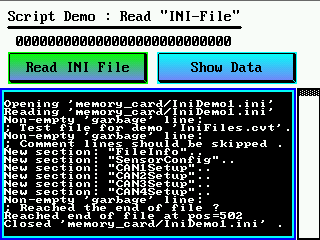
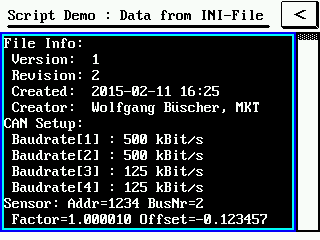
Screenshot from the 'INI-file' demo (programs/script_demos/IniFiles.cvt)
The test file IniDemo1.ini is contained in the installation archive.
To run the demo in the simulator (programming tool), the INI file is read from the folder which 'emulates' the memory card (an memory card reader is not required).
To test the demo on a 'real' target hardware, copy the sample file (IniDemo1.ini) from folder 'sim_mc' ("simulated memory card") into the root directory of a suitable memory card (with FAT or FAT32 file system without "long filenames").
- script_demos\TScreenTest.cvt
-
Test application for the text-screen buffer, with procedures to draw lines
and frames in the text-mode screen buffer ("tscreen")
.
This file was also used as a first test for local variables, parameter passing in procedures, and recursive calls during development .
//------------------------------------------------------------

     proc FillScreen1(string sFillChar)

       // PROCEDURE to fill the screen with a colour test pattern .

       local int X,Y,old_pause_flag;

       old_pause_flag := display.pause;

       display.pause  := TRUE; // disable normal screen output

       for Y:=0 to tscreen.ymax

         for X:=0 to tscreen.xmax

           gotoxy(X,Y);

           setcolor( clWhite,

               rgb((11*(X+Y))&255, (9*(Y-X))&255, (3*X)&255 ) );

           print( sFillChar ); // print a
     single character

         next X;

       next Y;

       display.pause:=old_pause_flag; // resume display output ?

     endproc; // end FillScreen1()
Furthermore, TScreenTest .cvt demonstrates how special DOS characters (from "codepage 437" or "codepage 850") can be used to draw lines, boxes, and grids on a text screen. This demo also contains a very simple 'video game' which polls the keyboard to steer a worm (or snake) through a maze. A similar principle can be used in your application to realize advanced animated graphics, using the special "graphic" characters from a DOS compatible font like the one shown below:

One of the built-in fonts with 'graphic characters' (DOS codepage 437)
- script_demos\LoopTest.cvt
-
Demonstrates various loop commands, like
for-to-next . Contains a simple 'animated' colour
text demo using loops, gotoxy,
color, rgb, the
print command, and the
display.pause flag to prevent the display from
being updated at the 'wrong' time (here to avoid flicker while filling the
text-screen buffer with new characters) .
- script_demos\TimeTest.cvt
-
Test application for the time-conversion functions like
time.date_to_mjd and
time.mjd_to_date .
Also shows how to split a 'Unix Time' into years, months, days, hours, minutes, and seconds.
- script_demos\StringTest.cvt
-
Test application for string functions like strlen(),
strpos(), substr(), etc.
- script_demos\StructArrayTest.cvt
-
Test application for an array of user-defined structures, with
each struct containing integers, floating point values, and strings
.
The array-filling loop also served as a simple benchmark during development in October 2010 .
- script_demos\PageMenu.cvt
-
This demo application builds a menu showing all the existing display pages
(in the application) in a menu, and allows jumping to the selected page (in
the menu).
- script_demos\EventTest.cvt
-
Test / demo for low-level events ("system events"
like OnEncoderDelta() ), and events fired by
graphic control elements like buttons, panels,
text fields, etc.
First we define a few symbolic identifiers in the script, to identify individual elements (here: graphic buttons) in the script and in the display page definition:
The identifiers defined that way (for example idButton1) should be copied into the definition of the display elements, on the tabsheet 'Page N', panel 'Properties of a display line' / 'Eigenschaften einer Anzeigezeile', in the 'Control ID' field as in the screenshot below. This value will be passed to the event handler OnControlEvent ( int event, int controlID, int param1, int param2) as parameter 'controlID'.const // Identifiers for certain DISPLAY ELEMENTS with event handling per script. // These IDs are passed as 2nd parameter to the OnControlEvent() handler. // Note that the maximum length for these IDs (in the page definition // table) is limited to 11 (ELEVEN) characters. Control-ID ZERO is invalid. idButton1 = 1; // first button idButton2 = 2; // second button, etc.. idButton3 = 3; endconst;
When pressing or releasing a button, the handler not only receives the type of event, but also the identifier of the control (here idButton1) which fired the event.
This way, one event handler can be used for multiple control elements.
For example, to program an 'electronic organ', we don't need an inidividial handler for each piano key - one handler for all keys will do, and if we're smart or lazy, we would use the frequency of the key (in Hertz) as numeric ID value.
The Event-Handler (OnControlEvent) uses select-case statements to tell different 'controls' (buttons), and different types of events (like evPenDown, evPenMove, evPenUp) from each other.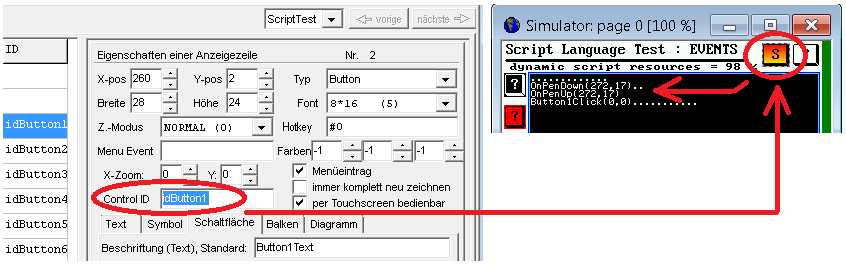
Screenshots from 'EventTest.cvt', with definition of a button with Control ID idButton1
Below is the skeleton of an 'OnControlEvent'-Handler, as used in the 'Event-Test' demo:
Note: The self-defined identifier idButton1 is just an example.//---------------------------------------------------------------------- // Common handler for all 'visible elements which interact with the user' // on the current display page, aka "Control Elements" //---------------------------------------------------------------------- func OnControlEvent( int event, // [in] type of the event, like evClick, etc int controlID, // [in] control identifier (from page-def-table) int param1, // [in] 1st message parameter, depends on event int param2 ) // [in] 2nd message parameter, depends on event // Called when 'something happens' with a certain control element // (button, menu item, edit field, etc) on the current display page . // param1: client-X-coordinate or keyboard code (depends on event-type) // param2: client-Y-coordinate (where applicable) local int x,y; select( event ) // what has happened (type of the event) ? case evClick: // button, menu item, etc, was "clicked"... select( controlID ) // WHICH control element was "clicked" ? case idButton1: // Button1 was 'clicked' ... // ... add your own code here : print( "Button 1 clicked.\r\n"); case idButton2: // Button2 was clicked // ... add your own code here ... endselect; // end select controlID, for event "click" (via touch or ENTER key) case evPenDown: // the TOUCH-PEN was just pressed on a display element select( controlID ) // WHICH control element ? case idButton1: // Button1 has just been PRESSED (touch-pen down) // ... add your own code here ... case idButton2: // Button2 has just been pressed -> display.Wiper := 1; // windscreen wiper on (CAN) // ... endselect; // end select controlID, for event "touch pen down" case evPenMove: // finger or pen MOVED over a control (while pressed) x := param1; // client X coord y := param2; // client Y coord select( controlID ) // WHICH control element ? case idButton1: // finger or pen was moved while pressed on Button1 // ... add your own code here ... endselect; // end select controlID, for event "touch pen down" case evPenUp: // the TOUCH-PEN was released over a display element x := param1; // client X coord y := param2; // client Y coord select( controlID ) // WHICH control element ? case idButton1: // Button1 has just been released (finger or pen "up") // ... add your own code here ... case idButton2: // Button2 has just been released -> display.Wiper := 0; // windscreen wiper off (CAN) // ... endselect; // end select controlID, for event "touch pen released" (just up again) endselect; // end select ( event ) return 0; // 0: let the system process this event, too endfunc; // OnControlEvent
In your own applications, you should use 'speaking names' wherever possible, e.g.
idStart, idStop, idGearbox, idHorn, idWiper, ...
- script_demos\ButtonEventDemo.cvt
-
This is another (small) demo with an event handler for button events;
it also shows how to transmit CAN messages controlled by graphic buttons (without a DBC file).
When a button is pressed, a button-specific signal is set, and a message (which contains that signal) is sent via CAN.
When releasing the button again, the signal is cleared, and an updated message is sent via CAN.
To show the current values of all "CAN signals" close to the buttons which control them, the user-defined function 'GetSignalByIndex' is called when updating the UPT display page. The parameter 'index' for the array 'CanSignals[index]' is passed as a function argument (here, 0..6 for simplicity).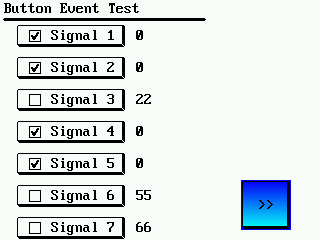
Screenshot from the 'Button-Event' demo (programs/script_demos/ButtonEventDemo.cvt)
The reaction on pressing or releasing any of the seven (?) buttons is implemented in OnControlEvent. As already explained in the previous example, this event handler (if it exists in the script) is called when anything (user action) happens with any control element. Each button has its individual identifier ('control-ID', e.g. idButton1), which -in the following example- is used to calculate an index to access the CAN-signal which is 'connected' to a particular button (CanSignals[0]...CanSignals[6], note the zero-based array indices):
The above symbolic identifiers are assigned to control elements (here: buttons) as already explained in the 'Event Test' example. Instead of brainless names like 'idButton1'..'idButton7', in a real-world application you should use 'talking' names like idStart, idStop, idUp, idDown, idLeft, idRight, etc.const // Identifiers for certain DISPLAY ELEMENTS with event handling per script. // These IDs are passed as 2nd parameter to the OnControlEvent() handler. // Note that the maximum length for these IDs (in the page definition // table) is limited to 11 (ELEVEN) characters. Control-ID ZERO is invalid. idButton1 = 1; // first button idButton2 = 2; // second button, etc.. idButton3 = 3; idButton4 = 4; idButton5 = 5; idButton6 = 6; idButton7 = 7; // (Calling the buttons "Button1" .. "Button7" etc is a no-brainer; // but it emphasizes that these buttons may be used for "anything") endconst;
By subtracting the constant 'idButton1' from the button's control-ID, a zero-based array index is calculated, which is then used to access an array of 'CAN-Signals'.
Thus a single event handler is enough to process user input from all buttons (and similar control elements, if necessary):
To transmit the modified signals (via CAN), the event handler calls the user-defined procedure 'SendCanSignals'. This procedure 'maps' all signals which may have been modified via buttons into a single CAN message, which is then sent to the CAN bus network via can_transmit ://---------------------------------------------------------------------------- func OnControlEvent( int event, // [in] type of the event, like evClick, etc int controlID, // [in] control identifier (from page-def-table) int param1, // [in] 1st message parameter, depends on event int param2 ) // [in] 2nd message parameter, depends on event // Called when 'something happens' with a certain control element // (button, menu item, edit field, etc) on the current display page . // param1: client-X-coordinate or keyboard code (depends on event-type) // param2: client-Y-coordinate (where applicable) . local int i; select( event ) case evPenDown: // the TOUCH-PEN was just pressed over a display element select( controlID ) // on WHICH control element was the touch pen pressed down ? case idButton1: // 1st button PRESSED, or... case idButton2: // 2nd button PRESSED, or... case idButton3: case idButton4: case idButton5: case idButton6: case idButton7: // To keep it simple, we treat all these buttons the same way. // Turn the buttons 'control ID' into a zero-based array index: i := controlID - idButton1; CanSignals[i] = 1; SendCanSignals(); endselect; // controlID (for event 'PenDown') case evPenUp: // the TOUCH-PEN was released from a display element select( controlID ) // from WHICH control element was the touch pen lifted up ? case idButton1: // 1st button RELEASED, or... case idButton2: // 2nd button RELEASED, or... case idButton3: case idButton4: case idButton5: case idButton6: case idButton7: // To keep it simple, we treat all these buttons the same way. // Turn the buttons 'control ID' into a zero-based array index: i := controlID - idButton1; CanSignals[i] = 0; SendCanSignals(); endselect; // controlID (for event 'PenUp') endselect; // end select ( event ) return 0; // 0: let the system process this event, too endfunc; // OnControlEvent
//----------------------------------------------------------------------------
proc SendCanSignals  // Called from the event handler (OnControlEvent)
                     // to send the current 'signals' via CAN .
  local tCANmsg msg; // use LOCAL variables (not globals) in event handlers !
  msg.id := 0x335;   // set CAN message identifier for transmission
  msg.len:= 8;       // set CAN data length code (max. 8 bytes)
  // Map our 'CAN-Signals' into a CAN message.
  // To keep this demo simple, each signal occupies EIGHT BITS in the CAN frame.
  msg.bitfield[ 0,8] = CanSignals[0];
  msg.bitfield[ 8,8] = CanSignals[1];
  msg.bitfield[16,8] = CanSignals[2];
  msg.bitfield[24,8] = CanSignals[3];
  msg.bitfield[32,8] = CanSignals[4];
  msg.bitfield[40,8] = CanSignals[5];
  msg.bitfield[48,8] = CanSignals[6];
  can_transmit( msg ); // send message to the CAN network
endproc; // SendCanSignals()
- script_demos\quadblox.cvt
-
Test application for two-dimensional array variables
and two-dimensional array constants
. Also shows how to poll the keyboard, or events
fired by programmable buttons on a certain display page. This demo is actually
a simplified implementation of a once-famous "puzzle game with falling blocks",
which we don't call by its original name to avoid copyright hassle. The cursor
keys may be emulated with the graphic buttons (for devices with touchscreen)
on the right side of the screen shown below.
The "QuadBlocks"-demo was designed for a 320*240 pixel screen, but it can automatically resize itself for displays with 480*272 pixels using the functions tscreen.vis_width and tscreen.vis_height . For devices with 240*320 pixels (aka "portrait mode" screen), the script switches to a different display page than the for "landscape" mode, by checking the horizontal screen resolution (display.pixels_x, which may be 128, 240, 320, or 480 pixels, depending on the target hardware).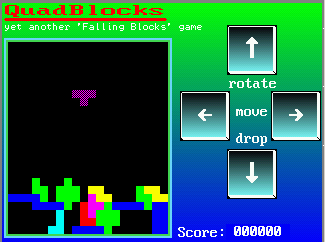
Screenshot from programs/script_demos/quadblox.cvt
- script_demos\MacPan.cvt : Demo application for directly painting into the framebuffer
- In this mock-up of a 1980-style Arcade game (with a slightly different name),
parts of the display are painted 'dynamically' into the framebuffer, using the
the OnPageUpdate() handler to define the
Z-order ("background", "foreground", and anything in between).
In the OnPageUpdate handler, parameter iElement controls the Z-order of the
player sprite, and a couple of 'ghosts' walking through the maze.
The 'maze' (here: the first display element, iElement = 0, using a text panel) is painted first (not in the OnPageUpdate handler but by the display interpreter, because it's a normal display element); the 'ghost'-sprites are rendered next (by the OnPageUpdate handler because they are no 'normal' display elements). The player sprite is painted last (in OnPageUpdate with iElement=255) to let it appear in the foreground, regardless of the number of 'normal' display elements actually present on the page.
Note: Rendering graphic objects directly into the framebuffer as described above is the fastest way for small, rapidly moving objects. For anything else (non-moving, or infrequently modified large objects) it's more efficient to paint them into an extra tCanvas-object first, and let the display-interpreter decide when to render the 'Canvas' into the framebuffer.
For overlapped, animated graphics, set option "Always redraw this page completely" in the page definition header.
- script_demos\TrafficLight.cvt
-
Simple 'traffic light controller'. Demonstates the use of the onboard
digital I/O lines (which only exist in a
few devices).
Pedestrians can request 'green' by pushing a button, connected to the first digital input. Alternatively, a graphic button on the touchscreen can be used for this.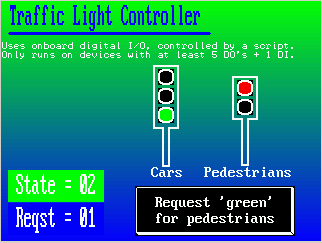
Screenshot from programs/script_demos/TrafficLight.cvt
Three digital outputs are used for the 'cars' (red, yellow, green), two digital outputs for the pedestrians (red alias "don't walk", green alias "walk").
The traffic light states are also displayed on the screen, using bitmaps which change their colours depending on the current states of the digital outputs.
It also shows how to change the colour of a certain display element (on the current display page) through the script, using display.elem .
- script_demos\ErrFrame.cvt
-
Specialized CAN test, allows to send (!) and
receive (count) error frames. On each received
CAN error frame, this application produces an acoustic signal - which may
be a helpful testing utility. Ideally, error frames do not occurr on a CAN
(Controller Area Network) - but in practise, they do happen. Some poorly
designed devices used to send a dominant bit sequence (six or more dominant
bits) during startup. This utility helps to spot such errors. It can also
be used to 'probe' a network: Send an error frame into the CAN, and (if there's
"someone else" on the bus), you will receive one error frame in response.
Otherwise, you know this CAN-bus is "dead".
The length of the error frame (in microseconds) can be modified in the edit field labelled 'Pulse Time'. The default, 12 microseconds, will only give an error frame if the CAN bus runs at 1000 or 500 kBit/second. To cause an error frame for lower bitrates, increase the number of microseconds.
To put the CAN network under 'sufficient stress', this application can also transmit normal CAN messages to the bus.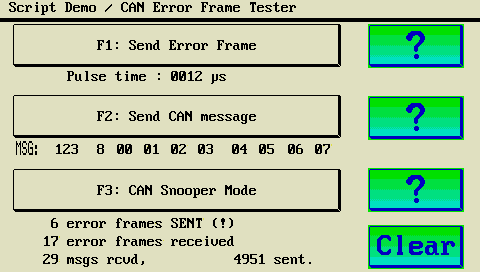
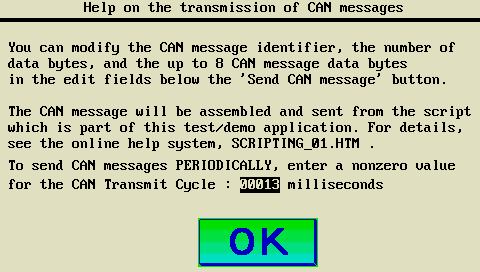
Screenshots from the 'CAN Error-Frame-Tester', programs/script_demos/ErrFrame.cvt
The format is:
CAN message ID (hex), number of data bytes (0..8), and up to 8 bytes (also hexadecimal).
Transmission can be initiated manually (button 'Send CAN message' in the 1st screenshot above) or periodically, using a timer event with an adjustable interval (see 3rd screenshot above).
- script_demos\SerialPt.cvt ; script_demos\GpsRcv01.cvt ; script_demos\GpsSim01.cvt
- Various tests for the serial ports, most of them for the MKT-View II (which, unlike most other devices, has two serial ports). The application 'GpsSim01.cvt' was used to simulate a GPS receiver by reading lines from an NMEA log file from a text file (line by line), and sending them through the serial port. The application 'GpsRcv01.cvt' is more or less the counterpart: It was used on a second MKT-View II (both connected through a modified "Null-Modem" cable) to display the received NMEA strings on a text panel.
Note: The serial port is accessed through the file I/O functions, so these demos only work if the extended script functions are unlocked !
To access the serial port from the script language, use the device names "serial1" (= the first serial port) or "serial2" (= the 2nd serial port, in the MKT-View II this port is decicated for the GPS receiver). Here is a sourcecode snippet from the 'GPS receiver' demo (GpsRcv01.CVT) :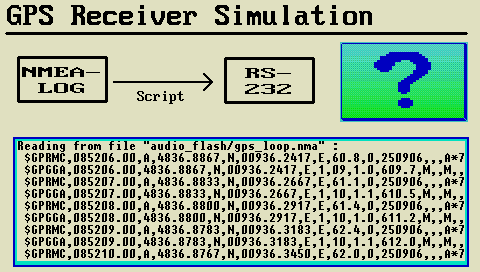 -------- ("Null-Modem") -------->
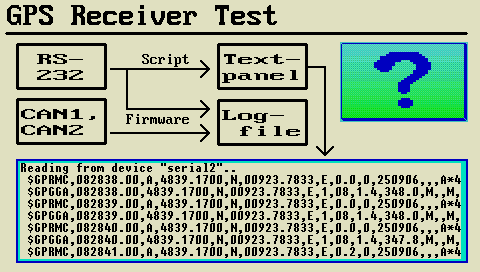
Signal flow for the serial port test
// Try to open the second serial port "like a file" .

     // In the MKT-VIEW II, device "serial2" is the GPS port.

     // Note: Do NOT modify the serial port's baudrate here.

     // The system has already set it, according to the
// 'System Setup' / 'GPS Rcv Type' (4k8, 9k6, ...).
hSerial := file.open("serial2");
if( hSerial>0 ) then // successfully opened the GPS port
display.PortInfo := "Port2";
else // Could not open the 2nd serial port !
// This happens on a PC (which has no dedicated GPS port).
// Try the FIRST serial port instead, with a fixed baudrate:
hSerial := file.open("serial1/9600");
display.PortInfo := "Port1";
endif;
if( hSerial<=0 ) then // could not open the serial port ?
print( "\r\nCouldn't open the serial port !" );
stop;
endif;
print( "Reading from device \"",file.name(hSerial),"\"..\r\n" );
while(1) // endless loop to read and process received data...
// Read the next bytes from the serial port
// (not necessarily a complete LINE) :
temp := file.read_line(hSerial);
if( temp != "" ) then // something received ?
// Dump the received character(s) to the text panel..
if( tscreen.cy >= tscreen.vis_height ) then
gotoxy(0,1); // wrap around
endif;
print( " ", temp );
clreol;
print( "\r\n" );
clreol; // clear the next line (to show last entry)
else // nothing received now ..
wait_ms(50); // .. let the display program work
endif;
endwhile;
The script in the 'Serial Port Test' application (programs\script_demos\SerialPt.CVT) also uses the file-I/O API to open both serial ports (which is possible in the MKT-View II), and reads anything received from both ports line-by-line. In this case, the script tries to open both serial ports with the same, fixed bitrate:
// Try to open the second serial ports "like files" .

     // In the MKT-VIEW II, device "serial2" is the GPS port.

     // To open the serial port with a fixed baudrate,

     // append it after the device name as below .

     hSerial1 := file.open("serial1/9600"); // open 1st serial port

     hSerial2 := file.open("serial2/9600"); // open 2nd serial port
The received strings are dumped to a text panel. The LCD may look like this:
See also (about serial ports): Selection/configuration of the serial port in the programming tool.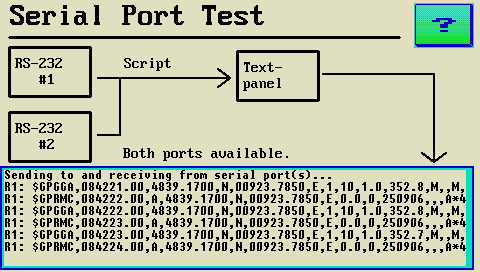
Screenshot 'Serial Port Demo' (programs/script_demos/SerialPt.cvt)
-
script_demos\InetDemo.cvt -
Test, demo, and an example application for the Internet functions (TCP and UDP) in the script language.
Also runs in the simulator, integrated in the programming tool, if you allow the program to 'act as a server' in the windows security center / personal firewall.
To run the 'internet demo' on a PC, make sure the firewall won't block the necessary functions. The three buttons in the upper right corner of the display (see screenshot above) select the mode of operation: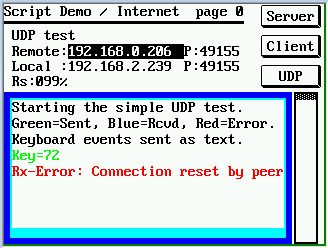
Screenshot 'UDP Test' (from programs/script_demos/InetDemo.cvt)
'Server' lets the script run as a simple TCP-server;
'Client' lets the script run as a simple TCP-client;
'UDP' starts a combined test for UDP transmission and reception.
In the 'Client'- and 'UDP' test, keys pressed on the display are sent to the remote end, using simple text strings.
Transmitted messages are shown in green colour.
Received messages are painted blue.
If 'something goes wrong', the script shows an error message in red colour on the scrollable text panel.
In the screenshot shown above, the error message 'Connection reset by peer' was deliberately caused because the remote end had not opened the specified port yet. In such cases (IP address valid but port not open), the MKT-View sends back an error response (ICMP which Wireshark decodes as 'destination unreachable / port unreachable), which the Winsock network layer passes on to the application as one of the 'socket' error codes shown in chapter 4.
- Note:
- Even though UDP is a connection-less protocol, Winsock returns error codes like 'Connection Refused' or 'Connection reset by peer' !
In the screenshot shown above, the error message 'Connection reset by peer' actually was caused by the remote end ('peer') which had not opened the UDP port yet, and thus correctly responded with an ICMP error message, which Wireshark decoded as follows:
26 11.561528 192.168.0.234 192.168.0.206 UDP 50 Src port: 49155 Dst port: 49155 27 11.561904 MktSyste_12 Broadcast ARP 60 Who has 192.168.0.234 ? Tell 192.168.0.206 28 11.561927 192.168.0.206 MktSyste_12 ARP 42 192.168.0.234 is at 74:27:ea:e2:84:d8 29 11.564618 192.168.0.206 192.168.0.234 ICMP 71 Destination unreachable (Port unreachable)No. Time Source Destination Prot. Len Info
Because the (ICMP-) error message arrived several milliseconds after trying to send the UDP message to the (non-existing) port,
the script could not notice that the attempted 'inet.send' had failed (again, because UDP is a connection-less protocol).
See also: Internet / Ethernet-related troubleshooting -
script_demos\MultiLanguageTest.cvt -
This application started as a test program for various script language
extensions. It uses the file I/O functions
to read textfiles stored in any of the device's FLASH memory files (using
the UPT's pseudo-file system), and a
user-defined function ("GetText") which is called from
the display in a backslash
sequence to retrieve a text (string) in one of many selectable
languages.
It also shows how to invoke script procedures from display interpreter commandlines. -
script_demos\OperatorTest.cvt - This application contains a test script for some 'advanced' operations. It was used during software development to check various operators (mostly the assignment operator) and other new functions.
-
script_demos\ReactionTest.cvt -
This application implements a simple 'reaction time test' for a human operator.
The script first waits for a random time (between 0.5 and 5 seconds),
then changes the display colour, and measures the time until the operator hits any key,
or hits the touchscreen surface, or turns/rotates the rotary encoder knob.
Depending on your reaction speed, the program suggests how to proceed:
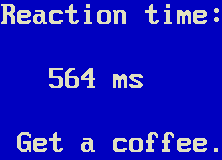
Screenshot 'Reaktion Test' (programs/script_demos/ReactionTest.cvt) -
script_demos\TraceTest.cvt -
This application contains a short script to test the Trace-Historie,
using the Commands to control the Trace History from chapter 3.10 .
This includes ("but it not limited to"):- Appending own messages via script to the trace history (trace.print)
- Automatically stopping the trace history via script
- Excluding certain CAN messages from the trace history (trace.can_blacklist)
- Showing the contents of the trace history on a text panel (trace.entry[n])
- Clearing the trace history by the operator (via graphic button / touchscreen)
- Saving the trace history as a text file on the device's memory card
-
script_demos\CANopen1.upt -
Only for the 'UPT Programming Tool II' and for devices with integrated CANopen protocol stack.
The graphic buttons 'Local OD', 'Remote OD', and 'PDO-Map' above the text panel launch different subroutines in the script. The scrollers on the right side and below the text panel can be operated via touchscreen to scroll the visible part of the larger 'virtual text screen' vertically and horizontally.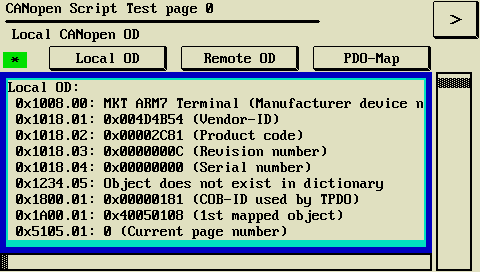
Screenshot from the 'CANopen Test' (programs/script_demos/CANopen1.upt)
Here is a slightly shortened variant the sourcecode of the 'PDO-Mapping Test', which reprograms the mapping of the first transmit-PDO://-------------------------------------------------------------------- proc TestPdoMapping // demo to 'reprogram' this device's own PDO mapping // 'Reprogram' a CANopen slave's PDO mapping table... // How to do it CORRECTLY (quoted from CiA 301, V4.2.0, page 142..143): // > The following procedure shall be used for re-mapping, // > which may take place during the NMT state Pre-operational // > and during the NMT state Operational, if supported: // > 1. Destroy TPDO by setting bit valid to 1b of sub-index 01h // > of the according TPDO communication parameter. // > 2. Disable mapping by setting sub-index 00h to 00h. // > 3. Modify mapping by changing the values of the corresponding sub-indices. // > 4. Enable mapping by setting sub-index 00h to the number mapped objects. // > 5. Create TPDO by setting bit valid to 0b of sub-index 01h // > of the according TPDO communication parameter. local dword dwCommParValue; // 32-bit unsigned integer cop.error_code := 0; // Clear old 'first' error code (aka SDO abort code) . // If the following CANopen commands work as planned, cop.error_code remains zero. // If something goes wrong, cop.error_code could tell us what, and why it went wrong. // In the original script (in script_demos/CANopen1.upt), it is checked after each obd-access. dwCommParValue := cop.obd(0x1800,0x01); // save original value of PDO comm par cop.obd(0x1800,0x01) := dwCommParValue | 0x80000000; // make 1st TPDO invalid by setting bit 31 cop.obd(0x1A00,0x00) := 0x00; // clear TPDO1 mapping table (CiA: "Disable mapping"..) cop.obd(0x1A00,0x01) := 0x40050108; // 1st mapping entry: map object 0x4005, subindex 1, 8 bits cop.obd(0x1A00,0x02) := 0x50010108; // 2nd mapping entry: map object 0x5001, subindex 1, 8 bits cop.obd(0x1A00,0x03) := 0x51050108; // 3rd mapping entry: map object 0x5105, subindex 1, 8 bits cop.obd(0x1A00,0x00) := 0x03; // enable mapping by setting the number of mapped objects cop.obd(0x1800,0x01) := dwCommParValue & 0x7FFFFFFF; // make 1st TPDO valid; clear bit 31 print( "\r\nNew PDO mapping table:\r\n" ); ShowPdoMap( cTPDO, 1/*PdoNumber*/ ); // show the new PDO mapping table (see CANopen1.upt) endproc; // TestPdoMapping() -
script_demos\J1939sim.cvt -
The script in this example simulates an ECU (electronic control unit) from which a few parameters
can be read via J1939 protocoll.
A similar script is available for ISO 15765-2 ("ISO-TP").
-
script_demos\ISO15765sim.cvt -
The script in this example tries to simulate an ECU (electronic control unit) with ISO 15765-2 support, aka "ISO-TP".
It uses the Aliases for ISO-TP in 29-bit CAN message identifiers (e.g. tCANmsg.ISO_TA, tCANmsg.ISO_TA).
By the time of this writing (2015-05-19), probably not functional, due to the lack of a suitable 'test environment' (ECU with ISO 15765).
A similar script is available for J1939.
- script_demos\BusSleepMode.cvt
-
This example detects a 'sleeping' CAN bus, simply by *not* receiving anything within several seconds.
Principle: In a timer event handler, the script compares the recent value of CAN.rx_counter() with the previous reading.
An MKT-View (II,III,IV) could even turn itself off in that case. In this demo, that happens after 60 seconds without activity.
Fragments from the script in BusSleepMode.cvt :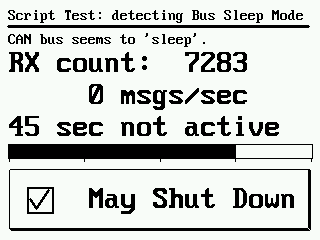
Screenshot from sample application 'Bus Sleep Mode',
after 45 seconds without activity on the CAN busvar int iPrevCanRxCount; // CAN-message-counter-reading from the previous second int iCanMsgsPerSecond; // current CAN message rate (messages per second) int iTimeOfNoActivity; // number of seconds without activity / shutdown-timer int MayShutDown; // flag controlled by a graphic button string Info; tTimer Timer1; endvar; ... setTimer( Timer1, 1000, addr(OnTimer1) ); // Start timer with event handler, called every 1000 ms init_done; // let the system know "we're open for business" (enable event handlers) while(1) // endless loop for the script's MAIN THREAD if (iTimeOfNoActivity>60) and MayShutDown then // no bus activity for over 60 seconds ? system.shutdown; // turn this device off endif; wait_ms(50); // give the CPU to someone else for 50 milliseconds endwhile; // main thread func OnTimer1( tTimer ptr pMyTimer ) // periodically called, once per second local int iNewCanRxCount; iNewCanRxCount := CAN.rx_counter( cPortCAN1 ); iCanMsgsPerSecond := iNewCanRxCount - iPrevCanRxCount; if( iPrevCanRxCount == iNewCanRxCount ) then // Arrived here: No bus activity ! iTimeOfNoActivity := iTimeOfNoActivity + 1; Info := "CAN bus seems to 'sleep'."; else iTimeOfNoActivity := 0; Info := "CAN bus is active."; endif; iPrevCanRxCount := iNewCanRxCount; return TRUE; endfunc; // end OnTimer1
- script_demos\VT100Emu.cvt
-
This example emulates a VT100- or VT52-Terminal, using the simulated 'text screen' (text panel).
Works with CAN (up to 8 characters per CAN message) and the serial port (RS-232).
An overview of the most important VT100- and VT52-Escape-Sequences can be found on the "MKT-CD" (available 'online'), in Document Nr. 85141, VT100/VT52-Emulation für MKT-Geräte (so far only available in german language, but the Escape sequences should be easy to grasp).
Excerpt from the script in the 'VT100 emulator':
The procedure VT100_HandleRcvdString is also implemented in the script. It is not only called from the main loop (shown in the code snippet above), but also from the CAN receive handler. Thus, the emulated "VT100 Terminal" can not only be used via serial port ("COM"), but also as a simple universal text display for the CAN-Bus .hSerialPort := 0; // use the serial port at all ? if (iSerialBaud>=300) and (iSerialBaud<=115200) then // Try to open the serial port "like a file" . hSerialPort := file.open("serial1/"+itoa(iSerialBaud) ); endif; // use the SERIAL PORT (RS-232) ? ........ init_done; // let the system know "we're open for business" ........ while( TRUE ) // main loop .. only interrupted by event handlers and similar wait_ms(50); // give the CPU to whoever-needs-it for 50 ms. if( hSerialPort>0 ) then // successfully opened the serial port (RS-232) if( file.read( hSerialPort, sRcvd ) > 0 ) then VT100_HandleRcvdString( sRcvd ); endif; endif; endwhile; // end of 'endless' script loop
A listing of the complete sourcecode of the VT 100 emulator would be beyond the scope of this document; you can find it in programs\script_demos\VT100Emu.cvt .
-
script_demos\popup1.cvt : Custom menu (pop-up, pull-down) -
This example shows a custom popup menu (with items filled during run-time), using the simulated 'text screen' (text panel).
One of the four menus may be opened at a time, using a standard button above each menu:
When not 'open', the popup menu (actually a 'text panel') is hidden by clearing the flag display.elem[<Element-Name>].visible.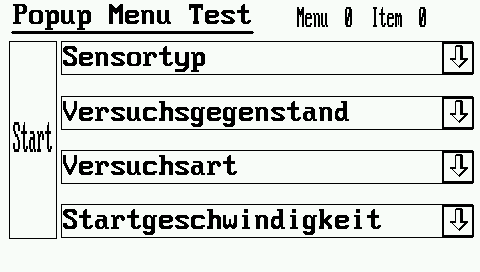
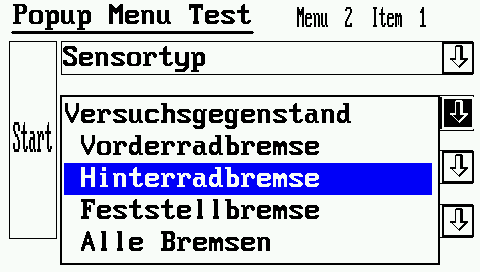
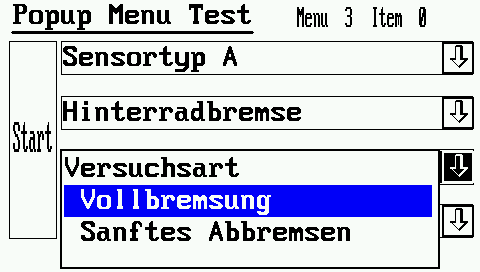
Selfdefined popup menus (from programs/script_demos/popup1.cvt)
To operate the menus via keys, rotary encoder, or touchscreen, the script uses the OnControlEvent-handler.
-
script_demos/i18nDemo.cvt : Internationalisation (multi-language application using a string table) -
This 'multi-language' demo uses a string table embedded in the script in combination with the
OnPageLoaded event, to automatically replace all 'translatable' strings
on any display page at runtime, depending on the operator's currently selected language.
On the page shown above, the entire display switches to the new language immediately, as soon as the operator selects 'his' language (without re-loading the page).
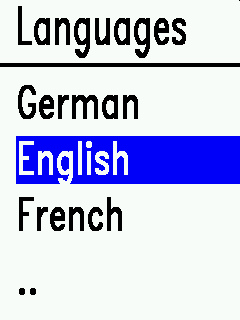
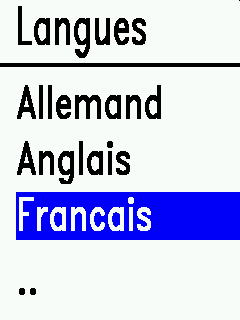
Example of a script-translated display page (in script_demos/i18nDemo.cvt),
using a simple string lookup table embedded in the application's script.
To keep this demo simple, the 'translation table' is embedded directly in the script (not loaded from a separate file). Thus the application only consist of the *.cvt file (which contains the script and the 'GUI), so there's no need to upload anything else into the device's internal Flash memory, and there's no need to keep a certain memory card inserted in the SD slot.
In this example, the translation table was embedded in the script as a constant array ('const' tMLString MLString[]), using a self-defined data type to store multiple languages in one element ('tMLString' = type for a Multi-Language-String) :
To translate a string from one language into another, the demo implements a self-defined function (TS(), formerly TranslateString() ). This function first searches for the to-be-translated string 's' in the german part of the table (because the display pages in this application were created in German language, so your treatment of this may vary - you may prefer English as the primary language when designing new pages). If 's' wasn't found in the first loop (looking for the 'primary' language), it will be searched for in any of the supported languages (struct components .sGerman, .sEnglish, etc) so a display page can also be translated directly from French to Spanish (if those languages were actually contained in the table):typedef tMLString = struct // structure for a 'multi-language string' : int iRefNr; // text reference number (to look up strings by INTEGER identifier) string sGerman; // display text in german language string sEnglish; // display text in english language string sFrench; // display text in french language string sSpanish; // display text in spanish language endstruct; tMenuItem = struct // data type for a 'menu item' int iRefNr; // DIAG_ITEM_xxx (used as reference into MLString[x].iRefNr) string sPageName; // display page name (for the "goto"-command) endstruct; endtypedef; const // define a more constants... here: for multi-language support // 'Language codes' for internationalisation, // without the need to duplicate all 'display pages' . LANG_DE = 0; // code for 'german' (actually an index into tMultiLangString.s[]) LANG_EN = 1; // code for 'english' LANG_FR = 2; // code for 'french' LANG_ES = 3; // code for 'spanish' (Espanol) NUM_LANGUAGES = 4; // number of different languages supported by this script NUM_LANGUAGE_STRINGS = 24; // number of 'language strings' (in a hard-coded 'ROM'-table below) tMLString MLString[NUM_LANGUAGE_STRINGS] = // a table with multi-language strings // iRefNr or "Item" , German, English French Spanish(not used yet) { { 0 , "Hauptmenü", "Main Menu", "Menu principal", "" }, // Max. width in menu SETUP: |----------------| |----------------| |----------------| |----------------| { 1 , "Sprache", "Language", "Langue", "" }, { 2 , "Steuergerät", "Control Unit", "Unité de contrôle", "" }, { 3 , "Helligkeit", "Brightness", "Luminosité", "" }, { 4 , "Version", "Version", "Version", "" }, { 5 , "Speichern", "Save", "Enregistrer", "" }, { 6 , "Exit", "Exit", "Sortie", "" }, { 7 , "Deutsch", "German", "Allemand", "" }, { 8 , "Englisch", "English", "Anglais", "" }, { 9 , "Französisch", "French", "Francais", "" }, { 10 , "Spanisch", "Spanish", "Espagnol", "" }, { 11 , "System", "System", "Système", "" }, { 12 , "Einheiten", "Units", "Unités", "" }, { 13 , "Einheit", "Unit", "Unité", "" }, { 14 , "Druck", "Pressure", "Pression", "" }, { 15 , "Temperatur", "Temperature", "Température", "" }, { 16 , "Datum", "Date", "Date", "" }, { 17 , "Einstellungen", "Setup", "Paramètres", "" }, { 18 , "Generator", "Generator", "Generateur", "" }, { 19 , "Sprachen", "Languages", "Langues", "" }, { 20 , "Hauptmenü", "Main menu", "Menu principal", "" }, // Max widths in a text line: |<-----21 chars---->| |<-----21 chars---->| |<-----21 chars---->| { 21 , "Taste druecken!", "Press any key!", "Appuyez s.u. touche!","" }, { 22 , "...gestartet", "...started", "...commencé", "" }, { 0 , "", "", "", "" } // letztes Array-Element in der Tabelle 'MLString[]' }; // end MLString[] endconst; // end of 'constant tables'
To translate a complete display page, the demo script contains another user-defined function, TranslatePage(). This function loops through all 'format strings' (.fs) of all display elements in the current page, and if there's a match (TS(), formerly TranslateString(), returns a non-empty string), the element's format string will be replaced by the translation://-------------------------------------------------------------------- func TS( string s ) // TranslateString(), abbreviated . // Translates a String (usually from GERMAN = language used on most pages) // into the currently selected language (global var iLanguage) . // Called from some display pages (use the global search function to find them) // where the 'translated string' is part of an expression . local int j,imax,found; local string result; if (typeof(s) != dtString ) then trace.print( "Error in TranslateString: typeof(s)=",typeof(s) ); return s; endif; if (s<>"") and (s[0]!='\\') then // 'translatable' string ? // Look for this string (s) in the 'translation table' j := 0; found := FALSE; while( (! found) and (j<NUM_LANGUAGE_STRINGS) ) if( s == MLString[j].sGerman ) then // bingo, found the string.. select( iLanguage ) case LANG_DE : result := MLString[j].sGerman; case LANG_EN : result := MLString[j].sEnglish; case LANG_FR : result := MLString[j].sFrench; case LANG_ES : result := MLString[j].sSpanish; endselect; if( result == "" ) then trace.print( "Missing language entry in MLString[",j,"] !" ); endif; found := TRUE; // leave the 'while'-loop else j := j+1; // try the next entry in the "multi-language string table" endif; endwhile; if ( ! found ) then // make a second guess ... // NOT found ? Try to translate the page from "any" language : j := 0; while( (! found) and (j<NUM_LANGUAGE_STRINGS) ) found := (s == MLString[j].sGerman ) or (s == MLString[j].sEnglish) or (s == MLString[j].sFrench ) or (s == MLString[j].sSpanish); if( found ) select( iLanguage ) case LANG_DE : result := MLString[j].sGerman; case LANG_EN : result := MLString[j].sEnglish; case LANG_FR : result := MLString[j].sFrench; case LANG_ES : result := MLString[j].sSpanish; endselect; else j := j+1; // try the next entry in the "multi-language string table" endif; endwhile; endif; // <not found in MLString[ ].sGerman> ? if( ! found ) then // still NOT found ? Show the "missing translation" in the TRACE HISTORY : trace.print( "Missing translation: \"",s,"\" !" ); // This way, after a 'test run', the missing strings can easily // be copied from the TRACE HISTORY, and added to array MLString[] ! result := s; // use the original (untranslated) string endif; else // not a 'translatable' string (but a backslash sequence, etc) : result := s; endif; // 'translatable' string ? return result; endfunc; // TranslateString()
To translate any display page automatically (immediately after loading it from Flash memory into RAM during a 'page switch'), TranslatePage() is called from the script's OnPageLoaded() event handler://-------------------------------------------------------------------- proc TranslatePage( int to_language ) // Translates an entire display page from the 'default' language // to another (to_language = LANG_EN or LANG_FR, etc) . local int i, imax; local string s; imax := display.num_lines-1; // get the number of lines on the current display page for i:=0 to imax // run through all LINES of the page s := display.elem[i].fs; // retrieve the original 'format string' in this line if (s<>"") and (s[0]!='\\') then // if it's a 'translatable' string.. s := TS(s); // then try to translate the string.. if( s<>"" ) then // found a translation ? display.elem[i].fs := s; // then use it as new 'format string' endif; endif; next i; endproc; // TranslatePage()//-------------------------------------------------------------------- proc OnPageLoaded( int new_page_number, int old_page_number ) // Event-Handler, will be invoked from the system // immediately after loading a 'new' display page from FLASH // into the device's RAM (where we can modify it via script). // // In this demo, the 'OnPageLoaded'-event will be used // to translate certain parts (strings) on the new page // from the language in which it was 'designed' to the // currently selected language (global var 'iLanguage'). trace.print("OnPageLoaded: new_page=",new_page_number," old_page=",old_page_number ); TranslatePage( iLanguage/*to_language*/ ); // try to translate all strings endproc; // OnPageLoaded()
See also (about internationalisation / multi-language applications):
Other methods for multi-language applications,
advanced example with a separate translation file loaded into Flash memory.
-
script_demos\AppSel_1.cvt : 'Application Selector' -
This example scans all *.cvt files (aka "applications") in the root folder of the memory card, and lists the filenames or (when available)
the file descriptions (more on that later). The operator can select one of these applications via touchscreen
to launch it.
When present, the list shows the file description instead of the filename, because the description is more informative than the DOS filename with only 8+3 characters. The operator selects the application which he wants to start via touchscreen or (MKT-View) rotary knob. In this example, the 'list' is a single-column table with a vertical scroll bar.
Screenshot of the 'Application-Selector' with a list of all applications stored on the memory card.
The file displayed in the last line doesn't contain a description, thus the filename is shown instead.
By clicking the 'Update' button, the operator can update the directory display. This may be necessary in the simulator if the content of the memory card simulation folder has been changed, or (in a 'real' target hardware) the memory card has been exchanged.
The script-controlled colours of this button have the following meaning:
- Yellow
- The memory card directory is currently being read.
- Green
- The memory card directory has successfully been read,
and at least one 'reloadable' display application has been found.
- Red
- The directory could not be read, no memory card inserted,
or no suitable file has been found on the memory card.
The file description of the listed applications can be modified by the programming tool via 'File' menu, 'Description' :
Details about the storage of the file description inside UPT- or CVT files can be found here .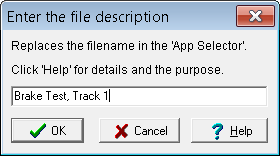
Entering an application's 'file description' in the programming tool
The following fragment from AppSel_1.cvt contains a loop to read the directory, and to extract the file description from all files. All relevant data are stored in an array ('MyFileList[]') of the self-defined type tMyFileInfo (the declaration is not contained in this fragment).
//----------------------------------------------------------------------------
func ReadDir( string sFileMask )
  // Reads the directory, and stores the result in MyFileList[].
  //   For *.cvt and *.upt files, tries to extract the 'file description'.
  // [in] sFileMask : defines which types of files to list, e.g. "*.*"
  // [return] number of entries found (0=none) .
  local int i,handle,n_entries;
  local string sPath;
  local tDirEntry dir_entry; // directory entry structure used by directory.read()
  local int fh;
  local string sExtension;
  local string sGarbage, sDescription;
  n_entries := 0;

  // Isolate the 'path' from the search mask:
  i := strrpos( sFileMask, "/" );
  if( i>0 ) then
     sPath := substr( sFileMask, 0, i+1 );
  else
     sPath := sFileMask;
  endif;

  // Isolate the 'extension' from the search mask:
  i := strrpos( sFileMask, "." );
  if( i>0 ) then
     sExtension := substr( sFileMask, i+1, 3 );
  else
     sExtension := sFileMask;
  endif;


  // open, read, and close the DIRECTORY :
  handle := directory.open( sFileMask );
  if( handle>0 ) then // successfully opened the directory for reading ?
     while( directory.read( handle, &dir_entry ) ) // repeat for all matching entries...
        if((dir_entry.attributes & (~cFileAttrArch))==cFileAttrNormal)
                 && (n_entries < MyFileList.size(0) ) then
           MyFileList[ n_entries ].sFilename := dir_entry.name;
           MyFileList[ n_entries ].sDescription := "";
           MyFileList[ n_entries ].sDate := itoa(dir_entry.year,4) + "-"
                                          + itoa(dir_entry.month,2)+ "-" + itoa(dir_entry.mday,2);
           MyFileList[ n_entries ].sPath := sPath;
           // Look "into" the file. If it's an UPT or CVT application,
           // it may contain a 'file description' which provides
           // more information for the operator than the 8.3 filename.
           if ( sExtension=="cvt") or ( sExtension=="upt") then
              fh := file.open( sPath + dir_entry.name, O_RDONLY | O_TEXT );
              if( fh>0 ) then // Successfully opened the file ? Try to extract its DESCRIPTION !
                if( file.read( fh, sGarbage, "Description=\"", sDescription,"\"\r\n" ) > 0 ) then
                   MyFileList[ n_entries ].sDescription := sDescription; // ok, found description
                 endif;
                 file.close(fh);
              endif;
           endif; // < *.cvt or *.upt ? >
           n_entries := n_entries+1;
        endif;   // < "normal" file ? >
     endwhile; // continue_reading ?
     directory.close(handle); // never forget to close files and directories !
     return n_entries;
  else   // failed to open the directory, most likely there's no memory card:
     return -1;
  endif;
endfunc; // ReadDir()
If the operator selects an entry in the visual table, the table's 'On-Click' stores the index of the selected table row (line) in a variable ('iSelectedItem'), which is then polled in the scripts main loop. If the selected item is valid, the script tries to launch the new application via system.exec :if( iSelectedItem >= 0 ) then // operator has selected an application. Launch it. system.exec( MyFileList[iSelectedItem].sPath + MyFileList[iSelectedItem].sFilename ); // system.exec() should load the selected application INTO RAM(!) // and start it. When successful, system.exec() never returns. // If we ever get HERE, there's something wrong with the selected app // so let the operator select another: iSelectedItem := -1; // "done" (until the user selects another file) endif; // iSelectedItem ?
To switch back from the selected application into the app-selector without an extra button (via system.reboot), the device may simply be restarted (or reset) via the built-in Shutdown Screen: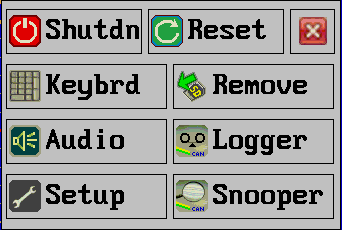
Screenshot of the 'Shutdown Screen', implemented in the device firmware restarts the application from internal FLASH, for example the 'app-selector'.
-
script_demos\IncludeTest.cvt : Test application for '#include' -
The script in this small example uses an include file. The include file contains a subroutine ('SayHello') which is called
from the script in the application.
Below is a snippet from the script sourcecodes, with the included text marked in gray (similar as in the editor/debugger):// File : "IncludeTest.cvt" #pragma strict #include "Test.inc" ##begin_include "Test.inc" date=2016-08-04_16:24:10 // DO NOT EDIT THIS PART ! proc SayHello() cls; print("Hello world, this is Test.inc speaking.\r\n"); endproc; ##end_include "Test.inc" init_done; SayHello(); // Call the procedure implemented in Test.inc // End of the script's "main part".
To load one of these examples into the programming tool, select 'File' ..
'Load Program' in the tool's main menu. Remember, any script is part of a
display application (*.cvt or *.upt), it is not saved in an extra file.
You will find the examples in the tool's subdirectory 'programs\script_demos'
(not to be confused with the windows 'Programs' / 'Program Files' /
'Programmi' folder .. there is no such language-dependent nonsense directory
inside the programming tool). Sometimes the windoze file selector
will enter that directory immediately. Otherwise, find your way to the directory
where the last version of the programming tool has been installed
on your PC.
For an overview of script examples, follow this link to the table of contents.
Bytecode
- Note:
- This chapter is considered 'worth reading', but it is not essential to use the script language. It's up to you to read it, or ignore it. If you like to know what's going on 'under the hood', please proceed :o)
To increase the execution speed of the script, the sourcecode is translated from plain text ("ASCII") into a tokenized binary code (bytecode). For various reasons, the bytecode isn't the same as the microcontroller's native machine code (because in that case, the script couldn't be easily simulated and debugged in the programming tool). But the microcontroller can execute this code much faster than interpreting the sourcecode directly (unlike the 'display interpreter', which interprets event definitions and expressions 'directly', without RPN, and without tokenisation).
Screenshot of script editor (left) with disassembly (right)
- Hint:
-
If you're interested, the bytecode can be seen in the 'disassembly view'.
In the programming tool, open the script editor tab, click on the menu item
in the editor's toolbar, and select 'Show Disassembly / Bytecode'.
In newer versions of the programming tool, the debugger / dissassembler can also be activated as shown here.
Compiling the sourcecode into bytecode
The human-readable sourcecode will translated into machine-executable bytecode after loading a display program, so -as a user- you don't need to care about this. This translation process (called 'compilation') takes place in the programming tool as well as in the real target (firmware), because the bytecode running on the real target is not exactly the same as in the programming tool.
During compilation, numeric expressions ("formulas") are converted from the normal mathematic 'infix' notation into 'postfix' alias Reverse Polish Notation (RPN). You will hopefully never have to worry about this (at least not as long as the compiler can parse your code..). Here is an example for a tokenized statement ("A := 1 + A * (3-1) "). The first line contains the original sourcecode, the second line shows the RPN (which is almost the same as the bytecode in symbolic form) :
-
Sourcecode     : A := 1 + A * (3-1) ;

            RPN / bytecode : 1 A 3 1 - * + ASSIGN(A)
RPN is evaluated from left to right. Operands (constant values and variables) are pushed on the stack, while operators (like "+"="ADD" or "*"="MULTIPLY") usually pop two values from the stack, and push the result back on the stack. At the end of an RPN evaluation, the top of the stack contains the result. A list of bytecode operators can be found in the bytecode specification in one of the next chapters.
- Hint:
-
If you are curious about RPN, and why it's so much easier to evaluate for
a machine than the classic 'infix' notation, search the net for an article
titled 'Postfix Notation Mini-Lecture' by Bob Brown. But again, to use the
script language, you don't need to understand all the details.
The debugger's disassembly view also shows the bytecode, with one instruction per line. You can watch the execution of the code (especially the evaluation of RPN expressions) while single stepping, and see how intermediate values are pushed on, and popped from the stack. During single-step, the stack contents are displayed in the editor's status line.
The bytecode concept may sound similar as the one used in a Java Virtual Machine, but they are not compatible. Each 'value' on the stack carries it's data type along with the value, which is not the case in a Java VM.
The amount of 'code memory' (RAM for the bytecode) is limited on the target system. This figure may vary, depending on the amount of RAM on the target system. The stack size is also limited to a few thousand entries.
To reduce the code memory requirements of your script program...
-
Avoid unnecessary 'constant expressions' like this one:
A := 1+2+3 // better use a calculated constant here ! -
Use integer variables if you don't need floating point, last not least because
the target CPU doesn't have a floating point unit (FPU).
Beware that old BASIC interpreters used floating point if the data type isn't specified by the data type suffix .
We don't : We use integer by default, because on older target systems, floating point calculations were slower than integer arithmetics. -
Integer constants ranging from -32768 to +32767 require less code
memory space than larger values, because there are different opcodes to push
'short' and 'long' values
The Stack
The stack is a keypoint of the script's runtime system. Any value that is passed from one function to another, or assigned to a value, or temporary values in an expression (RPN) use the stack.
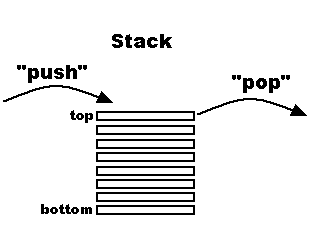
Stack used by the script runtime
To inspect the stack while debugging your code (in the programming tool), use the stack display . Keep an eye on the stack usage, especially if you program uses a lot of user-defined procedures or functions, with local variables and recursive calls !
In the script language, the stack is used to evaluate RPN expressions, to store return addresses (during function- and procedure calls), and local variables. Local variables are allocated on the stack by pushing a dummy value (usually zero) to the stack, and saving the address of the first local variable in a register frequently called the 'base pointer'. The local variabes of the currently active function or procedure are stored in a so-called stack frame, which is explained in the next chapter.
Stack Frames (for function arguments and local variables)
As mentioned in the previous chapter, the stack is also used as a storage for local variables. A special register, called the 'Base Pointer' (BP, similar purpose as in the 8086 CPU from which the name was "borrowed"), points to the base of the stack frame of the currently active function. Through the base pointer, that part of the stack area ('stack frame') is accessed like a random-access memory using the base pointer plus an offset. For example, the bytecode instruction PUSH BP[2] reads the value of the BP register, adds an offset of two, reads a value from that address, and pushes it on top of the stack. In effect, it copies some value from one stack location to another, and increments the stack pointer. In constrast to the stack pointer (SP) which always points to the top of the stack, the base pointer (BP) remains constant within an instance of a user-defined function or procedure.
Here is an example for the stack frame inside a function with a
few local variables (positive offsets), and two function arguments (negative
base pointer offsets). Note that the stack entries with negative offset for
the base pointer don't strictly belong to the callee's (called function's)
local stack frame, but for simplicity, they can be accessed through the BP.
BP[n] means "the n-th element addressed through the base pointer", treating
the stack frame like an array for simplicity.
    BP[2] = third local variable

          BP[1] = second local variable

          BP[0] = first local variable ("allocated" by the callee)

          BP[-1] = old base pointer saved on the stack, pushed by
      callee

          BP[-2] = return address on the stack, pushed by caller

          BP[-3] = Number of arguments passed from caller to callee

          BP[-4] = Last function argument (pushed last by the caller)

          BP[-5] = First function argument (pushed first by the caller)

          BP[-6] = Function result aka 'return value' .

           // Space for the 'return value' is reserved by the caller(!)

           // by pushing a zero; regardless of the returned data type.

           // Because the 'Function result' remains on the stack

           // after cleaning up the argument list, the return value

           // is pushed first / popped last .
In contrast to most built-in functions (runtime library functions), user-defined
functions don't remove the function arguments. Here, the caller removes those
arguments from the stack which 'he' has pushed before the call, and the callee
only cleans up those stack entries which 'he' has pushed there (like local
variables, etc).
Bytecode specification (preliminary !)
You only need to know what these bytecode instructions do, if you need to single-step through the assembly view. For 'normal' (source-level) debugging, skip this chapter - you will rarely need it.Note that most of the binary operators (i.e. operators with two inputs) know the data type of the operands, because the stack contains the data type as well as the 'value' (each stack entry occupies EIGHT bytes for that reason; strings are a special breed... they are in fact "pointers" to a special string memory.
| Mnemonic | Hex Opcode | Remarks |
| PUSH <value> |
various types |
Pushes a constant or variable to the stack.
The data type is encoded in the the opcode. The value follows immediately after the opcode in code memory. |
| PUSH BP[n] |
various |
Pushes the value of a local variable, parameter, or similar element
to the top of the stack. BP is the (virtual) base-pointer register. 'n' is an offset added to the base pointer value. Usually, positive offsets indicates a local variable, negative offsets are function arguments (etc). |
| POP BP[n] |
various |
Pops one element from the stack, and copies it to a local variabe (etc - see PUSH BP..) . |
| ASSIGN <var> |
various |
Pops one element off the top of the stack, and assigns it to the specified
variable. Global variables are identified by a unique, non-negative, 8- or 16-bit "reference number". |
| RD <source> |
various |
Read-access for arrays, and/or components of various structures. Depending on the complexity of the source, additional values may be popped off the stack. The read result will be pushed to the stack (similar as 'PUSH'). |
| WR <dest> |
various |
Write-access for arrays, and/or components of various structures. Depending on the complexity of the destination, additional values may be popped off the stack. The to-be-written value will also be popped off the stack. |
| ADD | 0x20 |
pops two elements off the stack, adds them, and pushes the result on the stack |
| SUBTRACT | 0x21 |
pops two elements off the stack, subtracts them, and pushes the result on the stack |
| MULTIPLY | 0x22 |
pops two elements off the stack, multiplies them, and pushes the result. If both operands are integer, the result is an integer. If any operand is a floating point value, the result is a floating point value, too. |
| DIVIDE | 0x23 |
pops two elements off the stack, divides them, and pushes the result
on the stack . Note: If both inputs are INTEGERS, the result will also be an INTEGER value (not float) ! |
| MODULO | 0x24 |
pops two elements off the stack, calculates their division remainder, and pushes the result. |
| COMP >= | 0x25 |
pops two elements off the stack, compares them for "greater or equal",
and pushes the boolean result (zero for FALSE, one for TRUE). |
| COMP <= | 0x26 |
pops two elements off the stack, compares them for "less or equal", and pushes the boolean result (zero for FALSE, one for TRUE). |
| COMP == | 0x27 |
pops two elements off the stack, compares them for "equality", and pushes the boolean result (zero for FALSE, one for TRUE). |
| COMP <> | 0x28 |
pops two elements off the stack, compares them for "non-equality", and pushes the boolean result (zero for FALSE, one for TRUE). |
| COMP > | 0x29 |
pops two elements off the stack, compares them for "greater than", and pushes the boolean result (zero for FALSE, one for TRUE). |
| COMP < | 0x2A |
pops two elements off the stack, compares them for "greater than", and pushes the boolean result (zero for FALSE, one for TRUE). |
| AND | 0x2B |
pops two elements off the stack, AND-combines them (boolean), and pushes the result. |
| OR | 0x2C |
pops two elements off the stack, OR-combines them (boolean), and pushes the result. |
| BIT_AND | 0x2D |
pops two elements off the stack, AND-combines them (bitwise), and pushes the result. |
| BIT_OR | 0x2E |
pops two elements off the stack, OR-combines them (bitwise), and pushes the result. |
.. |
||
.. |
||
| U_MINUS | 0x1D |
Inverts the sign of the element on top of the stack, for example turns 1.234 into -1.234 . |
| NOT | 0x1E |
Turns the element on top of the stack into it's (one's) complement, for
example, zero (boolean "FALSE") is turned into one (boolean "TRUE") and vice versa . |
.. |
||
| JUMP | 0x04, 0x05 |
absolute jump to the specified 'short' or 'long' address |
| POPJZ | 0x06 |
POP and Jump if Zero (to the specified address) Pops one value off the stack, and jumps to the specified address if the value is ZERO. This instruction is frequently emitted by the compiler to produce IF-THEN-ELSE, and REPEAT-UNTIL constructs . |
.. |
||
| PROC | 0x70 (?) |
Begin of a user-defined procedure. The operand field contains info about the stack frame, and the offset from the function's start and end (so it can easily be skipped in memory). |
| ENDPROC | 0x71 (?) |
End of a user-defined procedure. Cleans up the stack frame and returns to the caller. |
| CALL PROC | 0x72 (?) |
Calls (invokes) a user-defined procedure. Expects NO return-value. |
| FUNC | 0x73 (?) |
Begin of a user-defined procedure. Similar to a procedure, but a function returns a value. |
| ENDFUNC | 0x74 (?) |
End of a user-defined function. Cleans up the function's stack frame, and returns to the caller. Leaves the 'result' (special location on the stack) unchanged. |
| RETFUNC | 0x75 (?) |
Pops one value off the stack, copies it into the function's return value, cleans up the function's stack frame, and returns to the caller. After that (after returning), the caller will find the return value on the 'new' top of the stack. |
| CALL FUNC | 0x76 (?) |
Calls (invokes) a user-defined function. In contrast to a procedure-call, a function call expects a return value. After returning from callee to caller, the function's return value remains on the RPN stack. |
.. |
||
.. |
||
.. |
||
.. |
Note: There may be many opcodes missing in the above table, which have not been documented here due to a lack of time of the software development engineer.
Latest Revisions
Note: If you loaded this document from your local harddisk,there may be a more up-to-date revision history online !
The online revision history applies to the entire system (including programming tool and device firmware), while the revisions listed below only apply to the script language.
- 2021-05-05
- Removed some tags to improve the conversion from HTML to PDF; added references to the CAN simulator.
- 2020-10-12
- Added the file.delete command.
- 2019-12-17
- New commands and data types for text panels .
- 2019-02-22
- New data types (e.g. bool, tColor) and improved automatic type conversions .
- See also:
- Overview (link to an external file, only works in the online help (html), not in the PDF variant of this file)